Action recipes...
So...if you are like me you have an actions panel full of wonderful and fun actions. The fun part is getting to know your actions and what each one does. And learning each layer in each action is so important. Then what happens when you know your actions inside and out and you have fun using them but then your images start looking similar because you are running the same actions over and over? It's time to start mixing actions from different makers to get special recipes that are unique and fit your style. I've got my actions panel all cleaned up and I only have the ones I use all the time loaded. The ones I love and cannot live without. I have a few that I only use once in a while at the bottom of my panel. But I have MANY that I never use and I finally cleaned those out. If you have too many actions it can be overwhelming. So I took the time to get to know my actions so I could decide which fit my style. Then the best thing I did was organize and switch to button mode!
So today I'd like to just quickly show a couple examples of actions recipes and how you can take an image from nice to creative, fun and unique. They will be creative edits of course! Lol! And how fun and unique it can be to mix it up and think OUT OF THE BOX! It's a little hard to do this if you don't really know your actions. So I do highly suggest that you take the time to get to know your actions and what they can do for you and what you can do with them. Especially if you've paid for them. Get your money's worth! I know what each actions {for the most part} does and what look it will give me. So I can visualize how different actions will look together on an image. And no image is the same, so some will look good on one image but not the other.
The first one I'll start with today is a snap I took of my girls while camping in the desert. Since I'm only talking actions today I won't be sharing SOOC and screenshots as to how I got to my Before. This image has been ran through ACR with the sliders etc to where I like them. Then I ran my new all in one {yes ever newer than the last one I posted} with the layers adjusted. I'm doing more in ACR now so what I need in CS4 is much less. It's basically just 3 layers...a high pass filter {like in PW's Boost & TRA Oh Snap}. I keep the opacity at about 50%. Sometimes higher for non people or non face shots. Then a strong S curve {also like PW & TRA} that I keep at about 20-40% opacity with a blend mode of Luminosity {keeps the skin from going too yellow}. Then the last layer is just a basic levels adjustment layer which now I really only use for a mid tone bump if needed. Between ACR and the strong S curve I don't really have the need to touch the shadows or highlights.
So this is the image I started with after ACR & my basic action...
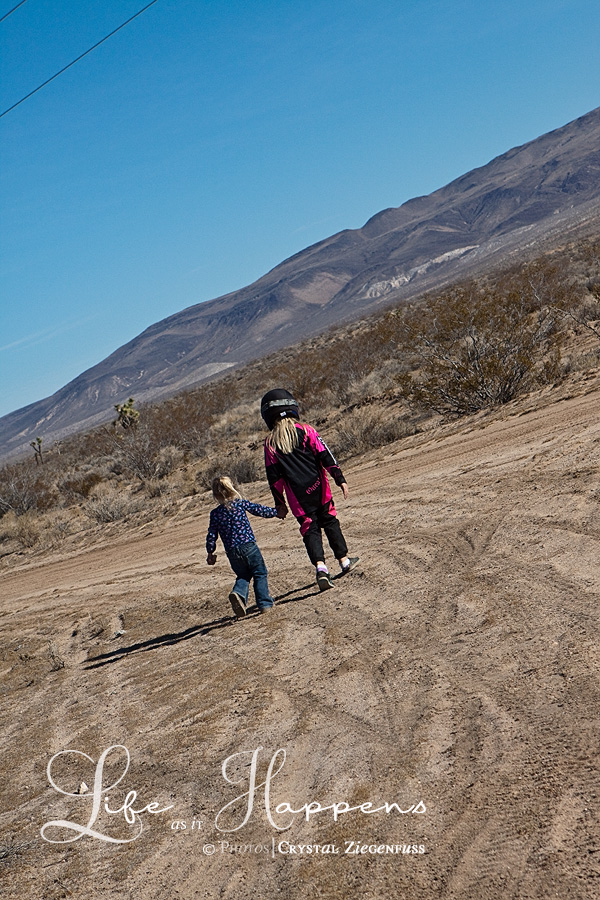
And here is the final edit...

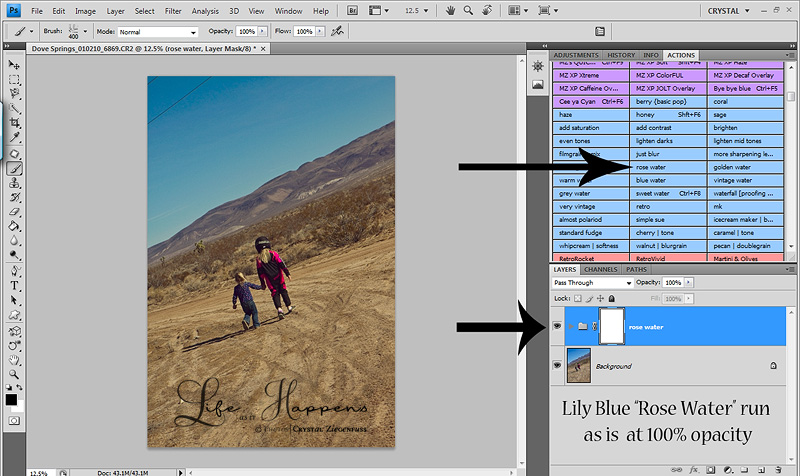
The first thing I did was run Lily Blue "Rose Water". I knew I wanted warmth. I love this action and I left it run as is and full strength...
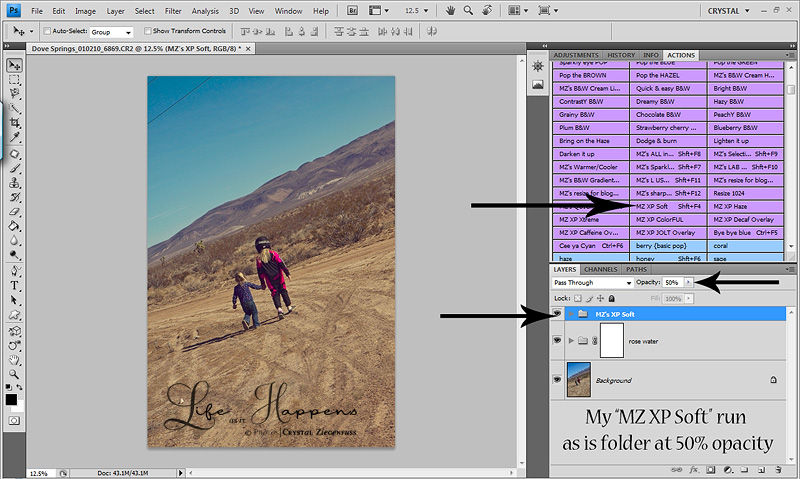
Then I knew I wanted a little pastel tint to it so I ran my MZ XP Soft. I left the layers as is but lowered the folder opacity to 50%...
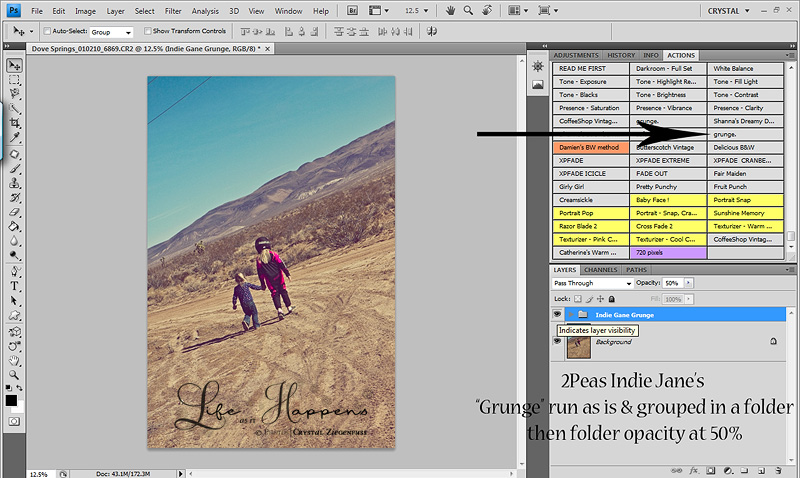
Then I used one of my FAV and FREE actions from 2Peas Indie Jane called Grunge. I knew in order to run this action I'd have to flatten first. Then I grabbed all the layer and grouped them in a folder and named it. Sometimes I will adjust the individual layers other times I just adjust the opacity of the entire folder. Here since there are no faces in the shot I just lowered the whole folder to 50%. I LOVE the feel of this action...
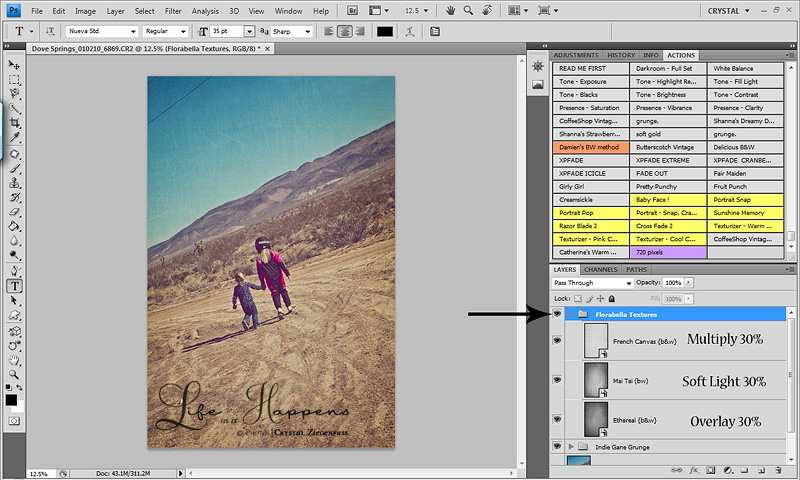
Now I really wanted to go creative and have a fun artistic feel to this shot. So I turned to my FAV textures and the ONLY ones I use now...Florabella Textures. I now apply textures the EASY way. File>Place...find the texture and it brings it in as a Smart Object, brings the name of the action on the layer with it and adds the Transform tool so all you have to do is stretch it and hit enter! Wish I'd tried this method so much sooner. So first I added Ethereal b/w and lowered the opacity to 30%. I use this opacity for textures a lot! Then I played with each blend mode til I found the one I liked which was Overlay. Then I added Mai Tai b/w and lowered the opacity down to 30% and blend mode Soft Light. Then finally I added French Canvas at 30% blend mode Multiply because this texture is pretty light and I didn't want to wash out the feel of the photo. I like to group my textures in a folder too so I can turn it on/off and see how they are all effecting the photo. Sometimes if I know my opacity for each texture will be the same then I'll just change blend modes on each layer then lower the opacity of the entire folder to about 30%. It will put each texture at 30% opacity...
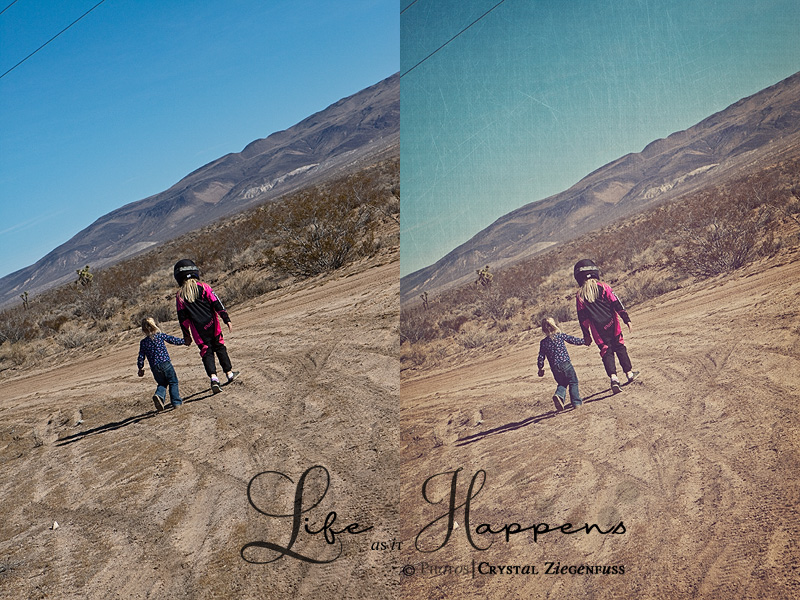
Then I flattened and ran my L USM at 70%. So here is the before and after side by side...
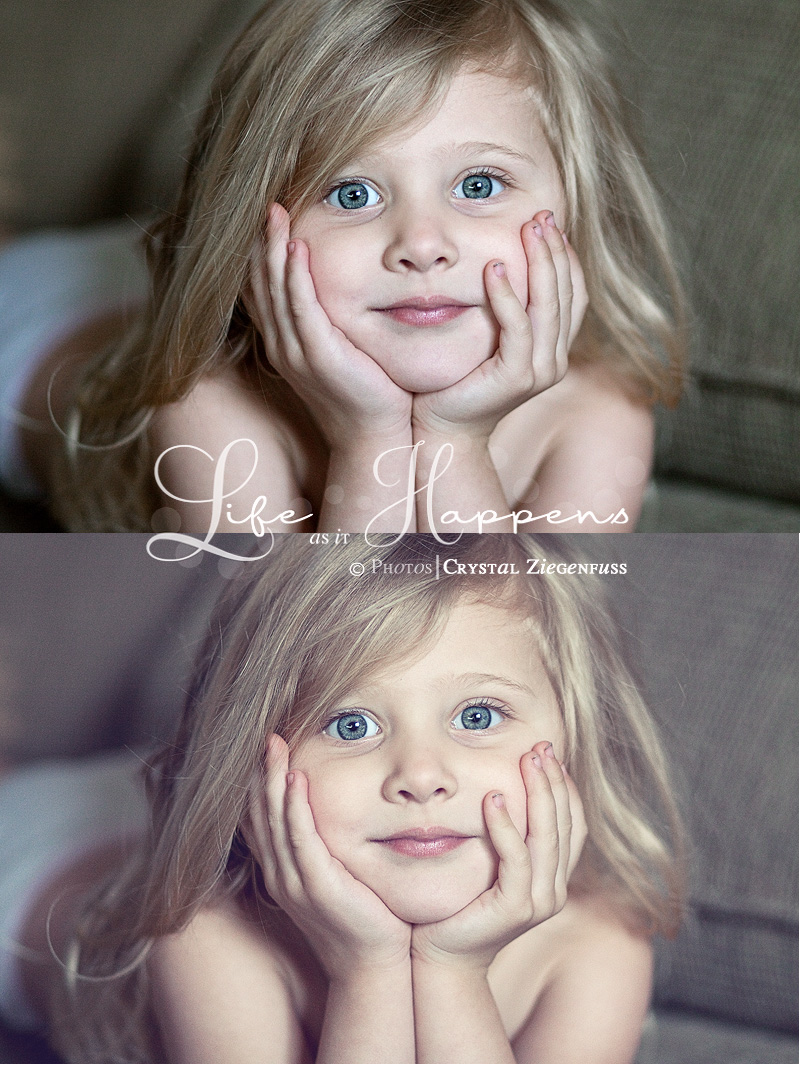
Here is another example. This is my little Avyree aka Nugget. I love this photo. She seems to peaceful and sweet. So to fit the mood of the photo I knew I wanted a soft light sweet pastel type edit.
Here is the before...
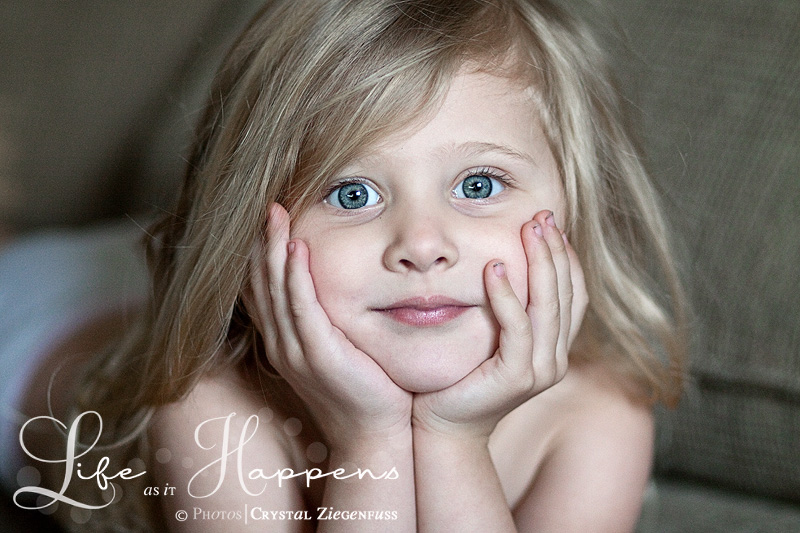
And here is the final edit...
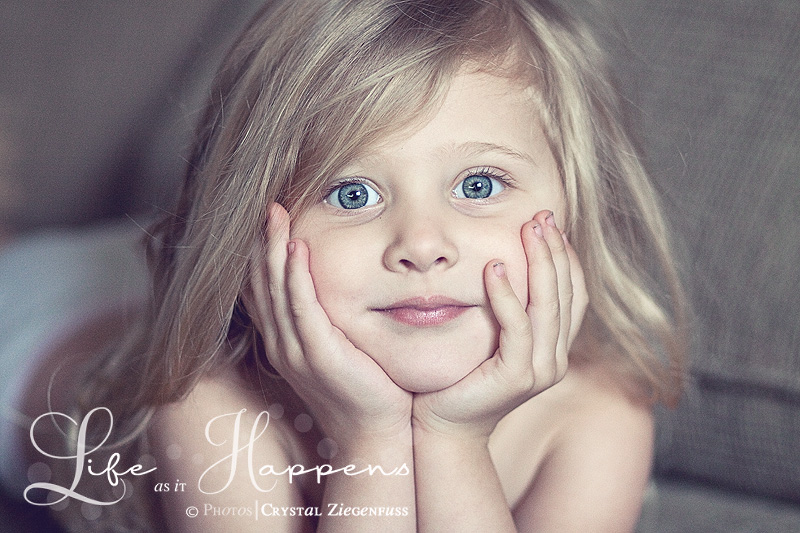
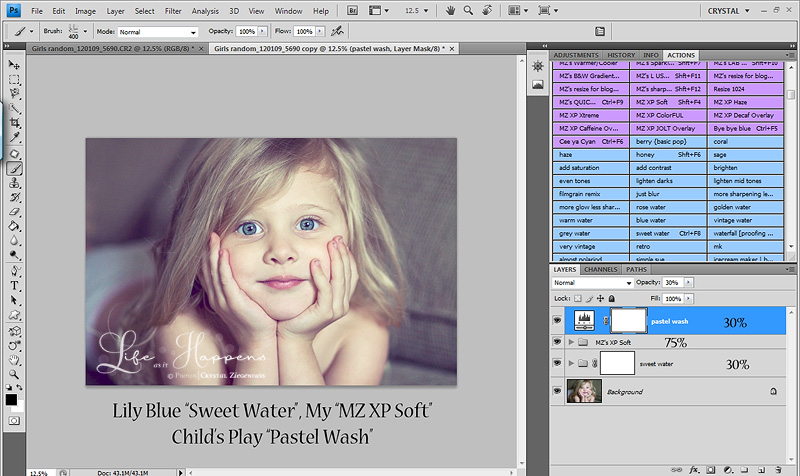
I only did one screenshot for this one. I ran Lily Blue "Sweet Water" which is one of my fav actions. I love her actions so much rarely do I mess with the actual layers, just the folder opacity. I brought it down to 30%. Then I ran my much used MZ XP Soft and lowered the folder opacity to 75%. This is one of my actions that I actually use on a regular basis. I love this action and it's one of my favs. I shared this action here on the blog. Then I used a one layer action to top it off that I use a LOT too and LOVE. Child's Play "Pastel Wash". I LOVE this action so much that I run it on top of so many different actions and recipes. I almost always lower the opacity. But I love the tones of this action. And then I flattened and ran my L USM at 60%. That's it...3 actions from 3 different makers to get a unique look that fits my style and the mood of the shot.
Here's the screenshot and what my folders looked like...
And the before after. Probably should've made this a bit smaller...
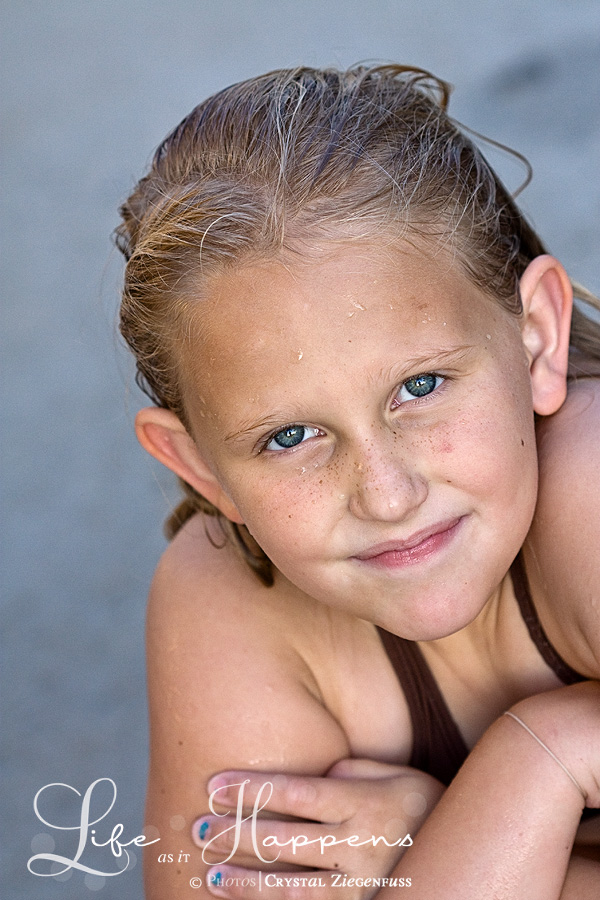
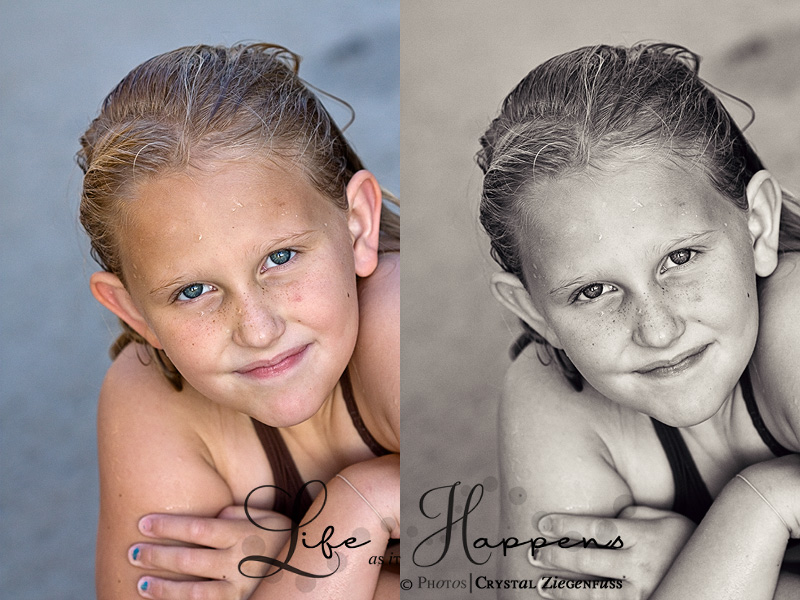
Now finally my last example is my sweet Haylee. I thought I'd show you how you can use action recipes for b/w's too.
Here is the before which I printed in color. This is one of my all time FAV shots of her that I took at sunset with my EF 100mm 2.8 Macro. I wanted to have a play with it in b/w...
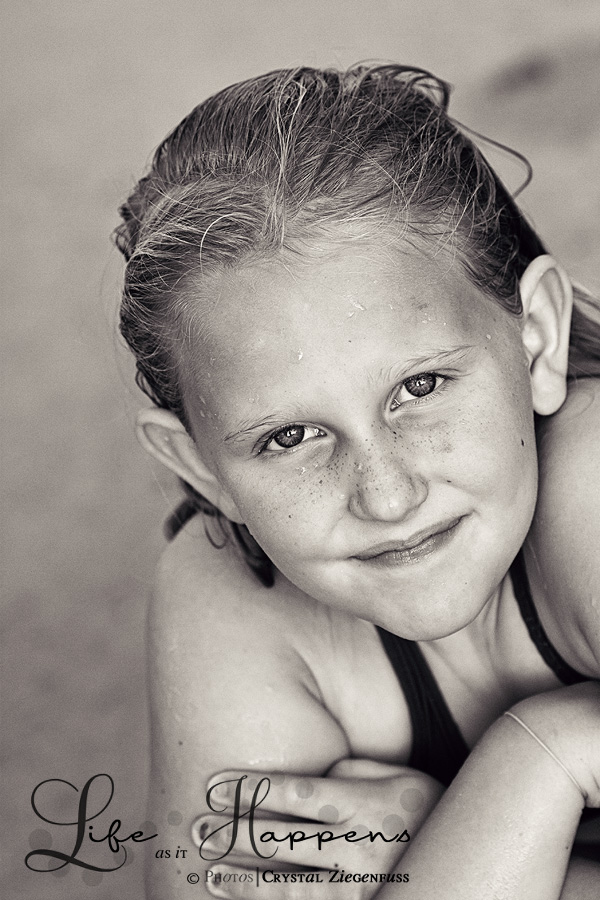
I didn't do any screenshots for this one because I flattened a lot in the process. But for this shot my main concern was keeping detail. I knew that I didn't want to go too light and washy because I'd start to loose detail. Her freckles were especially important to me in this shot. So I knew it would be a darker richer b/w but I really wanted a fun tonal range as well.
So here is the after and below it I'll go over the actions I used...
The first thing I did was run my "Quick & Easy B/w". Which is basically just a gradient map, dodge/burn layer, and a lighten layer. This action does duplicate the photo layer, change the blend mode to Soft Light 30%, flatten and run the layers that you can see. So with the Soft Light blend mode already there, it gave it the perfect contrast it needed. I turned off the Dodge/Burn layer as well. So basically dup layer, soft light 30% and a gradient map over the before. Then I use Florabella B/W Espresso Tint and put the layer opacity at 30%. Now onto Lily Blue Cherry Tone and put the layer opacity at 35%. I was happy with where it was going but I wanted a slight pastel type lift. So I ran my trusty MZ XP Soft. Told you I use it a lot. I started off by turning off the b/w layer or it would cover the 2 tints I already added. I then lowered the opacity of the XP Soft layer to 20%, turned the Blue Soft layer off and changed the opacity of the Cream layer to 20% as well. I then ran MCP Touch of Light/Dark and lightened the eyes just a tad with a very low brush opacity. I don't like to go too light on eyes because the lighter you go the more detail you loose. And for me, the details in the eyes are what it's all about. My girls have crazy detailed eyes so the last thing I want to do is over process them and lose that. Then I used the Dark to lightly go over her freckles with a very low opacity brush {10% brush opacity} to darken the freckles a bit. Then flattened and ran my L USM at 50%. I always run my L USM lighter on b/w's because they tend to look over sharp quicker than a color edit.
So here is the before and after side by side...
So..these edits may not be for you. But it shows you how you can really change it up and make each image you shoot ONE OF A KIND by using that actions panel and the different sets to their fullest. And you also see why it's so important to KNOW your actions inside and out and look at each image as an individual. Look at the image, find what's important to you to convey with that image then go to those actions in your panel that will give you the look/mood you want to display. Some images and the mood of the image calls for dramatic, urban, darker and others may call for a softer, washy pastel type etc etc. The more you know your actions panel, the better and faster you can create recipes to fit your style! That's the great thing with having a variety of actions! I'm ALL about variety in shooting and PP'ing! :O) It will help you better use them together in fun different ways. I hope this post gets you thinking and gets you combining actions and thinking outside the box. Cause let's be honest..it's MUCH MORE FUN outside the box. At least it is for me! Ha!
If you are interested in any of the actions I used I've linked where to buy each...with the exception of my freebies...
Lily Blue Actions ~ These actions are one of my FAVS. I use them all the time! I LOVE LB! I have her Color One Actions & her Waterplay Actions and they are SO YUMMY! I don't use her presets because I prefer to go creative with layers than in ACR. Her b/w actions are great too! But basically anything she makes/sells I will buy!
Florabella ~ I love FB as much as LB. Lol! I've had her 1st set of textures for a long time and after buying them quickly deleted all my free textures. Then I bought all 3 sets of her actions and LOVE them and have also now bought her 2nd set of textures which is just as good as the first, but slightly different. I LOVE FB and will buy all her stuff too!
Child's Play Actions ~ I don't use this set much with the exception of the Pastel Wash. I use it so much that I have a short key assigned to it! :O)
MCP Actions ~ Her Touch of Light/Dark FREE and a great quick way to dodge/burn. I also have this assigned to a short key. I have lots of Jodi's actions and you can't go wrong with any. My FAVs are Bag of Tricks and Blog it Boards.
My actions are here on the board on previous pages. So if you haven't downloaded them for free look back and you'll see several different free action shares.
Happy Thursday and I hope everyone has a great Friday and weekend! :O)
So today I'd like to just quickly show a couple examples of actions recipes and how you can take an image from nice to creative, fun and unique. They will be creative edits of course! Lol! And how fun and unique it can be to mix it up and think OUT OF THE BOX! It's a little hard to do this if you don't really know your actions. So I do highly suggest that you take the time to get to know your actions and what they can do for you and what you can do with them. Especially if you've paid for them. Get your money's worth! I know what each actions {for the most part} does and what look it will give me. So I can visualize how different actions will look together on an image. And no image is the same, so some will look good on one image but not the other.
The first one I'll start with today is a snap I took of my girls while camping in the desert. Since I'm only talking actions today I won't be sharing SOOC and screenshots as to how I got to my Before. This image has been ran through ACR with the sliders etc to where I like them. Then I ran my new all in one {yes ever newer than the last one I posted} with the layers adjusted. I'm doing more in ACR now so what I need in CS4 is much less. It's basically just 3 layers...a high pass filter {like in PW's Boost & TRA Oh Snap}. I keep the opacity at about 50%. Sometimes higher for non people or non face shots. Then a strong S curve {also like PW & TRA} that I keep at about 20-40% opacity with a blend mode of Luminosity {keeps the skin from going too yellow}. Then the last layer is just a basic levels adjustment layer which now I really only use for a mid tone bump if needed. Between ACR and the strong S curve I don't really have the need to touch the shadows or highlights.
So this is the image I started with after ACR & my basic action...
And here is the final edit...
The first thing I did was run Lily Blue "Rose Water". I knew I wanted warmth. I love this action and I left it run as is and full strength...
Then I knew I wanted a little pastel tint to it so I ran my MZ XP Soft. I left the layers as is but lowered the folder opacity to 50%...
Then I used one of my FAV and FREE actions from 2Peas Indie Jane called Grunge. I knew in order to run this action I'd have to flatten first. Then I grabbed all the layer and grouped them in a folder and named it. Sometimes I will adjust the individual layers other times I just adjust the opacity of the entire folder. Here since there are no faces in the shot I just lowered the whole folder to 50%. I LOVE the feel of this action...
Now I really wanted to go creative and have a fun artistic feel to this shot. So I turned to my FAV textures and the ONLY ones I use now...Florabella Textures. I now apply textures the EASY way. File>Place...find the texture and it brings it in as a Smart Object, brings the name of the action on the layer with it and adds the Transform tool so all you have to do is stretch it and hit enter! Wish I'd tried this method so much sooner. So first I added Ethereal b/w and lowered the opacity to 30%. I use this opacity for textures a lot! Then I played with each blend mode til I found the one I liked which was Overlay. Then I added Mai Tai b/w and lowered the opacity down to 30% and blend mode Soft Light. Then finally I added French Canvas at 30% blend mode Multiply because this texture is pretty light and I didn't want to wash out the feel of the photo. I like to group my textures in a folder too so I can turn it on/off and see how they are all effecting the photo. Sometimes if I know my opacity for each texture will be the same then I'll just change blend modes on each layer then lower the opacity of the entire folder to about 30%. It will put each texture at 30% opacity...
Then I flattened and ran my L USM at 70%. So here is the before and after side by side...
Here is another example. This is my little Avyree aka Nugget. I love this photo. She seems to peaceful and sweet. So to fit the mood of the photo I knew I wanted a soft light sweet pastel type edit.
Here is the before...
And here is the final edit...
I only did one screenshot for this one. I ran Lily Blue "Sweet Water" which is one of my fav actions. I love her actions so much rarely do I mess with the actual layers, just the folder opacity. I brought it down to 30%. Then I ran my much used MZ XP Soft and lowered the folder opacity to 75%. This is one of my actions that I actually use on a regular basis. I love this action and it's one of my favs. I shared this action here on the blog. Then I used a one layer action to top it off that I use a LOT too and LOVE. Child's Play "Pastel Wash". I LOVE this action so much that I run it on top of so many different actions and recipes. I almost always lower the opacity. But I love the tones of this action. And then I flattened and ran my L USM at 60%. That's it...3 actions from 3 different makers to get a unique look that fits my style and the mood of the shot.
Here's the screenshot and what my folders looked like...
And the before after. Probably should've made this a bit smaller...
Now finally my last example is my sweet Haylee. I thought I'd show you how you can use action recipes for b/w's too.
Here is the before which I printed in color. This is one of my all time FAV shots of her that I took at sunset with my EF 100mm 2.8 Macro. I wanted to have a play with it in b/w...
I didn't do any screenshots for this one because I flattened a lot in the process. But for this shot my main concern was keeping detail. I knew that I didn't want to go too light and washy because I'd start to loose detail. Her freckles were especially important to me in this shot. So I knew it would be a darker richer b/w but I really wanted a fun tonal range as well.
So here is the after and below it I'll go over the actions I used...
The first thing I did was run my "Quick & Easy B/w". Which is basically just a gradient map, dodge/burn layer, and a lighten layer. This action does duplicate the photo layer, change the blend mode to Soft Light 30%, flatten and run the layers that you can see. So with the Soft Light blend mode already there, it gave it the perfect contrast it needed. I turned off the Dodge/Burn layer as well. So basically dup layer, soft light 30% and a gradient map over the before. Then I use Florabella B/W Espresso Tint and put the layer opacity at 30%. Now onto Lily Blue Cherry Tone and put the layer opacity at 35%. I was happy with where it was going but I wanted a slight pastel type lift. So I ran my trusty MZ XP Soft. Told you I use it a lot. I started off by turning off the b/w layer or it would cover the 2 tints I already added. I then lowered the opacity of the XP Soft layer to 20%, turned the Blue Soft layer off and changed the opacity of the Cream layer to 20% as well. I then ran MCP Touch of Light/Dark and lightened the eyes just a tad with a very low brush opacity. I don't like to go too light on eyes because the lighter you go the more detail you loose. And for me, the details in the eyes are what it's all about. My girls have crazy detailed eyes so the last thing I want to do is over process them and lose that. Then I used the Dark to lightly go over her freckles with a very low opacity brush {10% brush opacity} to darken the freckles a bit. Then flattened and ran my L USM at 50%. I always run my L USM lighter on b/w's because they tend to look over sharp quicker than a color edit.
So here is the before and after side by side...
So..these edits may not be for you. But it shows you how you can really change it up and make each image you shoot ONE OF A KIND by using that actions panel and the different sets to their fullest. And you also see why it's so important to KNOW your actions inside and out and look at each image as an individual. Look at the image, find what's important to you to convey with that image then go to those actions in your panel that will give you the look/mood you want to display. Some images and the mood of the image calls for dramatic, urban, darker and others may call for a softer, washy pastel type etc etc. The more you know your actions panel, the better and faster you can create recipes to fit your style! That's the great thing with having a variety of actions! I'm ALL about variety in shooting and PP'ing! :O) It will help you better use them together in fun different ways. I hope this post gets you thinking and gets you combining actions and thinking outside the box. Cause let's be honest..it's MUCH MORE FUN outside the box. At least it is for me! Ha!
If you are interested in any of the actions I used I've linked where to buy each...with the exception of my freebies...
Lily Blue Actions ~ These actions are one of my FAVS. I use them all the time! I LOVE LB! I have her Color One Actions & her Waterplay Actions and they are SO YUMMY! I don't use her presets because I prefer to go creative with layers than in ACR. Her b/w actions are great too! But basically anything she makes/sells I will buy!
Florabella ~ I love FB as much as LB. Lol! I've had her 1st set of textures for a long time and after buying them quickly deleted all my free textures. Then I bought all 3 sets of her actions and LOVE them and have also now bought her 2nd set of textures which is just as good as the first, but slightly different. I LOVE FB and will buy all her stuff too!
Child's Play Actions ~ I don't use this set much with the exception of the Pastel Wash. I use it so much that I have a short key assigned to it! :O)
MCP Actions ~ Her Touch of Light/Dark FREE and a great quick way to dodge/burn. I also have this assigned to a short key. I have lots of Jodi's actions and you can't go wrong with any. My FAVs are Bag of Tricks and Blog it Boards.
My actions are here on the board on previous pages. So if you haven't downloaded them for free look back and you'll see several different free action shares.
Happy Thursday and I hope everyone has a great Friday and weekend! :O)
