Hi & welcome to my PS blog! This blog is for full PS although some steps will also work in PSE. Most actions, unless stated are not PSE compatiable. I do try to make an action for PSE from time to time. I hope you have fun here and learn some things along the way. If you have any questions, just drop me a comment! :O)

Friday, August 28, 2009

How I did it #2...

So while I was editing my Santa Monica Pier pics, I came across something fun and thought I'd share. It was by pure accident and yet I was so happy with the outcome. And it goes to show you what can happen when you have too much time on your hands and are click happy in PS! Ha!

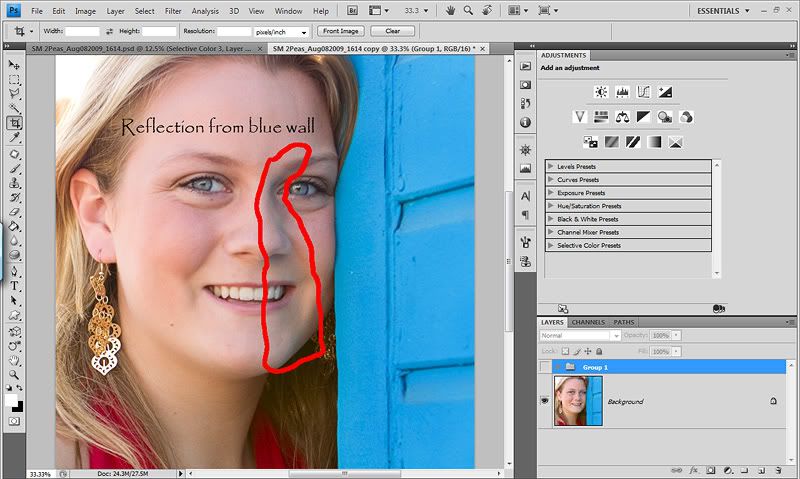
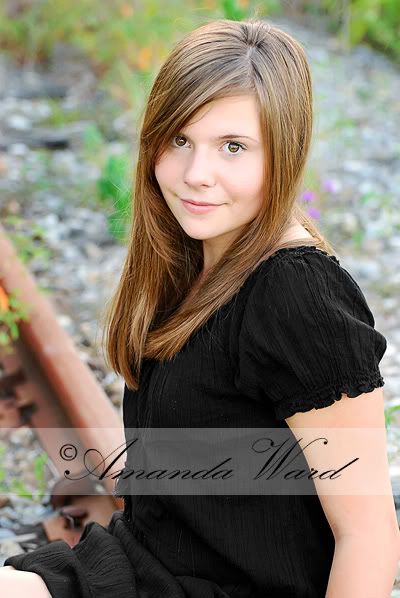
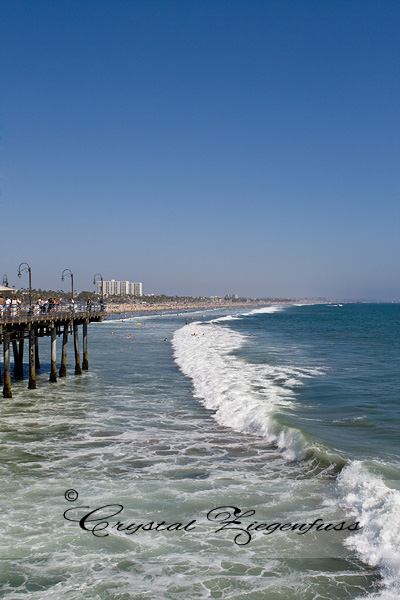
Here is the before shot that I'll be using today. Not a bad shot, but definately needs something to make it unique and stand out from the other 500 beach shots online! And as always, I HAD to find a way to make it my OWN! Something different, something that spoke to me!


And this is what I came up with using an action I'd never have thought to use to get this effect...


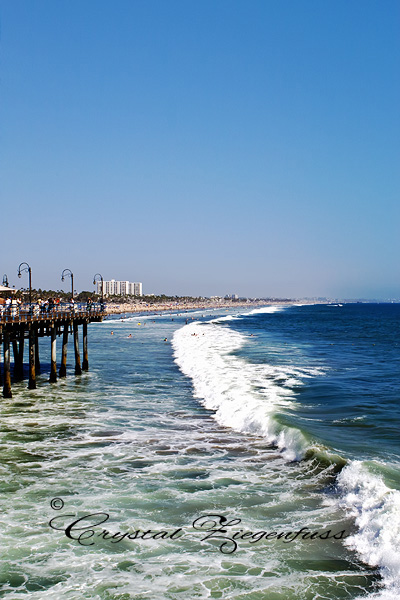
What I LOVE about this edit is what it did to the water. Sure, there are some blown parts on the caps of the waves...but I'm just not a perfectionist! Lol! I love the colors and drama and detail in the water now. And it was SO easy.

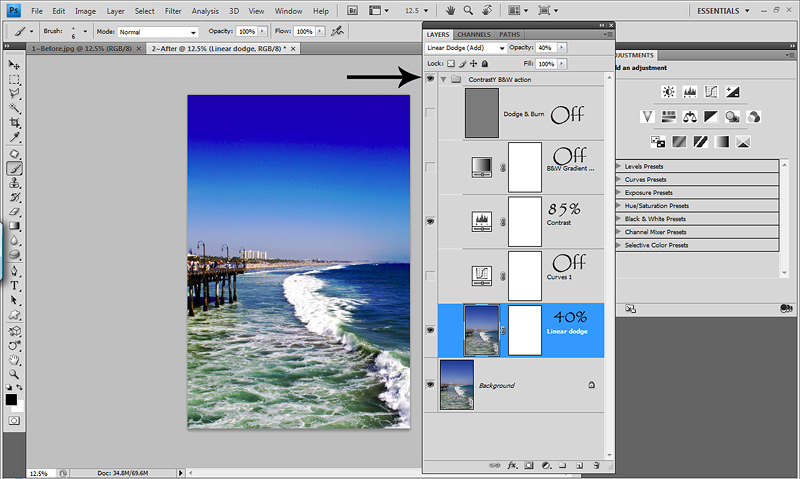
I started with my ContrastY B&W Action from my B&W conversion set! Yes, you heard correctly! Ha!

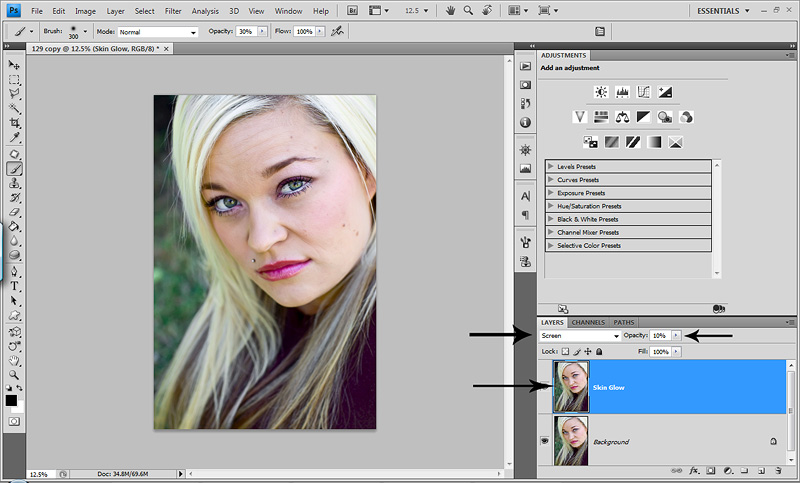
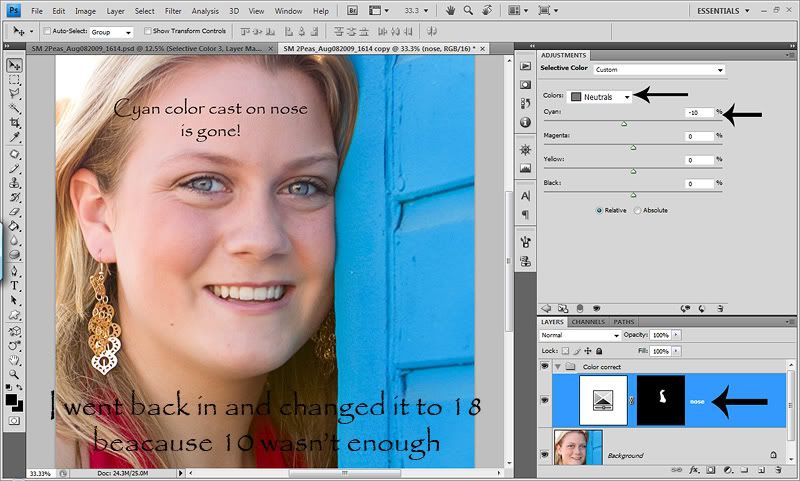
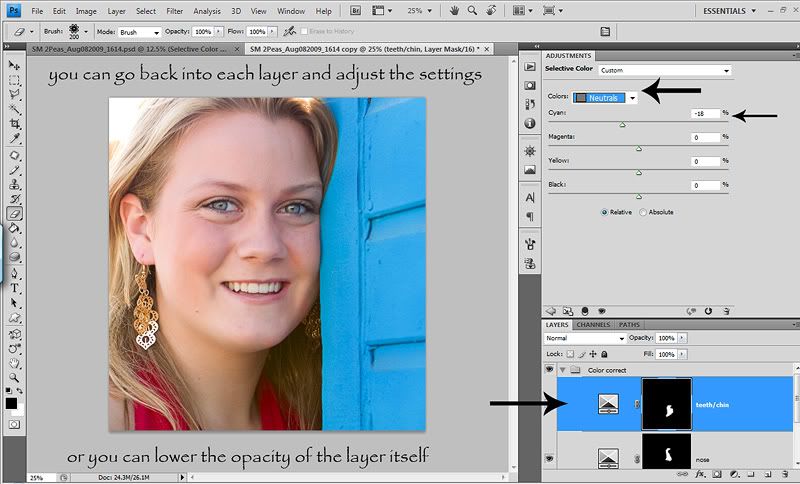
After I ran the action, I turned off the dodge/burn layer because I was feeling lazy. But feel free to dodge/burn your lil heart out! Then I turned the b&w gradient map off. I lowered the opacity of the Contrast layer to 85%, the curves layer off because it was bright enough and lowered the opacity of the Linear Dodge layer to 40%.

Here is my layers panel so far...


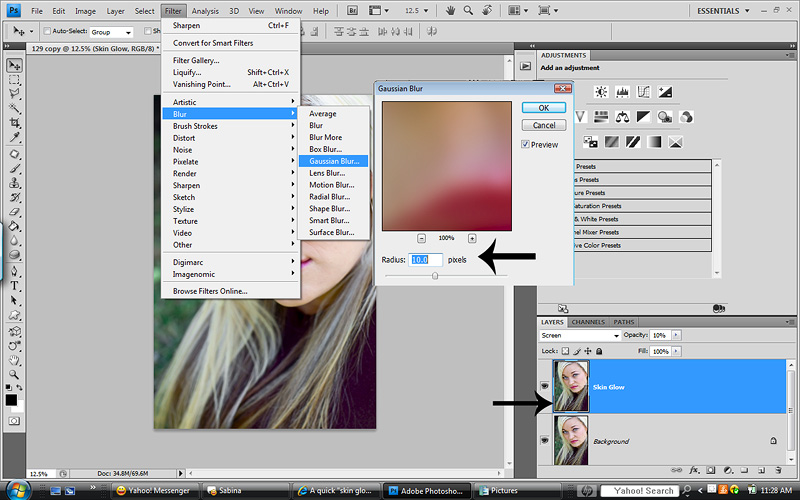
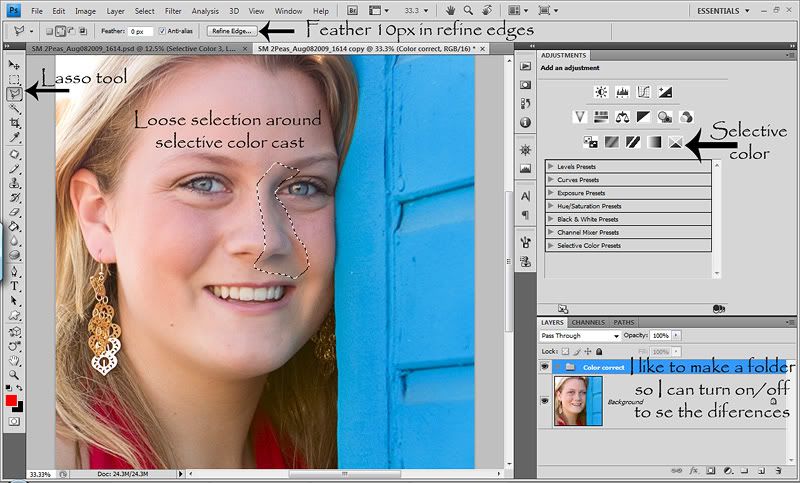
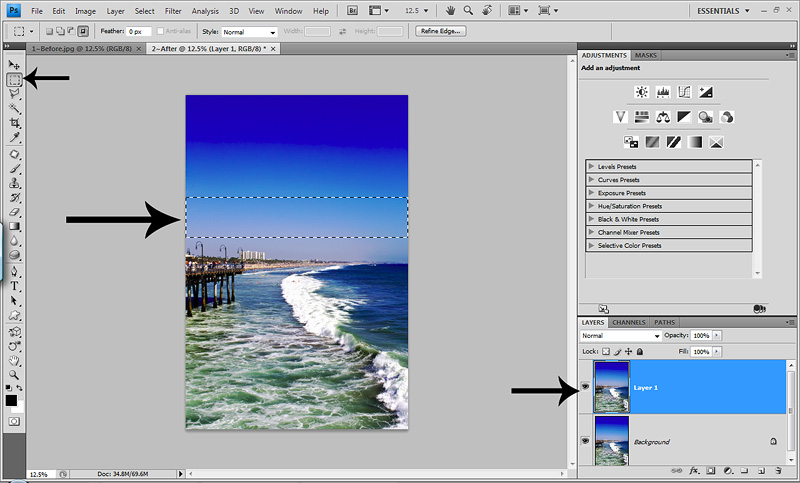
Now I wasn't thrilled with what it did to the sky. It looked wonky and over saturated and neon to me! So I flattened my layers, duplicated the layer and removed noise with my Noiseware filter to smooth out the sky. Then I flattened and duplicated again. Sorry...I do that a LOT! I then took my Rectangle Marque tool and made a selection in the bottom half of the sky. Making sure I have a decent selection of gradient from light blue to the lower white part near the water. Here's what my selection looked like...


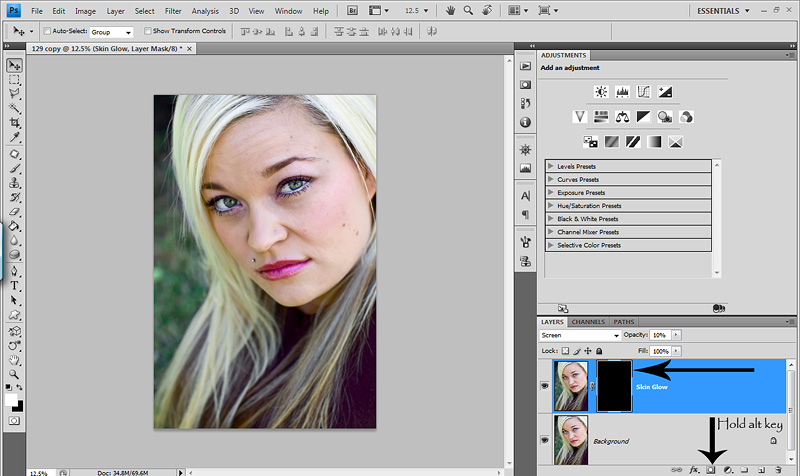
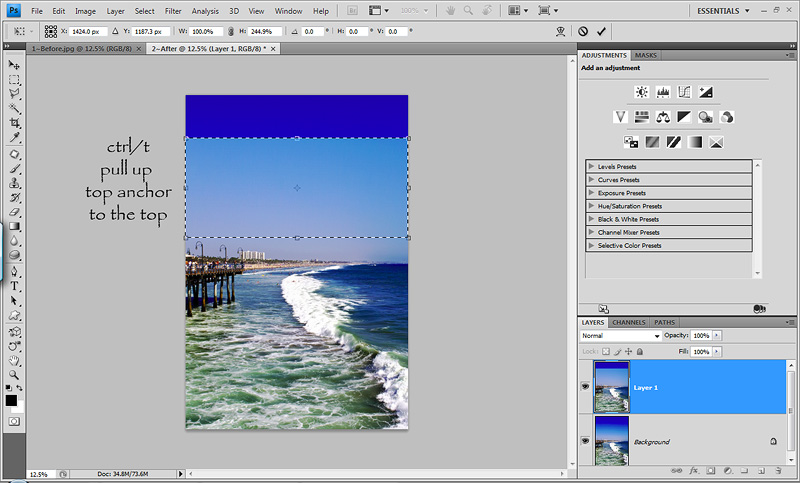
Now I hit ctrl/t for my transform tool. What I want to do is stretch the top anchor all the way to the top of the image to hide the crazy wonky sky. Here is a screenshot of it half way up...but don't worry...I went all the way up and didn't leave it there!


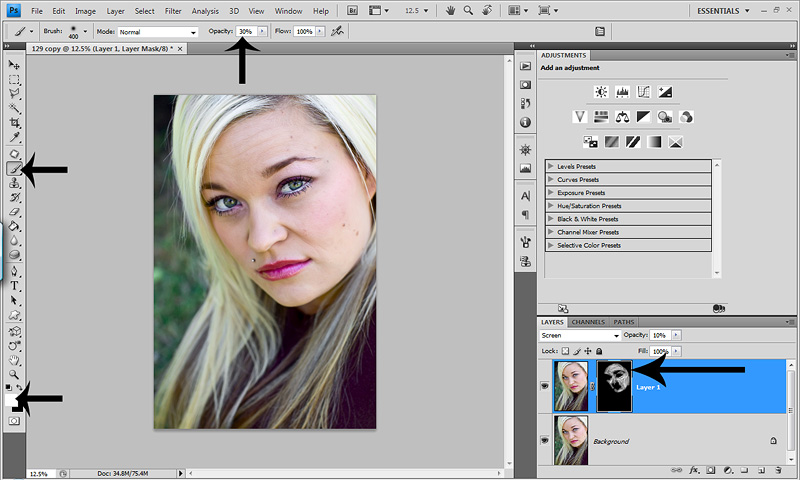
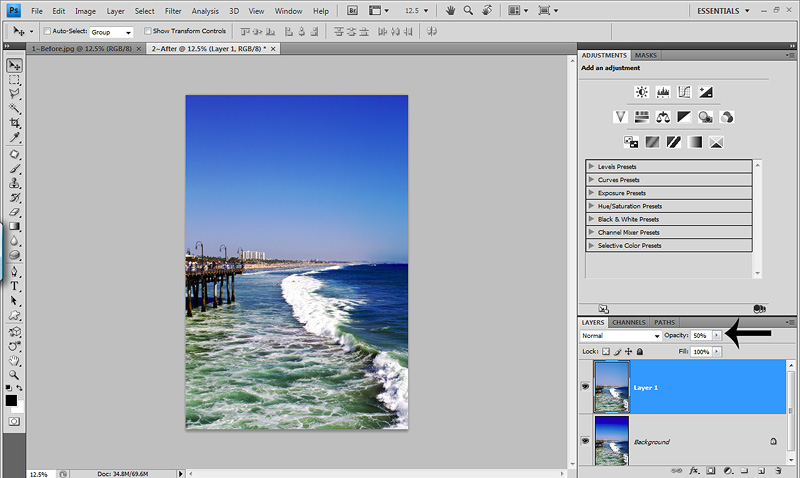
Once I have it pulled up all the way I can leave it as is. But lets say I do want a little bit of the darker blue sky to show through? Easy peasy...lower the opacity of the top photo layer. For the screen shot below, I lowered it to 50% to see what it looked like...


For me, it's still a little too much. I want more focus on the water and less on the sky. So I settled at a layer opacity of 75%. If you want more, lower the opacity, less, raise the opacity!

And here is the before after side by side...


I did try this action on other shots from this day, but wasn't nearly as happy with the end results. So this was the only image to get this treatment.

So this goes to show you that actions are really versatile and you can click and combine and turn off layers etc to make them your OWN! I encourage you to PLAY with your own techniques and actions that you may have recorded yourself and downloaded online! There is NO LIMIT to creativity!

Friday, August 21, 2009

How to give the skin a soft "Glow"...

First and foremost I want to thank Rachel on Clickinmoms for introducing me to the FAB little trick to give the skin just a slight pretty glow! She posted a tut on CM and I asked her if it would be okay for me to share this tut on my blog and she gave me the go ahead. I wrote the tut and used my own examples! If you aren't a memeber of CM yet, I HIGHLY suggest trying it out! It's really inexpensive and you can join with a monthly account or pay in advance. I bought a year membership and it's already paid for itself 100 times over with the help I've gotten and the tuts on the board! All of the girls are very knowledgeable and so very helpful! So please try it for at least one month...you won't regret it!

So, do you want to give your skintones just a little pop...a little healthy glow? Well this is the trick for you! It's VERY subtle which on skin, we want. But with that said, you can use higher settings to make it more intense. Beauty is in the eye of the beholder, so make it your own!

This method is meant to be done at the very end of editing. So do all your stuff, including any patching to the skin that needs to be done and sharpening etc. Then you want to flatten your image so all you have is one layer open!

Then duplicate your photo layer (ctrl/j) and you can name it if you want! I call this Skin Glow. Now change the blend mode to Screen and lower the opacity to about 10%. We don't want to blow any highlights or have white skin. So low opacity is important!


Now we want to add some blur for a touch of smooth skin. So go to Filter>Blur>Gaussian Blur. The numbers will vary depending on the look you want and the size of your photo. The smaller the photo, the smaller number. You can use a higher number if it's a high res pic. The lower the number the more subtle the overall effect will be and the higher number the more intense it will be. Rachel suggested in her tut between 4-6 but I used 10 for a little more. Test out different numbers so you can make it your own...


Oops..forgot to crop that screen shot above! Ha! Okay...so now obviously we don't want blur everywhere. We only want to have the blur where we choose. Easy fix. Hold down the alt key and press the mask icon (little camera looking icon at the bottom of the layers panel) and now you will have a black layer mask which is HIDING the screen blend mode and blur!


Now comes the creative part where you get to control how much and where! Take your brush tool, foreground color set to white (opposite the mask) and set your opacity to about 30%. For a more subtle look, use a lower brush opacity and for a more intense look, use a higher brush opacity. I prefer to do most of my masking at about 30% and go over some areas more than others! Make sure the black layer mask is active by clicking on it once. You'll see a little frame around it and that is how you know you have it active. Now just start painting where you want the soft glow! Here is what my layer mask looked like when I was done...


And here is the before and after. As you can see it's VERY subtle. To really see how it effected your pic, zoom in to get a good view of the skin where you painted and toggle the layer on and off. You'll see a nice soft, clean and subtle pop and glow to the skin!

Hope you enjoyed this and thanks again Rachel! Lemme know if you have any questions!

Monday, August 17, 2009

Photobucket went DELETE HAPPY on me....

WARNING...this will be long and VERY negative! Ha! just warnin ya!

I've been having issues with photobucket deleting certain pics of mine! Some are of Avyree in her panties or just without a shirt on! This violates their TOS apparently! A 2 year old in just her diaper or panties! Ummm...okay! Then they deleted photos that were NOT of her nakey just with no top on! Yet, leaving some of her in JUST her panties! So I emailed them about the issue. They said they do not allow CHILD NUDITY on their site EVEN IF YOUR ACCOUNT IS SET TO PRIVATE! And they WILL delete them as THEY see fit! So I wrote back expressing my frustration and the INCONSISTENT way in which they delete photos from my account. Deleting some that are NOT against their TOS, deleting others that are just MY 2 year old with no shirt on yet leaving ones of her in just her panties and felt that their selection process was not very professional nor consistent! And that I did not appreciate no warning and just having the pics of MY children disappear that THEIR discretion! I told them I would no longer be using photobucket to host my images but unfortunately would not be able to delete my account due to MANY tuts on different boards/blogs over the past 2 years!

So for kicks about an hour or so later I went back into my account and...THIS is what I saw...


Nice huh? Basically they went through my account with a FINE TOOTH COMB and deleted pretty much EVERY pic that has Avyree with no shirt on! It's hard to keep clothes on the kid! Haha! Even pics of her in her highchair covered in chocolate ice cream. I took some while we were camping in the desert in our 5th wheel and Avyree was in the BACKGROUND with no shirt on and THEY DELETED it! So since I was an UNhappy customer and talked to customer service about why I was unhappy, they did a photo raid on me! VERY VERY PROFESSIONAL PHOTOBUCKET! THANK YOU SO MUCH FOR YOUR ATTENTION TO DETAIL AND FINE FINE CUSTOMER SERVICE! I COMMEND YOU FOR YOUR DEDICATION TO YOUR CUSTOMERS! TOP NOTCH SERVICE!

So needless to say I AM DONE WITH PHOTOBUCKET & will NEVER EVER use them!

Last time I checked...I was 33 with 2 kids! Not only are they MY images, and MY kids, I guess I was under the SAD impression that business' worked for the good of people...NOT revenge! So glad to be set straight! Point taken...on photobucket your images are NOT REALLY YOURS and you will be treated like a child and have your toys taken away without warning or care if your teeny tiny pinky toe touches that chalk line!!! Nothing like being parented from a hosting website! I also know of a bikini model photographer who photographs ADULTS with PROOF they are adults and photobucket deletes his photos too! They say that on some the front of the bikini is too small, yet will leave shots from the back of a girl wearing a g string bikini! Sound consistent to YOU? NOT to me! I feel like my images are being stolen or being held for ransom! It does NOT feel good to feel like you have no control over YOUR images and they can take them from you! YES...OF COURSE I have the full size images tucked away safely on my EHD. But there was a LOT of time taken to resize, WM etc and would take FOR-freakin-EVER to reload them all and replace the codes in my posts on my blogs!

And I am not that person that goes around complaining and bashing companies! So this is true frustration from my heart!

Why do I share my story here? Two reasons...if any screen shots are missing...THIS is why! And...be VERY careful with Photobucket. If you PISS THEM OFF, they may raid your account and go delete happy on you too!

I am in the process of trying different hosting places at the moment and have gotten lots of great help and advice on who to use! For now I'm using Flickr. But I am not finding it very convenient so I'm still researching other options!

So the tuts will still be coming and I WILL make sure that I can find a hosting site that will not PARENT the images I choose to post of MY OWN KIDS!

Phew...vent over! Ha!


Wednesday, August 12, 2009

Selective color casts on SKIN...

Today I'd like to talk about selective color casts on skin! Not to be confused with WB (global color cast) issues. By selective color casts I mean, reflections from a wall or shirt etc. that casts on your subjects skin. I already went over how I remove selective color casts in shadows etc by using the hue/sat slider to remove color. Which I still use & love. I still have blue/cyans in my shadows and on my whites & blacks. So this is still my go to method. But I don't think it's the best method on skin!

There are MANY ways to remove selective color casts on skin. Some are more complex than others. This one is pretty darn easy and quick. So that's the one I will go over today!

So while on a fun photographer gathering with my So Cal 2Peas I took a shot of a beautiful senior. She was leaning on a bright cyan wall, which reflected a color cast onto sections of her face. Don't mind that I said blue in the screen shot. I meant cyan...lol! At first glance, it's not horribly noticeable. But when brought into CS4, I could really see it.

I've outlined where the color cast is here...


The first thing I did was grab my lasso tool and made a very loose selection around the top portion. I prefer to do it in sections for more control. The cast me be stronger in some areas, so I want to be able to go strong on some sections and lighter in others. Then I did a feather of 10px. You can either right click and choose feather or in CS4, use the Refine Edges and choose 10px in your feather section.

Here is what it looks like now. Don't pay attention to the layers panel in this screen shot. And note where the Selective Color Adjustment Layer is in CS4. That's the layer we'll use to correct this...


Now click the Selective Color Adjustment Layer either in the adjustments panel or in the little half black/white circle below the layers panel. The key here is to work in the Neutrals! So select Neutrals in the drop down menu.

Now I know my color cast is cyan off the bat. So I go to the cyan slider and slide it to the left which adds red. Remember... Cyan/Red ~ Green/Magenta ~ Blue/Yellow. And to show you how it works, for example purposes, I slid the cyan slider all the way over, which is adding red. Because of your selection, it is only going to effect that area. You can also see it feather out, which will help you get a more natural look.


How the Selective Color Adjustment Layer works is you slide it to the right to add THAT color or slide it to the left to add it's OPPOSITE color!

I slid the cyan slider to the left a little watching my photo. I have the screen shot for 10, but I went back in and changed it to 18, as I felt 10 wasn't enough.


In hind sight, I also should have slid the yellow slider to the right a bit adding a little yellow to blend a little more with her skin tone.

Now I'm pretty happy with that section, it's time to move onto the rest of the cast. So I did another selection and feathered it and clicked a new Selective Color layer. Now in my layers panel you see two Selective Color layers. In the actual photo I edited, I did it in more sections than just two. But you get the idea!


And here is the side by side...


So the key with this method is first trying to assign a color to the cast! Then making your loose selection, giving a decent feather so it looks natural, and working in the Neutral tones in the drop down menu. Just open a Selective Color layer, go to Neutral and start sliding around watching how it effects your photos. This is probably the best way to get comfy with it. And remember the color wheel and which color is opposite the other... Blue/Yellow ~ Green/Magenta ~ Cyan/Red. Write it down and keep it next to your computer so you can reference it until you remember. And make sure not to go too far with any of the sliders so you don't introduce a new cast. And there will be times that you need to correct/slide more than one color. Don't be afraid to slide them around because you can also delete the layer or set them all back to zero!

And to really clean it up a step further you can use the method I posted in the link above by adding a new layer and painting over the area with the subjects skin tone to even it out nicely! I've also used this method by itself to fix some selective color casts from reflections. Combine them both and you are on your way! :O)

Let me know if you have any questions!

Thursday, August 6, 2009

PSE actions FINALLY ready!

Boy was that a journey! Thanks for sticking this out with me. I now understand how it works, so next time will be a breeze. And I wanted to give a shout out to Kim for holding my hand through the learning process. She is the reason I'm able to share this set and I can't thank her enough. If you click on her name it will take you to her website and she also sells great actions for PSE as well as overlays and textures. So be sure to check out her stuff...she's AWESOME. Another quick shout out for the PSE girls is Rita at The Coffee Shop! Rita is a wonderful caring and VERY talented woman who gives and gives. ALL of the actions & tuts on her site are FREE! Her site helped me get this done as well. So jump over there if you haven't been there yet and leave her some love on her blog if you download anything. So thank you Kim & Rita. You helped me more than you'll ever know!!

Okay, onto the actions! I'm really excited about this set. It's very similar to the Jewel Tone Washes that I shared for full PS users. I basically took the same look, but made it PSE friendly. And I have loaded and tested them all in PSE7 and they work perfectly! YAY! :O)

For the Jewel Tone Washes there are 4 levels adjustment layers all doing something different to your photos, 1 optional b&w gradient map that is turned off (just turn the eye on to use it) and 1 solid color fill. None of these actions flatten, so once you run them you can adjust each and every layer to your taste. You can up the opacity of the layers for an extreme look, lower the opacity of the layers to make it more subtle, you can turn layers off or turn the b&w on! The possibilities are endless!

This set will work on images with good exposure and color. So if your shot is under/over exposed or has any color issues, clean it up first. Because it's a Wash set, if your shot is over exposed, this will bleach it out. Will work fairly well with darker images...within reason. But I do not suggest running this on a SOOC shot as you'll want to add some contrast before the actions. If you don't add some contrast and pop your image a bit, the end result will probably be too washed out!

So here is the original edited image I used for the examples. This photo was taken by my DEAR friend & fellow photographer Amanda. Thank you for giving me such lovely images to play with!


Here are the examples of the Jewel Tone Washes...


All examples above were adjusted after the action ran. Most actions do not look good run as is because every photo needs something different and not all actions look good on all photos.

And here are examples when turning on the b&w gradient map for some b&w tones...


Again, layers adjusted for the examples and you can bring down the tones much more than I did. And you can take it a step further and lower the opacity of the b&w layer for a faded vintage feel or even spice it up and change the blend mode of the b&w layer to soft light (hard light or overlay) and then play with layer opacity. And another thing you can do to change the look of an action that I don't think people think about, is changing the layer order. Switch them around and see what it does to your photos. Actions are ALL about learning! :O)

I also included some extras in the set too! The only one I couldn't get to work was the warmer/cooler because I either use curves adjustment layers or color balance, neither of which PSE uses. I tried to do it in levels but I couldn't get it to look right. Now if you haven't see the Smart Curve yet, GO GET IT! It's a plugin for PSE (it'll be in your Filter menu) and allows you full control with curves and working in the R G B channels. I've tried it and it works GREAT! The only thing is that you can't double click on it to adjust it later like you do with adjustment layers. So make sure to duplicate your photo layer, name it curves and run your Smart Curve on that so you can lower opacity, erase or mask any areas you aren't happy with.

Now comes the not so fun part. How I recorded and saved these. For those of you who know how they come and how to install them, you don't need to read this part. But if you are new to PSE, you might want to know! Full PS is very different. You can have 1 atn file and have as many actions in it as possible. Then you just double click on the atn file and it's loaded in your actions panel in a nice pretty folder with all of your actions in the folder. Well you PSE girls know that it's very different for you.

So what I did is saved a separate folder for EVERY action I ran. Each folder will be named with what action set is inside. In each folder there will be 3 files...the atn file (the action) a png (for PSE 6 & 7) and a psd (for PSE 3,4,5).

Here is what all the folders will look like after you unzip the file...


And here is the inside of one of the actions folder...


Sorry the icon is so ugly. Hopefully they'll get better over time, but I'm not good with that kinda stuff...so maybe not! Ha! You CAN make your own if you'd like to toss mine out! All you have to do is make it 64x64 and get creative. When you are done creating, merge visible (DO NOT flatten) and save as a png with the EXACT same name as my atn file. And if you use PSE 5 or lower, you need to save it as a psd instead of png. But if you can stand looking at my ugly icon, more power to ya! :O)

Now onto installing the actions. Of course you'll have to unzip the file first. Most just double click or right click and choose your unzip program and the rest will be done for you!

I was going to explain it all, but figured I'd leave that to the pros! So if you need help on how to install them go HERE on Rita's site and all the info is there!

Once you've got them all installed (you'll have to go into each folder and copy/paste for each action), just open PSE and click on Photo Effects, then select the one you want to run and either double click it or hit apply.

Momaziggy's PSE Jewel Tone Wash action set!

And after all that boring stuff is done...HAVE FUN!

Let me know if you have any questions and I will do my best to help. Now that I know what I'm doing, I will from time to time share PSE actions that I think you'll like or will be helpful!

I'd love to see plays with the actions, so you can link me in the comments section and I'll go check them out!

Happy editing! :O)

Wednesday, August 5, 2009

PSE girls...it's YOUR turn for an action share...

Okay...PSE girls...bare with me! I tried to give you girls an action BEFORE I'd ever even tried running one. I figured all you needed was the ATN file! But now I get it! So I'm going to delete everything out of this post and once I'm all set, I'll post with the correct action set! And I will acutally TEST it before posting. Hopefully by the end of the night!

I'm so sorry for the confusion and next time will be better since I actually KNOW what I'm doing!

Tuesday, August 4, 2009

NEW action set as promised...Jewel Tone Washes...

Hi everyone! Thank you for being so patient with me. And I wanted to say quickly that I know I don't post on this blog as often as most tutorial type blogs. But when I started this blog I told myself I would only post when I had something I wanted to share. Something that I thought would be helpful. I wouldn't post mindless things just to post regularly. Plus I'm a mom to two kids. Ha! I often feel guilty I don't post more, but this is exactly what I didn't want to happen. I want to enjoy keeping up this blog and do it when I feel like I can help, but not feel that I have to post a certain amount. So thank you for still coming back although I don't post regularly. My only goal with this blog is to share and help, so I hope I've achieved that.

Now onto my new set! I have to say that I am REALLY excited about this set. I think it has so many possibles and hope that you explore them all. I think I'll be using this set a lot and hope you will too. These are not compatible with PSE...I'm sorry! :O(

This set will give you a creative tonal wash to your images. It is *similar* to my Day at the Beach set. But I worked more in the color channels in curves and levels this time around giving what I think is a cleaner look and a little bit different tonal range. This set isn't for everyone tho. For those of you who like the faded wash look, this set is for you. For those of you who only like clean color poppin edits, this isn't for you.

And to help you get the most out of this set I have to remind everyone that not all actions look good on all images. So you have to know what actions to run on what images. The way I run and explore a new action set is to run each one. I start at the bottom and turn each layer on and off, watching what it does to the image. I go up every layer this way. Then I start adjusting layer opacity for the layers that I think are too strong. Then if I want to really change it up I'll turn certain layers off for different types of looks and play with blend modes on different layers. I'll do some making if necessary and sometimes I'll even go in and change settings. It's just a matter of getting to know the action so you know how to get the most out of it and make it your own!

Instead of adding any stops into the actions themselves, I recorded some action tips in the top of the folder. Read them, then if you don't like them in your actions panel, you can delete the instructions/tips. All you have to do is select the ones you want to delete and hit the trash can. And don't worry if you accidentally delete the wrong one. These changes are only in your actions panel...unless you save over the action. So if you mess up, delete the action set from your panel and load it back in! Easy peasy!

Here is a quick run down of the actions...
Gold Glory
Ruby Red
Sapphire Shine
Emerald Empress
Diamond Dazzle
Amethyst Anyone?
then I added some extras...
Lighten/Darken
Warmer/Cooler
Fix Blue/Cyan color cast (went over this in a previous post...use on whites/blacks/shadows)
Luminosity USM Sharpen (for full size images)
Resize to 480px wide (for my IV girls)
Resize to 600px wide (for my 2Peas girls)
Resize to 800px High (for blog vertical images)
Resize to 800px Wide (for blog horizontal images)
Sharpen for the web.

Each action comes with an optional b&w gradient map that is turned off. If you want to play with b&w washed tones, just turn it on. You can play with the opacity for a washed faded vintage look, leave it full force for a old time faded tonal b&w or even play with blend modes and layer opacity! ALL actions/layers in this set come with a layer mask and are grouped in a folder that also includes a layer mask. So you have 100% control to make this action set YOUR OWN! MOST actions do NOT look good run as is! So really get in there and play with the layers! This is not a run as is set by far! Ha! Most likely when you run it, you will think I'm a HORRIBLE PS crazy lady and vow to never come back to my blog and try any of my actions! :O) So for that reason, I did 3 different example sets to show you some of the things this set is capable of. You may still hate it, but give it a try. If you don't like them...DELETE! Ha! You never know until you TRY!

So in this 1st example, I ran the actions on an edited image from my dear friend Amanda. Thank you so much for donating your BEAUTIFUL images for my blog! I LOVE YOU GIRL!

Here is the original edited image I started with...


And here is each wash that I ran and adjusted the layers. I do think that the Sapphire Shine is *similar* and I use similar LOOSELY (ha) to LB's Honey. NOT nearly as good, but fairly similar...


And here are the exact same actions run on another photo Amanda sent me with the b&w gradient map turned on and the layers adjusted. Here is the image I started with. This is Amanda's beautiful daughter...


Oops...forgot to delete the black fill under the above examples..HA!

And here is another example of how you can use these actions. For a Vintage tonal feel. All I did was turn on the b&w layer, change the blend mode to Soft Light and lower the opacity to about 75% then adjusted the other layers. You can go onto dodge/burn and clean them up a bit. But I just wanted to show you another option this set holds for you...

Here is the HORRIBLE image I took of Haylee in our front yard at 2pm....YIKES! I know...but I needed a quick example shot and I wanted a distance scenery type shot for this example. Don't run away PLEASE! Ha!


So if you got this far and are still interested in trying out the my Jewel Tone Wash action set...click HERE

I hope you like the set and gets lots of use out of them. If you have any questions, don't hesitate to ask. I'd love to see some examples of the actions in play. Just gimme a link and I'll run over to check them out!

My next post that I've been working on this week will be another touch on color correcting and a little more in depth...working in color channels with curves & levels.

Hope everyone is having a GREAT week! :O)


Search My Blog

Followers

About my PS Blog

Hi, my name is Crystal and I am addicted to Photoshop. I have PSCS4 and it's my other half. I love photography, but sometimes I think it's a means to edit!

So I thought it would be fun to have a place to post the free action sets I record, tips and tricks that I learn in PS and tuts for various different types of photo editing.

I hope you enjoy and find my PS blog helpful and if you have any questions, leave me a comment with your questions and your email address and I will get back to you!

Happy editing!

About Me

My photo
I am a stay at home to 2 great girls. My older daughter Haylee just started middle school and my younger daughter Avyree is in 1st grade! I have been married 11 years to my hubs Eric. I got my first DSLR June 31, 2008 and have been hooked ever since! My style is primarily Lifestyle! I like to take a natural and real life approach to my images! I want them to remind me of WHO my girls were when they were little, not just what they looked like. I love to edit and my editing style is always evolving and changing! I like variety and photography is a means to edit! I shoot Canon (full frame) and almost only primes. I pull out my wide angle zoom from time to time! Thanks for stopping by and I hope you like our story...
Background paper by Kay Miller

  © Blogger template 'Photoblog' by Ourblogtemplates.com 2008

Back to TOP