Organzing your actions panel and button mode...
So I am finally getting around to doing this tut! It'll actually be a quick and easy tut! Once I finally did this, it made a world of difference in how efficient I am in PS!
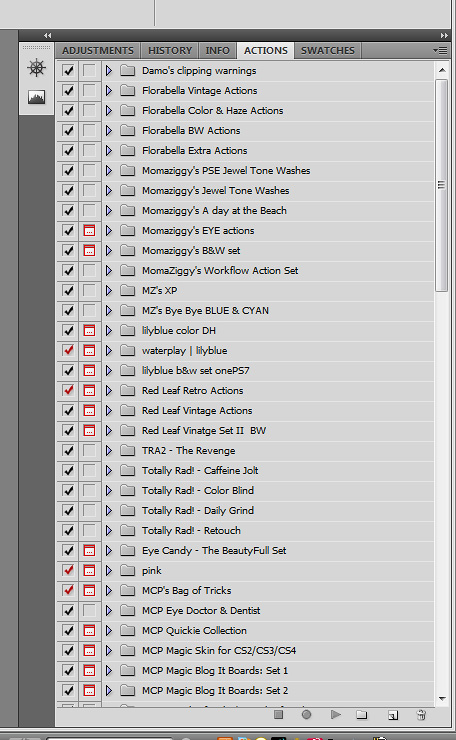
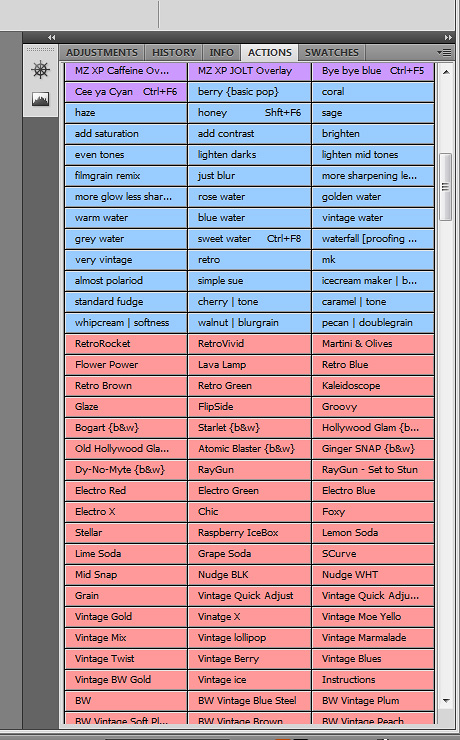
So the first thing is to clean out any actions you do not use. We all know that we accumlate a LOT of actions...many wonderful free shares and some we've bought and just didn't care for! So the first thing I did was delete ALL sets and single actions I NEVER use. When I say delete, I mean just from my panel. They are still in a folder on my hard drive and backed up on disk! ALWAYS back up your actions, plugins, textures etc on disk!!! I have a few I only use once in a while, so I did leave those but moved them to the bottom of my panel. Then once you have your actions panel cleaned up, it's time to put it in order! Very easy and simple. Simply collapse the action folder then drag it where you want it. The ones you use the most should be at the top of your actions panel, then go in order of how often they are used! So all my Florabella actions are first, well actually Damien's hightlight/shadow action is first. Then after FB I have all of my actions. Then Lily Blue cause I use these A LOT...and so on! So far so easy! Here is a screenshot of what my actions panel looks like once I have them all on order.
Now comes the NOT so fun time consuming part! We are going to assign colors to each action set. The only thing that bugs me is that you cannot assign a color to the whole folder...you have to assign it to each and every action in the set! So it's takes a long time, especially if you have a lot of actions. But the time it takes is SO worth it! It took me almost a full afternoon to do it and I was really grumpy and annoyed at the process, but once it was done I was happy as a clam...if clams are actually happy! Lol! And while we are assinging colors to our actions, we can also assign short cut keys to our most used actions. I have just about every short cut key used for my actions that I use a LOT. It's a BIG time saver! :O)
The reason it is important to assign colors to your actions is so that you can quickly tell them apart by maker! I wish PS had more colors for this!
So for Damien's awesome action and FB's FAB actions, I left them at the default gray because I ran out of colors! Lol! Then I started with my actions. My favorite color is purple, so I assigned purple to ALL of my actions.
Here's how...
First start by opening the folder so that you can see all the actions. Then I click once on the first action in the set to highlight it. Then I click on the little arrow thingy and it gives me the following options. You want to click on "Action Options".
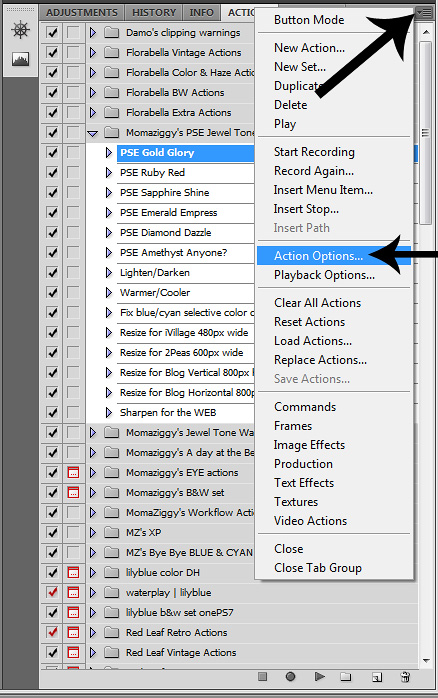
This is what you'll see...
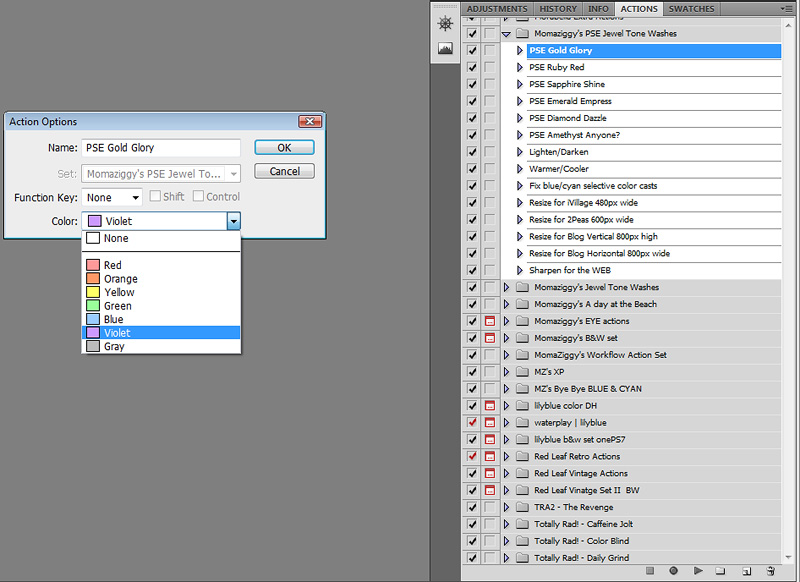
So now you just click on the arrow for the drop down menu and select your color. The important part is that you use the same color for all the actions from the same maker. So ALL of my action sets are purple! The PITB now is that you HAVE to do this step for EACH individual action! So once you select your color for your first action, click ok then select the next action in that set and do the same steps assinging the color you chose for that maker! Rinse, lather and repeat...a thousand times! Lol! Then when you get to the next action maker, chose a different color. If you run out of colors like I did you can use default gray in between other colors to make the different makers stand out. Again the key is to be able to tell color wise each action set from each maker! Or it'll take you more time to browse through your actions in button mode defeating the purpose of button mode!
So now lets say you want to assign a short cut key to an action you use all the time or on every pic. I have a very basic all in one action I use now! I use it on EVERY photo!!! It's a high pass filter, strong S curve at low opacity {blend mode set to Luminosity} and a levels adjustment layer for the middtones. Since I use it on every photo I don't want to have to click on my actions panel every time. So I assinged a short cut key to it. Here's a screenshot of it...

So you go back into "Action Options" the exact same place you assigned your color. Now you use the Function Key drop down menu to choose what F key you want assigned to this action. They also give you the option to choose Shift and/or Ctrl. This helps if you run out of short cut keys. So for my action that I use on all my photos I assigned Ctrl-F9 since I have SO many already assigned! Then you click ok and that's it. Now while you are assigning your colors, if you come across an action you use all the time, then you can assign the color AND the short key at the same time. Another time saver. So now the 1st thing I do after I run an image through ACR and bring into PS is hit Ctrl-F9 and it runs that action for me. I never have to touch the actions panel to run this action...another time saver! And as you can see in my actions panel, I've assigned many short cut keys! I wrote them all down and have them on a piece of paper to remember them. I've got almost all of the memorized now but there are a few I don't use as often, so I sometimes have to refer to my little cheat sheet. So I HIGHLY suggest writing them down on a paper next to you until you have them memorized!
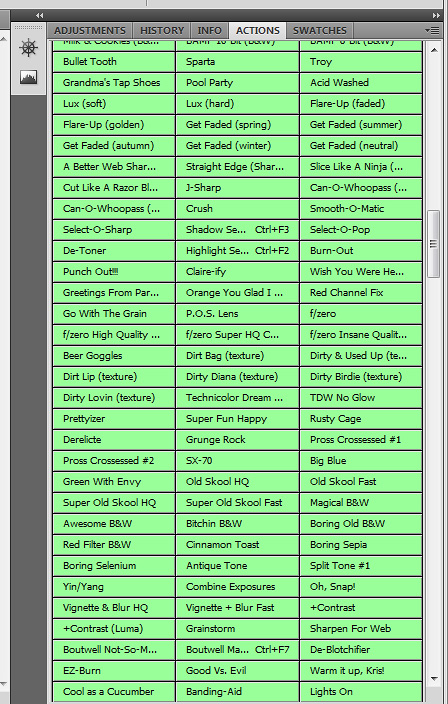
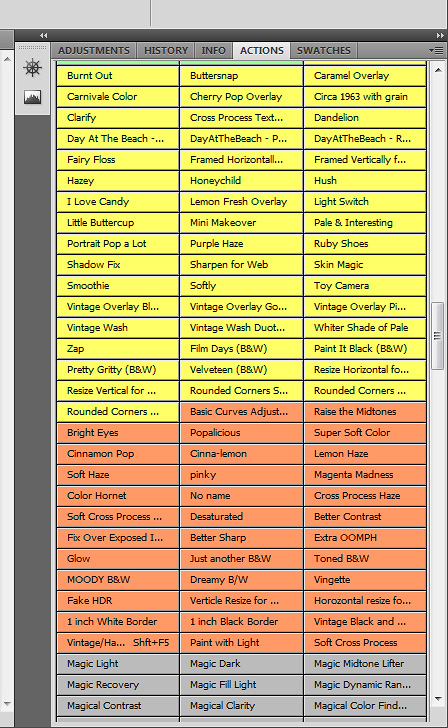
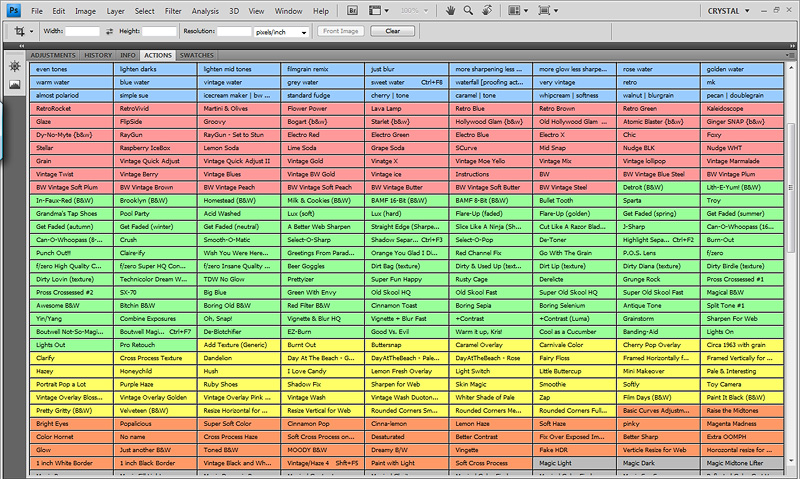
And that's the hard time consuming part. Now we are almost done. You noticed that when you clicked on the little arrow thinging the first option is Button Mode! So go back and select it! Now you are in button mode! Here is what my actions panel looks like now that I've got them all done...
Like I said I have a LOT of actions so it's a really long actions panel! Lol! So I did a few screenshots while scrolling down.
This is the top of my actions panel. 1st action is Damien's which really ROCKS! Then Florabella in gray then mine in purple...
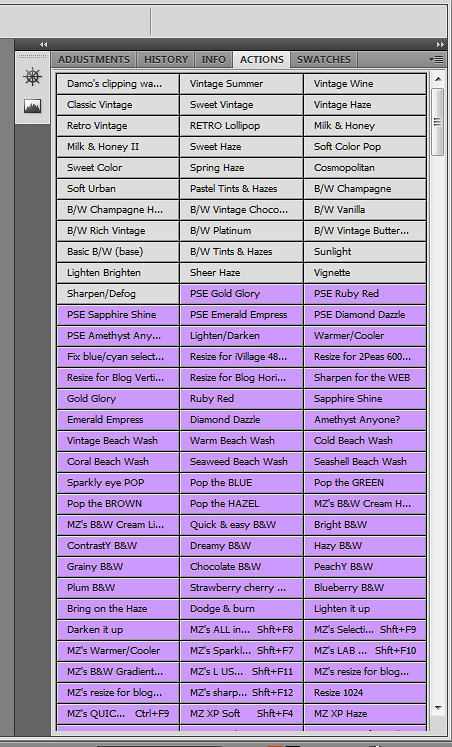
After mine I have Lily Blue's in blue and Red Leaf in red! Lol!
TRA in green...
Eye Candy in yellow, Ashley's McNarma's in orange and MCP in gray again...
And so on. And to show you the color differences and why it's so important I made my actions panel take up my whole workspace so you can see most of it! Sadly it still wouldn't all fit in my screen...lol...
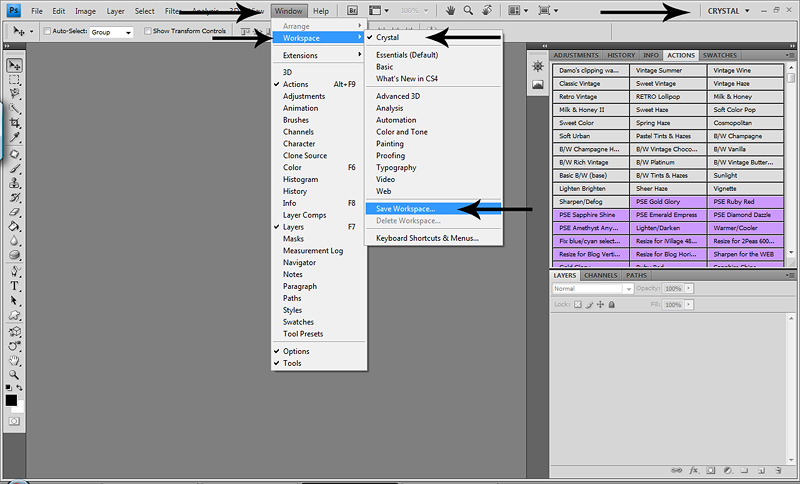
And one other quick thing I wanted to show you that is a huge time saver as well is setting up and saving your own workspace! We all process different and all have different workflows. I find myself using certain things for my workflow and some things I never used. My screen is only 15 in, so I need all the workspace I can get! So I started moving things around, using the Window tab up top to select the things I use and have them all tabbed up where the adjustment panel is. CS4 has an adjustment tab. Older versions do not. But you can still set it up to your liking. Here is my workspace...

Once you have it set up the way you like it go to Window>Workspace and select Save Workspace. It will give you a pop up menu and allow you to name it. You can see where mine is and it also puts the name you assign at the top right!
So now if I accidently move something {which happens if I'm working fast or the girls are running a muck all round me} or PS goes all wonky, all I have to do is go to Window>Workspace and click on the workspace I saved it's instantly back to MY workspace!
PS is such a powerful tool with so many different options. Some will be used and some won't. So to use it to it's fullest and get the most out of it without it ruling your life, it's important to learn all the little time saving things you can do and get it set up for you so that editing is faster, easier and more efficient. Every one's workspace will be different depending on what you use! This is just what works for me. Find your own way and then customize it so PS is working for YOU instead of you working for IT! Lol!
I hope this was helpful and as you can see, it's REALLY easy to do, just time consuming. Oh...one last tip for the day! Once you've made your changes, CLOSE PS then reopen. Because if you spend most of the day doing this and PS crashes on you, NONE of your changes will be saved and you'll have to start over!!!! Trust me...I KNOW! Lol! After it crashed and I lost all my work {luckily I was still doing it not completely done} I started closing PS down a couple times to save my progress! The first time I was about half way done. So I was NOT going to start over again! Lol! So close it down and reopen as you go to save yourself the headache of wasting half a day just to start over! :O)
So the first thing is to clean out any actions you do not use. We all know that we accumlate a LOT of actions...many wonderful free shares and some we've bought and just didn't care for! So the first thing I did was delete ALL sets and single actions I NEVER use. When I say delete, I mean just from my panel. They are still in a folder on my hard drive and backed up on disk! ALWAYS back up your actions, plugins, textures etc on disk!!! I have a few I only use once in a while, so I did leave those but moved them to the bottom of my panel. Then once you have your actions panel cleaned up, it's time to put it in order! Very easy and simple. Simply collapse the action folder then drag it where you want it. The ones you use the most should be at the top of your actions panel, then go in order of how often they are used! So all my Florabella actions are first, well actually Damien's hightlight/shadow action is first. Then after FB I have all of my actions. Then Lily Blue cause I use these A LOT...and so on! So far so easy! Here is a screenshot of what my actions panel looks like once I have them all on order.
Now comes the NOT so fun time consuming part! We are going to assign colors to each action set. The only thing that bugs me is that you cannot assign a color to the whole folder...you have to assign it to each and every action in the set! So it's takes a long time, especially if you have a lot of actions. But the time it takes is SO worth it! It took me almost a full afternoon to do it and I was really grumpy and annoyed at the process, but once it was done I was happy as a clam...if clams are actually happy! Lol! And while we are assinging colors to our actions, we can also assign short cut keys to our most used actions. I have just about every short cut key used for my actions that I use a LOT. It's a BIG time saver! :O)
The reason it is important to assign colors to your actions is so that you can quickly tell them apart by maker! I wish PS had more colors for this!
So for Damien's awesome action and FB's FAB actions, I left them at the default gray because I ran out of colors! Lol! Then I started with my actions. My favorite color is purple, so I assigned purple to ALL of my actions.
Here's how...
First start by opening the folder so that you can see all the actions. Then I click once on the first action in the set to highlight it. Then I click on the little arrow thingy and it gives me the following options. You want to click on "Action Options".
This is what you'll see...
So now you just click on the arrow for the drop down menu and select your color. The important part is that you use the same color for all the actions from the same maker. So ALL of my action sets are purple! The PITB now is that you HAVE to do this step for EACH individual action! So once you select your color for your first action, click ok then select the next action in that set and do the same steps assinging the color you chose for that maker! Rinse, lather and repeat...a thousand times! Lol! Then when you get to the next action maker, chose a different color. If you run out of colors like I did you can use default gray in between other colors to make the different makers stand out. Again the key is to be able to tell color wise each action set from each maker! Or it'll take you more time to browse through your actions in button mode defeating the purpose of button mode!
So now lets say you want to assign a short cut key to an action you use all the time or on every pic. I have a very basic all in one action I use now! I use it on EVERY photo!!! It's a high pass filter, strong S curve at low opacity {blend mode set to Luminosity} and a levels adjustment layer for the middtones. Since I use it on every photo I don't want to have to click on my actions panel every time. So I assinged a short cut key to it. Here's a screenshot of it...
So you go back into "Action Options" the exact same place you assigned your color. Now you use the Function Key drop down menu to choose what F key you want assigned to this action. They also give you the option to choose Shift and/or Ctrl. This helps if you run out of short cut keys. So for my action that I use on all my photos I assigned Ctrl-F9 since I have SO many already assigned! Then you click ok and that's it. Now while you are assigning your colors, if you come across an action you use all the time, then you can assign the color AND the short key at the same time. Another time saver. So now the 1st thing I do after I run an image through ACR and bring into PS is hit Ctrl-F9 and it runs that action for me. I never have to touch the actions panel to run this action...another time saver! And as you can see in my actions panel, I've assigned many short cut keys! I wrote them all down and have them on a piece of paper to remember them. I've got almost all of the memorized now but there are a few I don't use as often, so I sometimes have to refer to my little cheat sheet. So I HIGHLY suggest writing them down on a paper next to you until you have them memorized!
And that's the hard time consuming part. Now we are almost done. You noticed that when you clicked on the little arrow thinging the first option is Button Mode! So go back and select it! Now you are in button mode! Here is what my actions panel looks like now that I've got them all done...
Like I said I have a LOT of actions so it's a really long actions panel! Lol! So I did a few screenshots while scrolling down.
This is the top of my actions panel. 1st action is Damien's which really ROCKS! Then Florabella in gray then mine in purple...
After mine I have Lily Blue's in blue and Red Leaf in red! Lol!
TRA in green...
Eye Candy in yellow, Ashley's McNarma's in orange and MCP in gray again...
And so on. And to show you the color differences and why it's so important I made my actions panel take up my whole workspace so you can see most of it! Sadly it still wouldn't all fit in my screen...lol...
And one other quick thing I wanted to show you that is a huge time saver as well is setting up and saving your own workspace! We all process different and all have different workflows. I find myself using certain things for my workflow and some things I never used. My screen is only 15 in, so I need all the workspace I can get! So I started moving things around, using the Window tab up top to select the things I use and have them all tabbed up where the adjustment panel is. CS4 has an adjustment tab. Older versions do not. But you can still set it up to your liking. Here is my workspace...
Once you have it set up the way you like it go to Window>Workspace and select Save Workspace. It will give you a pop up menu and allow you to name it. You can see where mine is and it also puts the name you assign at the top right!
So now if I accidently move something {which happens if I'm working fast or the girls are running a muck all round me} or PS goes all wonky, all I have to do is go to Window>Workspace and click on the workspace I saved it's instantly back to MY workspace!
PS is such a powerful tool with so many different options. Some will be used and some won't. So to use it to it's fullest and get the most out of it without it ruling your life, it's important to learn all the little time saving things you can do and get it set up for you so that editing is faster, easier and more efficient. Every one's workspace will be different depending on what you use! This is just what works for me. Find your own way and then customize it so PS is working for YOU instead of you working for IT! Lol!
I hope this was helpful and as you can see, it's REALLY easy to do, just time consuming. Oh...one last tip for the day! Once you've made your changes, CLOSE PS then reopen. Because if you spend most of the day doing this and PS crashes on you, NONE of your changes will be saved and you'll have to start over!!!! Trust me...I KNOW! Lol! After it crashed and I lost all my work {luckily I was still doing it not completely done} I started closing PS down a couple times to save my progress! The first time I was about half way done. So I was NOT going to start over again! Lol! So close it down and reopen as you go to save yourself the headache of wasting half a day just to start over! :O)
So you may be wondering why would you want to use button mode?! Really it's just a time saver. I'm an organized person and it allows me to be more efficent and work faster. With your regular actions panel, you have to open each folder, then select the action you want to run then hit play! A few steps. With button mode ALL you have to do is scroll down and find the action you want to run and hit it! That's IT! Once you use it for a day or two you'll wonder how you lived without it! I will say that if you aren't familar with your actions, button mode can be harder to use. It took me a while to switch because I didn't know my actions well enough. Now that I know and have them in order, it's a BREEZE! So try it for a few days and you'll be IN LOVE!
If you have any questions, feel free to ask and I'll do my best to help! I am by NO means a PS pro. One of the reasons I haven't been posting much. I realize there is just too much I don't know yet to be teaching others! Lol! Reading Damien's posts have shown me that. So for now I'm sticking to posts like this and creative editing post, but nothing on clean processing or skin tones until *I* get better!
Happy Friday and I hope you all have a wonderful weekend! :O)
