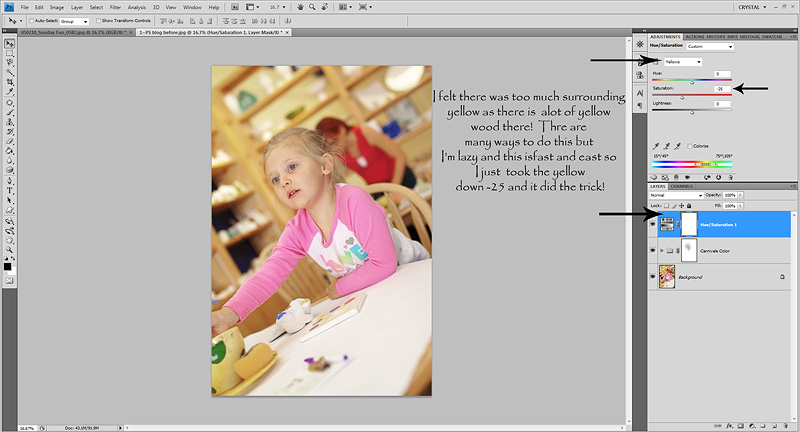
Before and after with new stuff I'm trying...
Wow..can you believe I'm actually posting! Lol! The more I learn the more I find out what I DON'T know. Which is the main reason why I haven't posted much. I haven't felt I've had anything to share and when you realize you don't know nearly as much as you thought you did..it makes you leery of teaching others! Lol! One reason why this blog is called "for FUN" tho. It truly was never a place to teach, but to share fun things I've learned! But I started posting some more serious color correcting tuts etc before I even got a great grasp on it. Not to say that those methods aren't good methods. Just that I probably shouldn't be teaching that important stuff and need to keep it more about the "FUN" stuff!
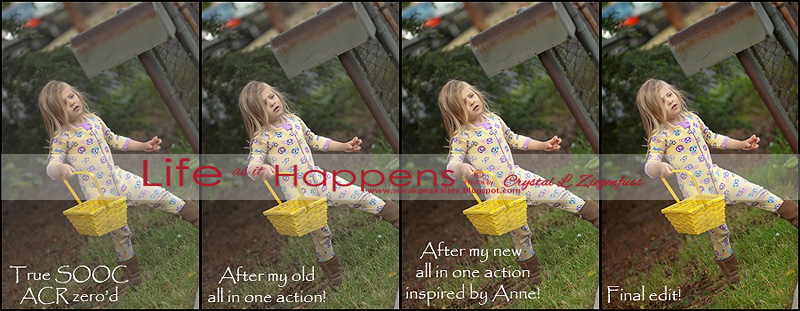
I've learned some things from Anne on 2Peas and have been playing around. And it's made a big impact on my editing. I was having a bad time with muddy colors and skin tones. Just blah and lifeless! So here is just a little peak at what a difference her methods {that I'll share a bit below and link you to her tut on 2Peas} have made! Much better than before and I'm learning that the true next step to stepping up my game and images is starting to mask more and working on specific parts of the image with different layers rather than just a couple all over adjustments. I think that's part of what separates those really rockin edits and mine. Well that and the fact that the images rock and mine are mostly snaps of my girls! I bet you missed how long winded I am..NOT! Ha! Okay...here they are...
I'm also trying a new method of doing most of the typing on the actual screenshot. For two reasons. One..it's just easier and more time efficient. It takes forever to do all the instructions in between the screenshots, two you can right click and save and will have the majority of the instructions right there and an extra...three...I can't talk quite as much on that little screenshot! Ha!
So here is a snap of Avyree at a place where you can paint your own ceramics and they fire them for you. It's for my mom for her bday! I'm in the process of editing the folder {my last of mine and I'm finally caught up..yay} and this one jumped out at me! The light was nice, focus was good and I was happy with the edit. So I thought I'd do a before/after with it!
So here is the zero'd out ACR SOOC. Just so you know and something I never thought about. When you load a RAW file into ACR, it's instantly no longer a SOOC image. ACR applies a medium contrast S curve, 50 brightness, 25 contrast and 5 blacks. That's the default. So it's already been slightly edited for you. Then bring it into PS and do your normal editing and you could end up with clipped shadows, blown highlights and an image that overall just has too much contrast which looks wonky, throws off your colors and enhances any color issues including reflected color casts! And not to mention that each image {even in the same lighting but different angles} may need different things. And if you changed your settings while shooting, that will also require different settings per shot! Soooooo....I now have my RAW saved to zero out everything on import! Sure it's ugly and gray BUT it allows me to see the image for what it really is...naked! Then I can really analyze what it REALLY needs and do my ACR adjustments for each image then go into PS! So when you see my SOOC example, you'll know it's a TRUE sooc image and as I've also learned, is pretty right on with a good SOOC RAW image! So that makes me happy!
Here is the before/after...
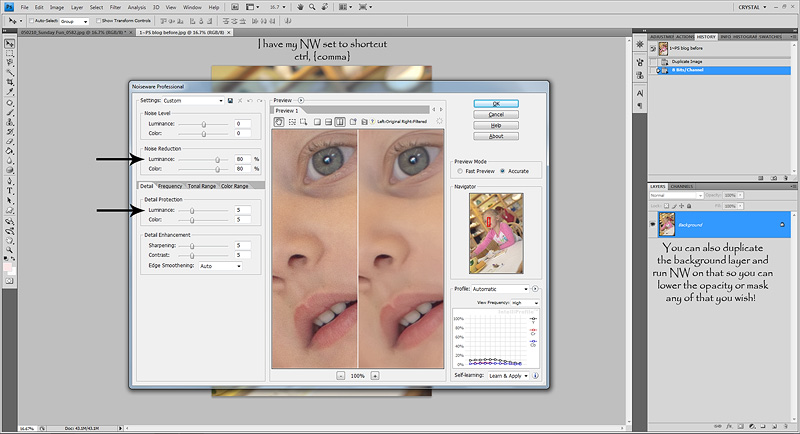
I'm also trying this new method from Anne about Noiseware. The theory is removing the noise without making the image too soft and silky also making the skin looked too smooth and plastic! To see the full tut about her clean post processing with some fun great extras to help you really pop your photos head over to 2Peas PhotoClassroom ~ Post Processing!
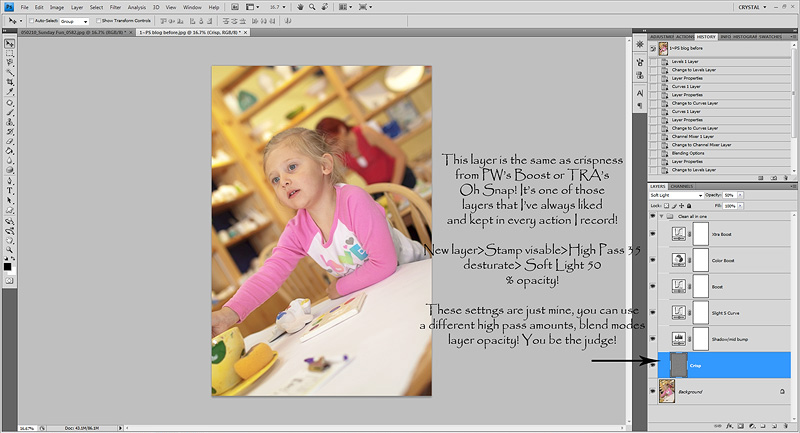
And here I went over each layer in my new action! So there are lots of screenshots but I know when you are beginning and just learning screenshots with specific settings are so important and give you a starting off point! :O)


Go check out Eye Candy Actions if you are interested in them!
Another tip for the cream layer, at 10-15% over a b/w can make a nice soft creamy b/w and it helps lift the shadows of a b/w too! :O) My b/w cream actions that I shared here use this layer on top at low opacity!

Check out Child's Play Actions if you are interested!
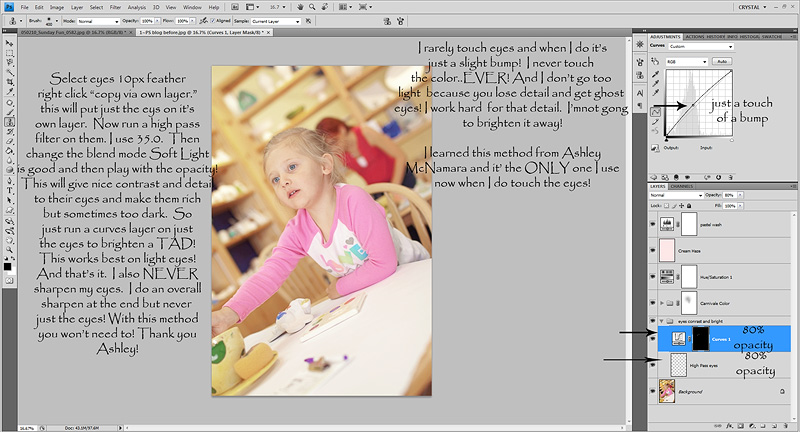
Check out Ashely McNamara's Tut for this method! Check out her blog! She's great and has a great photographers section, actions and tuts! :O) Oh...and I went a bit lighter on the eyes here than I normally would or did with my original edit. I was rushing since this was a re edit for the tut! Normally I'd lower the eye curves a bit more but I'm really freaking about over popped eyes! So even Avyree's in this after are a bit much for me!
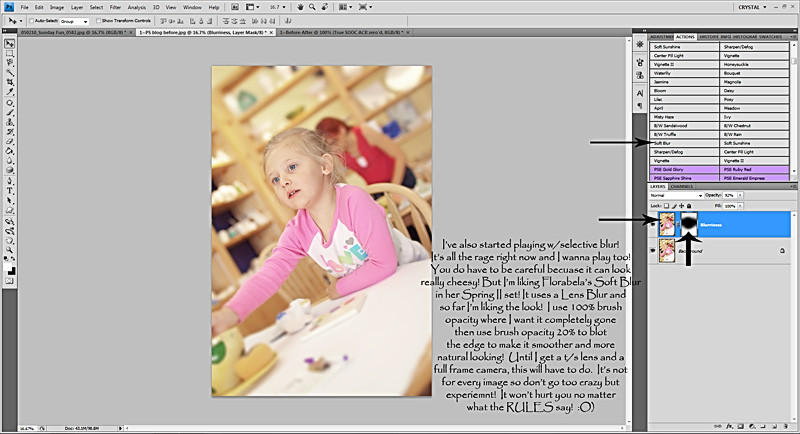
Florabella is my HERO and I LOVE her! I have everything she's sold and will buy everything she sells in the future! Lol! I have all 5 of her action sets and both of her texture sets and her textures are the only ones I use now! So you have to go check out her GOODS!
Then after I ran this and flattened I ran my Luminosity USM that I still use at the end of EVERY edit unless it's like crazy underexposed 3200 ISO! Lol! I lowered the opacity to 75%. I have a tut here on the blog on how to do the LUSM but am way too tired to search and still have to finish the editing I stopped to do this tut that took like 3 hours! Lol!
And after all of that...here is the after! :O) Isn't she a cutie!
And I actually have another post idea. It will be more random but with some fun tricks that I've learned for fun creative stuff! So hopefully in the next week or two I'll get it up!
Hope everyone is great and thanks for being so patient with me. Now that my 700 Idaho pics are done, 600 small wedding pics are done and 500 event pics are done and I'm on my last folder of personal files, maybe I'll be able to start posting again! Lol! I don't know how you girls do the biz thing, daily life and still get your own pics done, blog posts up etc etc! I bow down to you!
And a special THANK YOU to Anne on 2Peas. The amount of time she gives to us on the board is truly amazing. She's so gifted and generous with her knowledge. She truly wants to give back and help others learn how to get what they want out of their images. The amount that I've learned from her posts out number any classes I could ever take! And she does it simply for the goodness of her heart! So if you don't know about 2Peas...get your butt over there because it ROCKS and tell em Momaziggy sent you! Lol! Cause I rock like that! Teehee! Oh geeze...I need sleep!
Have a GREAT Friday and weekend!
I've learned some things from Anne on 2Peas and have been playing around. And it's made a big impact on my editing. I was having a bad time with muddy colors and skin tones. Just blah and lifeless! So here is just a little peak at what a difference her methods {that I'll share a bit below and link you to her tut on 2Peas} have made! Much better than before and I'm learning that the true next step to stepping up my game and images is starting to mask more and working on specific parts of the image with different layers rather than just a couple all over adjustments. I think that's part of what separates those really rockin edits and mine. Well that and the fact that the images rock and mine are mostly snaps of my girls! I bet you missed how long winded I am..NOT! Ha! Okay...here they are...
I'm also trying a new method of doing most of the typing on the actual screenshot. For two reasons. One..it's just easier and more time efficient. It takes forever to do all the instructions in between the screenshots, two you can right click and save and will have the majority of the instructions right there and an extra...three...I can't talk quite as much on that little screenshot! Ha!
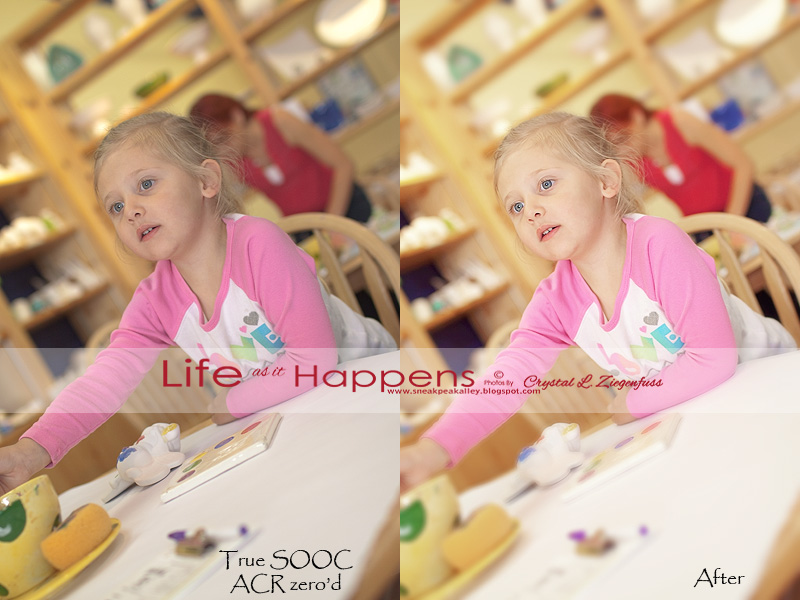
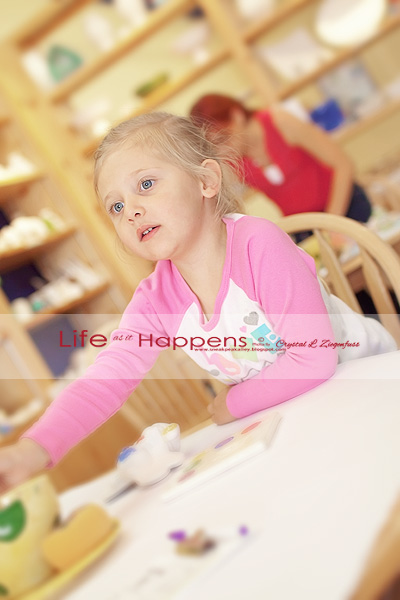
So here is a snap of Avyree at a place where you can paint your own ceramics and they fire them for you. It's for my mom for her bday! I'm in the process of editing the folder {my last of mine and I'm finally caught up..yay} and this one jumped out at me! The light was nice, focus was good and I was happy with the edit. So I thought I'd do a before/after with it!
So here is the zero'd out ACR SOOC. Just so you know and something I never thought about. When you load a RAW file into ACR, it's instantly no longer a SOOC image. ACR applies a medium contrast S curve, 50 brightness, 25 contrast and 5 blacks. That's the default. So it's already been slightly edited for you. Then bring it into PS and do your normal editing and you could end up with clipped shadows, blown highlights and an image that overall just has too much contrast which looks wonky, throws off your colors and enhances any color issues including reflected color casts! And not to mention that each image {even in the same lighting but different angles} may need different things. And if you changed your settings while shooting, that will also require different settings per shot! Soooooo....I now have my RAW saved to zero out everything on import! Sure it's ugly and gray BUT it allows me to see the image for what it really is...naked! Then I can really analyze what it REALLY needs and do my ACR adjustments for each image then go into PS! So when you see my SOOC example, you'll know it's a TRUE sooc image and as I've also learned, is pretty right on with a good SOOC RAW image! So that makes me happy!
Here is the before/after...
I'm also trying this new method from Anne about Noiseware. The theory is removing the noise without making the image too soft and silky also making the skin looked too smooth and plastic! To see the full tut about her clean post processing with some fun great extras to help you really pop your photos head over to 2Peas PhotoClassroom ~ Post Processing!
And here I went over each layer in my new action! So there are lots of screenshots but I know when you are beginning and just learning screenshots with specific settings are so important and give you a starting off point! :O)
Go check out Eye Candy Actions if you are interested in them!
Another tip for the cream layer, at 10-15% over a b/w can make a nice soft creamy b/w and it helps lift the shadows of a b/w too! :O) My b/w cream actions that I shared here use this layer on top at low opacity!
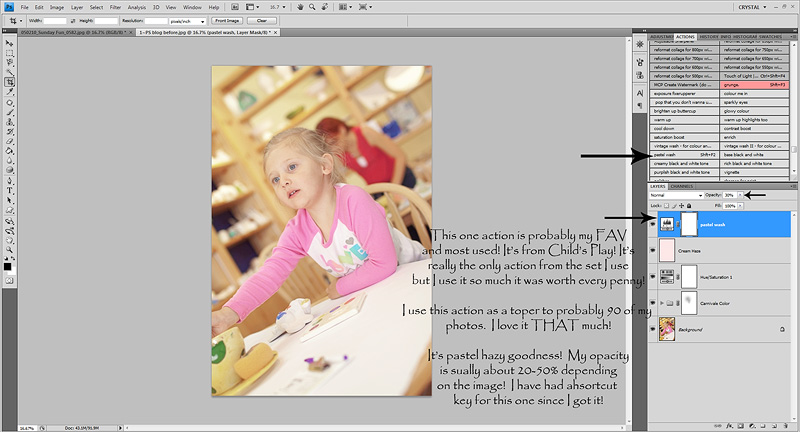
Check out Child's Play Actions if you are interested!
Check out Ashely McNamara's Tut for this method! Check out her blog! She's great and has a great photographers section, actions and tuts! :O) Oh...and I went a bit lighter on the eyes here than I normally would or did with my original edit. I was rushing since this was a re edit for the tut! Normally I'd lower the eye curves a bit more but I'm really freaking about over popped eyes! So even Avyree's in this after are a bit much for me!
Florabella is my HERO and I LOVE her! I have everything she's sold and will buy everything she sells in the future! Lol! I have all 5 of her action sets and both of her texture sets and her textures are the only ones I use now! So you have to go check out her GOODS!
Then after I ran this and flattened I ran my Luminosity USM that I still use at the end of EVERY edit unless it's like crazy underexposed 3200 ISO! Lol! I lowered the opacity to 75%. I have a tut here on the blog on how to do the LUSM but am way too tired to search and still have to finish the editing I stopped to do this tut that took like 3 hours! Lol!
And after all of that...here is the after! :O) Isn't she a cutie!
And I actually have another post idea. It will be more random but with some fun tricks that I've learned for fun creative stuff! So hopefully in the next week or two I'll get it up!
Hope everyone is great and thanks for being so patient with me. Now that my 700 Idaho pics are done, 600 small wedding pics are done and 500 event pics are done and I'm on my last folder of personal files, maybe I'll be able to start posting again! Lol! I don't know how you girls do the biz thing, daily life and still get your own pics done, blog posts up etc etc! I bow down to you!
And a special THANK YOU to Anne on 2Peas. The amount of time she gives to us on the board is truly amazing. She's so gifted and generous with her knowledge. She truly wants to give back and help others learn how to get what they want out of their images. The amount that I've learned from her posts out number any classes I could ever take! And she does it simply for the goodness of her heart! So if you don't know about 2Peas...get your butt over there because it ROCKS and tell em Momaziggy sent you! Lol! Cause I rock like that! Teehee! Oh geeze...I need sleep!
Have a GREAT Friday and weekend!
