I'm back with Part 2 on why I shoot RAW. Today I'm just going to go over the basic tab in ACR. I grabbed Haylee right after school and took three shots. The first will be basic good exposure which means good skin tones! :O) The second I purposely under exposed a bit. The third I took in my bathroom which has almost no natural light and had both of my overhead lights on. And I show you the steps for each in ACR and include a final edit.
***my normal disclaimer...I'm not a pro! Just a MWAC who loves taking snaps and loves editing. I will also say that I am still not great at color correcting. I'm still learning. I still do it by eye and not numbers, but I am learning little bits. My goal is to know how to edit by numbers so I have a good foundation and starting off point and then be able to adjust to taste after. My last example is not the best and does still need some work. But I have to find some balance and if I go through everything and pick it apart, I'll never hit the power button on my laptop! Ha! I'm also due to re calibrate, so my colors are a bit off right now. Also know that I'm not a super picky person. I'm okay with some things that others are not. I don't over analyze my shots and pick them apart. Okay I do, but then I get over myself and just edit to what *I* like. Okay...end of excuses...I mean disclaimer***
I still prefer to do the bulk of my editing in CS4. I like the control of layers. I use ACR for a few very important things. WB, Exposure & recovery. For me, it's a way to get my image as clean and correct as possible so I can go into CS4 to enhance. When I have a good SOOC shot, I do less in ACR. When I have a mess of a shot, I do a lot more in ACR. But I always do the good stuff in CS4. So there is much much more that ACR can do for you if you want to. I will go over some of the more advanced and extra tools that ACR has in post three. That is probably about 2 weeks away.
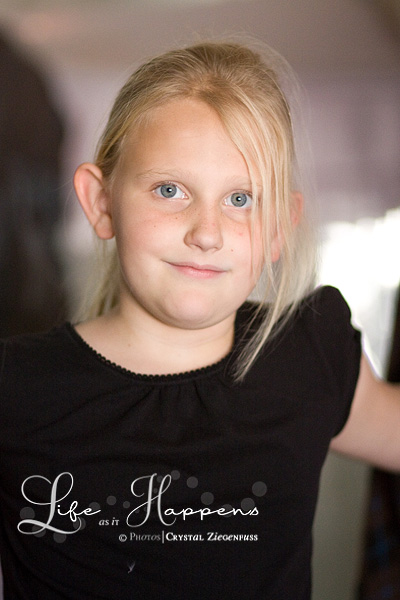
So here is number 1. Not the best but the overall exposure is good. The only blown section is a reflection on the mirror behind her. So I'm not too worried about that. And taking the time to set up the shot and reposition could've completely removed that element in the image. But I'm not keeping any of these images. Just for the blog...lol.
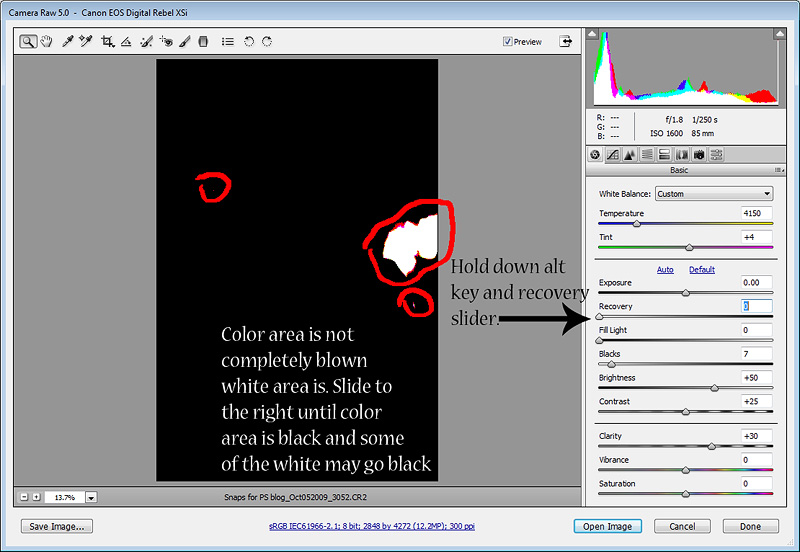
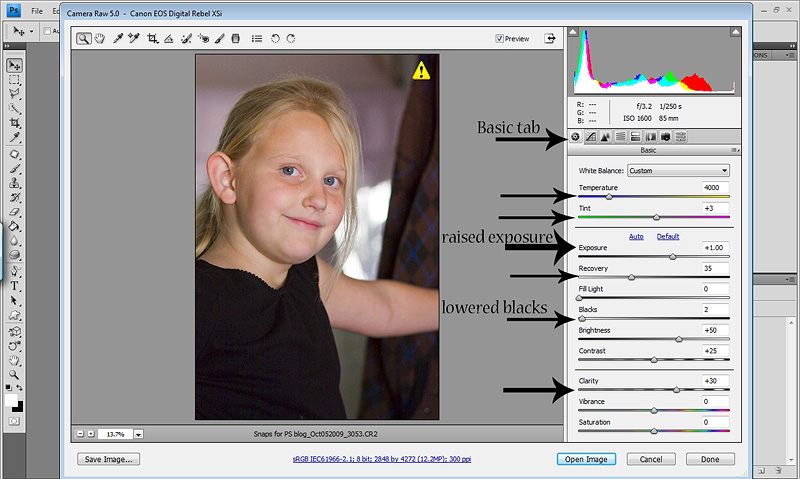
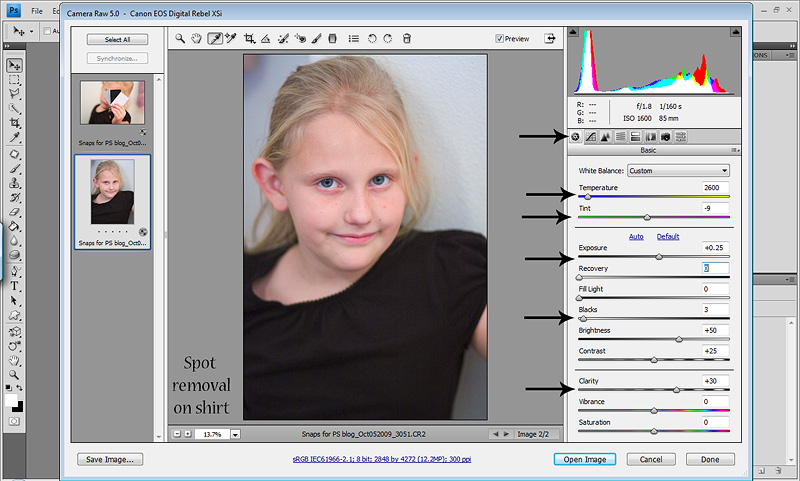
So I opened my RAW file into ACR. Here is the screenshot...

As you will see, the little circle is the Basic tab.
*The first thing I did was adjust the WB to get her skin tone a bit more close. The top slider is your temperature. If you slide to the left it will add blue (cool) and if you slide to the right it will add yellow (warm). This is for overall WB which is global and not to be confused with selective color casts. This is pretty close to what she looks like IRL. When shooting in natural light (no indoor lights on) your WB will be much more accurate. Shooting in the shade can be a bit cool and need some warming up. Shooting at sunset may be too warm and need some cooling. But overall, AWB in good clean natural light is pretty accurate.
*Then I held down my alt key and clicked on the recovery slider to check where I'm blowing any highlights. As you can see in the screenshot below, anywhere you see color you are blown but not completely. Where you see white you are completely blown. You can usually recover the color areas very nicely but will have less luck with the white sections. You also have to gauge what is important in the shot. The recovery slider attempts to bring down the brightness in your highlights, in return giving you back some detail in your highlights. If it's completely blown, there are no pixels to bring back. If you slide too far to the right the image will start to go gray. So don't go too far. And since there are no blown areas on her skin, I go far enough to the right to get some detail back in the blown section, but not too far that I make the image muddy. Here is the screenshot of the recovery slider while holding down the alt key. I should also say (hate when I forget things in the screenshots) that if you look at the histogram on the top right of the screen, there are two arrows at each top corner. The top left is for shadows and the top right is for highlights. If you click on either, they will warn you when you are clipping either. It will show up directly on your image. Try it. Click on both to see how it looks. I personally prefer to alt click on the slider itself because I find the clipping warning on the image to be a bit annoying. If you like it, leave it on. If you don't, just click each again and it will turn the warning off.
*Then (I will be saying then a LOT) I go to the blacks slider. Since her shirt is black, I don't want to go too dark and lose all detail there! So I only bumped it from 5 to 7.
*Now I use the clarity slider. I use this on most images. I never go over 30 on people shots. Many might say that's even too much. Basically the clarity slider acts as a defog. It makes your images appear more sharp without actually sharpening the pixels. It will add contrast and if done with a heavy hand will leave you with a harsh over contrastY image. I like typing contrastY! :O)
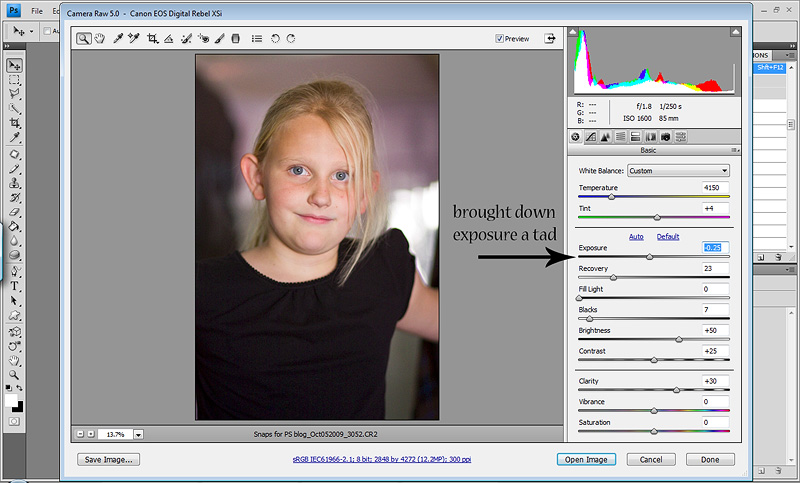
After looking at the shot I decided to bring down the exposure just a tad. Knowing that when I pull it into CS4 to finish it up, I don't want to have to mask a bunch of layers preventing blown skin. But I make sure not to bring down the exposure so much that I undo the WB work by going too dark. Under exposed images will appear muddy as well. Here is the exposure slider after bringing it down a tad...
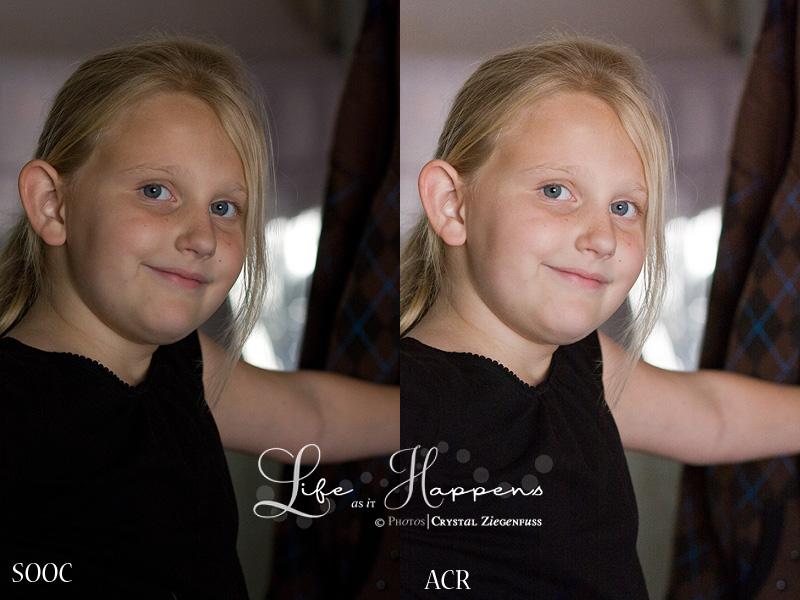
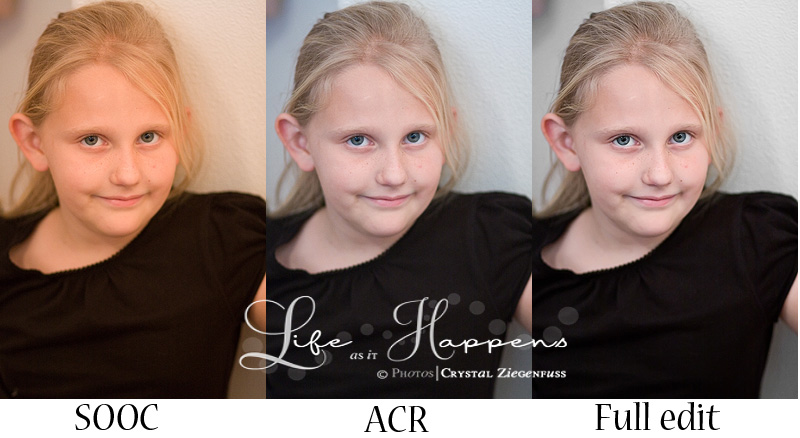
I also used the spot removal brush to remove the feather from her pillow off her shirt. But I forgot to add that screenshot. Oops. It's also easily done in PS with the patch tool...my personal favorite! But I'll also go over the spot removal tool in post three, so I'm not too worried about it now. Lol! For this image, that was all I did in ACR. And here is the SOOC & ACR only edit side by side...
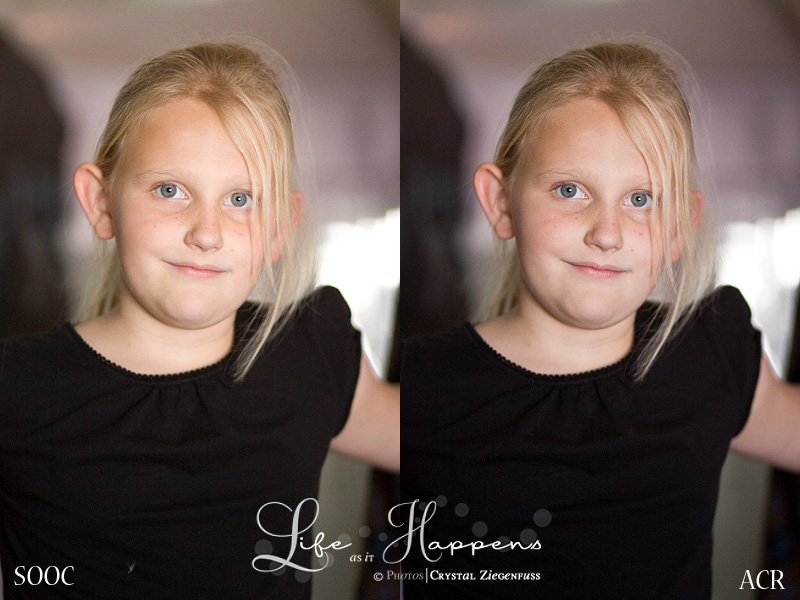
I'm pretty happy with this edit so far. My main goal is to make sure her skin tone looks balanced and real. I want to make sure I'm not blowing sections of the image. Then the blacks & clarity give it a bit of pop. I will from time to time use the Vibrancy slider if it's an outside shot with lots of color and scenery. I never use the saturation slider. It can go neon and unnatural very quickly. The Vibrancy slider takes colors that are dull in the image and brings them to life while leaving the properly saturated colors alone. I use it a lot of macro/still/landscape type shots. And I will go higher on the clarity slider for those type of shots as well.
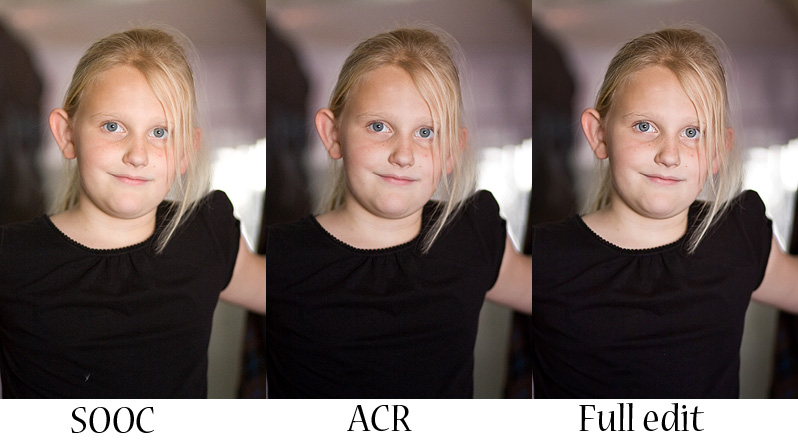
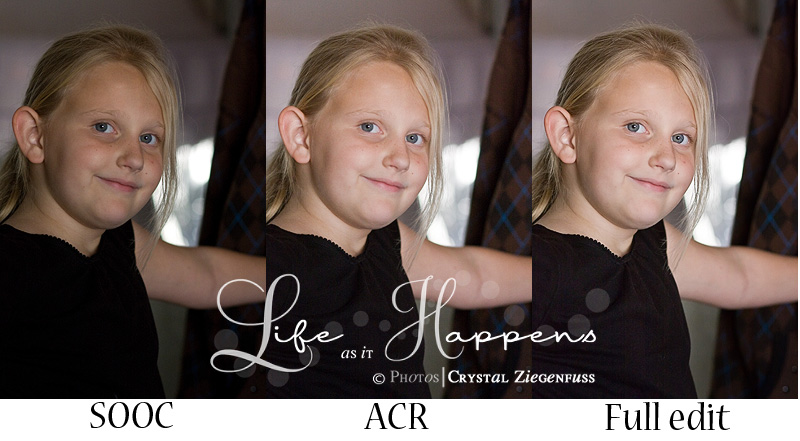
And here is the image after having a quick run through CS4 for a standard edit...
Here is the shot I purposely under exposed. I didn't go too far because with everything in life, ACR has it's limits. But with that said, it can really clean up a shot worse than this...trust me!
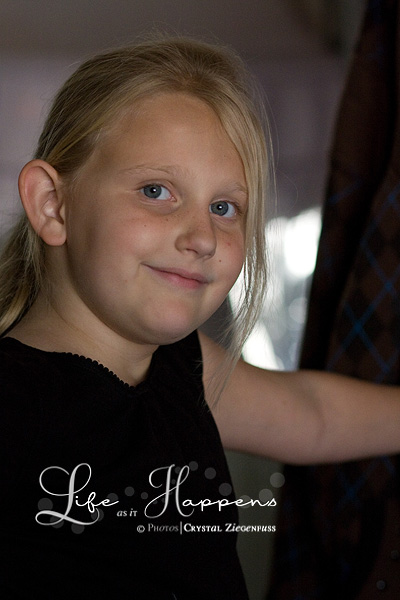
You can see what under exposure does to skin tones. Not pretty. And it adds more noise. These were shot at ISO 800 which on my camera is bad enough. But now with the under exposure, the noise is even worse. One of the many reasons it's so important to get it as close to correct/perfect in camera.
Here is my ACR screenshot and it's not too different than the first. I do the same basic steps with just about every image...
Still in the basic tab the first thing I do is up the exposure. Watching that I don't wash out the image or blow any highlights. Then I start working on the WB. I use the temp & tint slider to get it where I want it. You can also try the drop down menu and select a preset. Most times tho, you will still need to slide a bit with the presets. I used the recovery slider again to lessen some of the blowouts in the background. But again it's not on her skin, so I'm not going too far to the right. I brought the blacks slider back to keep some detail in her shirt. On normal shots, I usually up the blacks slider to about 10, a bit more if it's a very flat image or has a lot of background and colors I want to be richer. Then I upped the clarity slider a bit! I rarely play with any of the other sliders. Once in a while I'll bump up the fill light slider, but most times I do it in CS4 with a curves layer and black mask, then paint where I want it. What can I say...I LOVE layers!
And here is the SOOC & ACR only...
As you can see, there is a big improvement over the SOOC shot. The exposure and WB look much better now.
And after a quick standard edit in CS4...
Now for the NOT so fun example. I will say in advance, I'm not happy with my final edit and think it's needs some color work. But I need to go to bed to get up at 5am and exercise for 2 hours, so I'm leaving it as is! Ha!
Here is the shot taken in my icky bathroom with 2 overhead lights on...
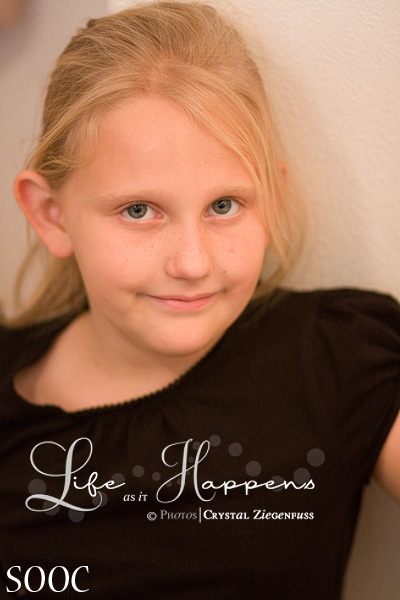
And because I shoot in RAW, I shoot with a AWB. Can you say BLECH! So the first thing I did was take a shot of my gray card, then took the shot of Haylee. I will use this to get my WB to a more accurate color.
So I open both shots in ACR. The first shot as you'll see is Haylee looking quite annoyed while holding my gray card! Oh kids! Right below that you will see the actual shot. Here is the screenshot and below I'll go over what I did step by step...
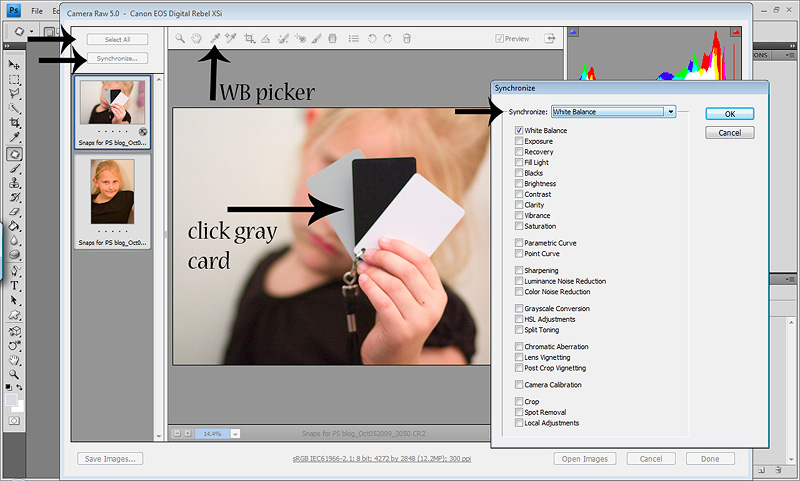
The first thing I did was select the WB picker tool on the top bar. Then I clicked on the gray card. There is an instant difference. It's not perfect, but much closer to what I want. Then I use the temp & tint slider to get it where I want it. Also knowing that I will be working in layers to polish it in CS4. So I am mainly looking at her overall skin tone, whites of her eyes etc and the wall behind her. I also know that because I have tungsten lights on, the wall won't be perfect and I'll clean it up in CS4 with layer masks. Then once I have the WB where I want it I hit Select All, then Synchronize. A pop up menu comes up allowing me to choose what options to sync. Right now I'm only worried about WB. So I click that and ok. Instantly the WB is copied onto the actual shot of her. Now I click on the shot of her and go to work. Here is the screenshot...
I brought the exposure up a bit and didn't need the recovery slider. I brought the blacks slider down a bit to keep some detail in her black shirt and upped the clarity slider a bit. And now I have a much cleaner more accurate image to bring into CS4. Not perfect mind you, but it's MUCH better. See for yourself...

Now her skin isn't glowing, the whites of her eyes are white and the wall, with the exception of the blue/cyan color cast (that I always have ugh) look like they do IRL. I did however make this image too cool. I will have my hand at this image again tomorrow because now it is the thorn in my side. I think I'll be trying my NEW MCP Bag of tricks action set! Teeehee! If anyone can fix this shot...Jodi's actions can! Have I told you just how ECSTATIC and GRATEFUL I am to have won them! THANKS AGAIN JODI! Okay...back to regular scheduled programing...
Now after my crappy edit in CS4...
And remember that although WB is VERY important, there is also room for personal preference. Some people like their skin tones warmer, some cooler. As long as you don't have a lemon or lobster there is some room for personal taste. Know HOW to correct it, then make it your own. And please do not do what I've done and still do on occasion and did with the bathroom shot and try to over correct skin tones. When you are first learning, you tend to try to find casts where they may not exist and try so hard to correct one issue that you create 10 more...like I did above. Lol!
So that's it for today. Those are the basic steps I personally do in ACR and why I love RAW so much. As you can see in the last shot, editing that mess in PS directly would've been a disaster and the final image would not be NEARLY as nice and clean if shot in JPEG. And you aren't masking for hours on tons of different layers. I actually attempted to edit the converted SOOC jpeg and gave up after about 2 layers. Also remember that you CAN open a jpeg in ACR. You won't have nearly the amount of control had you shot in RAW nor the cleaner final image. But it's still MUCH MUCH MUCH better than if you bring the jpeg straight into PS. If you are too scared to jump into RAW, then start opening your jpegs in ACR to get a feel for it. Then once you've got your feet wet you can switch that dial on your camera!
If you have any questions, PLEASE don't hesitate to ask. And please excuse the color of the screenshots. They are always a bit wonky when loaded! I'll do my best to answer any questions this week. But I'm going to Vegas for the US Open this weekend to watch my Stewart! WAHOO! So I'll be a bit busy this week getting the girls & I packed...laundry etc!
Hope everyone is having a GREAT week!