Hi & welcome to my PS blog! This blog is for full PS although some steps will also work in PSE. Most actions, unless stated are not PSE compatiable. I do try to make an action for PSE from time to time. I hope you have fun here and learn some things along the way. If you have any questions, just drop me a comment! :O)

Thursday, December 17, 2009

Found some GREAT FREE actions....

I admit to being an action snob! I have a lot of really good pay actions that cover all my needs. So it's rare that I find a set of free actions that I actually USE! But I was really happy with these actions and wanted to pass them along. They sadly will not work with PSE...sorry!

Here is an example of "Portrait Snap, Crackle & Pop". I LOVE the Portrait Snap layer. I rarely push colors because I like soft muted tones and washy type edits. But this is perfect for slightly popping colors in portraits without making the skin go neon and masking like crazy. It's soft, subtle and most important...a CLEAN color pop.

A snap of my little Nugget with her Gummy Vitamins stuck on her face. She told me it's her mole! Ha!


As you can see, it's very soft and subtle. Look at the pink in her PJ's and the mole {lol} and you'll see a very nice clean subtle NON neon pop and her skin still looks great. I ran the action as is and didn't touch a layer, opacity and no masking!

So if you want to download them and try them for yourself, just go to Catching Sand Photography Blog and download them. Make sure to say Thanks on your way out and I hope you enjoy them! :O)

Happy Holidays and thanks for being patient with me and my lack of posting!

Friday, December 4, 2009

I'm sorry....

that I've neglected this blog! It was never my intention. I'm in an editing rut the size of Texas with a spork to dig my way out! Ha! So I've had nothing new and exiciting to share! I keep thinking of things to post but I'm just so blah about editing right now! So please allow me to apologize for not posting in a while! As soon as I have some inspiration again I'll post! Happy Holidays!

Thursday, November 26, 2009

Canon XSi & accessories for sale...

****SOLD****
I've upgraded to the 50D thanks to my dear husband. So I'm ready to sell my XSi and accessories.

I'm selling everything for $675.00 and if you don't want the 18-55mm kit lens, I will sell it for $600. I have all boxes and everything that came with all items. I have the date written on each box when I purchased it. I bought the XSi June 30, 2008. Everything is in PERFECT condition. Always stored in my camera bag in a cabinet.

Items included are...

XSi and Canon battery grip including 2 Canon batteries
EF-s 18-55mm lens {optional}
Canon RC-1 wireless remote
2 8GB Kingstons SDHC cards
1 4GB PNY SDHC card
1 4GB Kodak SDHC card
1 2GB Kodak SD card
XSi field guide book by David Busch

I won't be parting anything out with the exception if you don't want the kit lens. Everything else will be sold together. Price firm.

Here are some pictures I snapped quickly this morning. I did not take pictures of the 5 memory cards, but they will be included.


If you are interested please leave me a comment or email me at momaziggy @ yahoo . com. If you are in So Cal we could meet. I will also be putting it up on CL Monday. Everything I've put on CL has sold in the first couple days, so hurry if you are interested. If you email me I can give you my phone number so we can talk over the phone if you'd like.

Friday, October 23, 2009

PSE & full PS B&W Cream action...

Are you tired of dull gray b&w conversions or conversions that are too blue? Well this action may help you. I personally do not care for gray b&w's most of the time & I truly dislike blue b&w conversions. This action is a simple action with only 3 layers. This action will give you a clean, bright white b&w. Yet it will keep the details in your darks without washing them out. It will lift the darks yet keep them rich. This works great on darker images, or subjects with darker hair. It will lift the highlights in the darker hair giving nice detail while still keeping the richness in the hair. This is now my go to b&w conversion.
Since I recorded this with PSE in mind, it is not a set but a single action and it will not group the layers in a folder since PSE does not have folders. If you are using full PS and really want the folder, start recording a new action, then hit play on this action in your layers panel (you will have to keep the original in your panel for this to work) then once my action runs, select all the layers from my action, hit ctrl/g to group the layers into the folder and stop recording. Now you'll have an action that does my steps but groups them into a folder. I'm a folder freak, so it may be worth the time to do if you are an odd ball like me! Lol!

Here are some examples.

Nugget after eating strawberries this morning. Yes, I leave the food on the faces of my girls. I like to keep it real! Lol!


And here is after the conversion and tweaking the layers...


Here is another example. Obviously this is not SOOC. But it also shows you that you can run this on an already edited image and still get a great result...


I did mask the lighten layer at 50% opacity out of the image on the left because it was already pretty bright....


Some detail shots that I edited... {oops, forgot to resize}


the action with the layers tweaked just a little...

A few options that are fun to try with this actions is...
*For a nice creamy bright color edit, run the action and turn off the b&w layer
**Lower the b&w layer for a creamy fadded look
***For a deeper rich more urban creamy look, change the blend mode of the b&w layer to soft layer and play with layer opacity....lowering it to around 30% or lower usually
**** For a brighter more washed out creamy look, change the blend mode of the b&w layer to screen and lower the opacity also to around 30% or so.
*****And of course with any action, play with all the layers until you have the desired look. Make sure to play with the Lighten layer if it's too bright, or raise it if it's still too dark and if the cream is too much, lower the opacity!
So give it a try and tell me what you think! Download the zipped file HERE! I included the atn, png & psd so that it can be used in all PSE versions. If you have any questions, please let me know.

Friday, October 16, 2009

Looking ahead...next couple of posts...

Hi everyone! I just wanted to check in and let you know the next 2 posts I have lined up. I'm working on the RAW Part 3, the final of my little RAW series and I also was the LUCKY winner of MCP's new action set...Magic bag of tricks. So I will of course be doing a review on her new set. It truly is amazing and a MUST HAVE! Her best set yet! So that is what is in the works. I'm second shooting a wedding with a friend this weekend, so I HOPE to have a new post next week...not sure which of the 2 it will be yet! So please stay tuned! Hope everyone has a great weekend! And since no post is complete without a pic...here are some I took in Vegas last weekend...


Tuesday, October 6, 2009

Winner of my PSP9 editing software is...

***Sharon aka SGiles***


There were 7 entries and I had Haylee choose a number between 1 & 7 and she picked 5! So Sharon you win! Email me your address to momaziggy @ yahoo . com and I will get the program out to you before Friday! Congrats and I hope it helps you get started the way it helped me!
Sorry it took me so long to post this. I've been editing all day and the time got away from me!
CONGRATS! :O)

Monday, October 5, 2009

Why I shoot RAW ~ Part 2...

I'm back with Part 2 on why I shoot RAW. Today I'm just going to go over the basic tab in ACR. I grabbed Haylee right after school and took three shots. The first will be basic good exposure which means good skin tones! :O) The second I purposely under exposed a bit. The third I took in my bathroom which has almost no natural light and had both of my overhead lights on. And I show you the steps for each in ACR and include a final edit.

***my normal disclaimer...I'm not a pro! Just a MWAC who loves taking snaps and loves editing. I will also say that I am still not great at color correcting. I'm still learning. I still do it by eye and not numbers, but I am learning little bits. My goal is to know how to edit by numbers so I have a good foundation and starting off point and then be able to adjust to taste after. My last example is not the best and does still need some work. But I have to find some balance and if I go through everything and pick it apart, I'll never hit the power button on my laptop! Ha! I'm also due to re calibrate, so my colors are a bit off right now. Also know that I'm not a super picky person. I'm okay with some things that others are not. I don't over analyze my shots and pick them apart. Okay I do, but then I get over myself and just edit to what *I* like. Okay...end of excuses...I mean disclaimer***

I still prefer to do the bulk of my editing in CS4. I like the control of layers. I use ACR for a few very important things. WB, Exposure & recovery. For me, it's a way to get my image as clean and correct as possible so I can go into CS4 to enhance. When I have a good SOOC shot, I do less in ACR. When I have a mess of a shot, I do a lot more in ACR. But I always do the good stuff in CS4. So there is much much more that ACR can do for you if you want to. I will go over some of the more advanced and extra tools that ACR has in post three. That is probably about 2 weeks away.

So here is number 1. Not the best but the overall exposure is good. The only blown section is a reflection on the mirror behind her. So I'm not too worried about that. And taking the time to set up the shot and reposition could've completely removed that element in the image. But I'm not keeping any of these images. Just for the blog...lol.


So I opened my RAW file into ACR. Here is the screenshot...


As you will see, the little circle is the Basic tab.

*The first thing I did was adjust the WB to get her skin tone a bit more close. The top slider is your temperature. If you slide to the left it will add blue (cool) and if you slide to the right it will add yellow (warm). This is for overall WB which is global and not to be confused with selective color casts. This is pretty close to what she looks like IRL. When shooting in natural light (no indoor lights on) your WB will be much more accurate. Shooting in the shade can be a bit cool and need some warming up. Shooting at sunset may be too warm and need some cooling. But overall, AWB in good clean natural light is pretty accurate.

*Then I held down my alt key and clicked on the recovery slider to check where I'm blowing any highlights. As you can see in the screenshot below, anywhere you see color you are blown but not completely. Where you see white you are completely blown. You can usually recover the color areas very nicely but will have less luck with the white sections. You also have to gauge what is important in the shot. The recovery slider attempts to bring down the brightness in your highlights, in return giving you back some detail in your highlights. If it's completely blown, there are no pixels to bring back. If you slide too far to the right the image will start to go gray. So don't go too far. And since there are no blown areas on her skin, I go far enough to the right to get some detail back in the blown section, but not too far that I make the image muddy. Here is the screenshot of the recovery slider while holding down the alt key. I should also say (hate when I forget things in the screenshots) that if you look at the histogram on the top right of the screen, there are two arrows at each top corner. The top left is for shadows and the top right is for highlights. If you click on either, they will warn you when you are clipping either. It will show up directly on your image. Try it. Click on both to see how it looks. I personally prefer to alt click on the slider itself because I find the clipping warning on the image to be a bit annoying. If you like it, leave it on. If you don't, just click each again and it will turn the warning off.


*Then (I will be saying then a LOT) I go to the blacks slider. Since her shirt is black, I don't want to go too dark and lose all detail there! So I only bumped it from 5 to 7.

*Now I use the clarity slider. I use this on most images. I never go over 30 on people shots. Many might say that's even too much. Basically the clarity slider acts as a defog. It makes your images appear more sharp without actually sharpening the pixels. It will add contrast and if done with a heavy hand will leave you with a harsh over contrastY image. I like typing contrastY! :O)

After looking at the shot I decided to bring down the exposure just a tad. Knowing that when I pull it into CS4 to finish it up, I don't want to have to mask a bunch of layers preventing blown skin. But I make sure not to bring down the exposure so much that I undo the WB work by going too dark. Under exposed images will appear muddy as well. Here is the exposure slider after bringing it down a tad...


I also used the spot removal brush to remove the feather from her pillow off her shirt. But I forgot to add that screenshot. Oops. It's also easily done in PS with the patch tool...my personal favorite! But I'll also go over the spot removal tool in post three, so I'm not too worried about it now. Lol! For this image, that was all I did in ACR. And here is the SOOC & ACR only edit side by side...


I'm pretty happy with this edit so far. My main goal is to make sure her skin tone looks balanced and real. I want to make sure I'm not blowing sections of the image. Then the blacks & clarity give it a bit of pop. I will from time to time use the Vibrancy slider if it's an outside shot with lots of color and scenery. I never use the saturation slider. It can go neon and unnatural very quickly. The Vibrancy slider takes colors that are dull in the image and brings them to life while leaving the properly saturated colors alone. I use it a lot of macro/still/landscape type shots. And I will go higher on the clarity slider for those type of shots as well.

And here is the image after having a quick run through CS4 for a standard edit...


Here is the shot I purposely under exposed. I didn't go too far because with everything in life, ACR has it's limits. But with that said, it can really clean up a shot worse than this...trust me!


You can see what under exposure does to skin tones. Not pretty. And it adds more noise. These were shot at ISO 800 which on my camera is bad enough. But now with the under exposure, the noise is even worse. One of the many reasons it's so important to get it as close to correct/perfect in camera.

Here is my ACR screenshot and it's not too different than the first. I do the same basic steps with just about every image...


Still in the basic tab the first thing I do is up the exposure. Watching that I don't wash out the image or blow any highlights. Then I start working on the WB. I use the temp & tint slider to get it where I want it. You can also try the drop down menu and select a preset. Most times tho, you will still need to slide a bit with the presets. I used the recovery slider again to lessen some of the blowouts in the background. But again it's not on her skin, so I'm not going too far to the right. I brought the blacks slider back to keep some detail in her shirt. On normal shots, I usually up the blacks slider to about 10, a bit more if it's a very flat image or has a lot of background and colors I want to be richer. Then I upped the clarity slider a bit! I rarely play with any of the other sliders. Once in a while I'll bump up the fill light slider, but most times I do it in CS4 with a curves layer and black mask, then paint where I want it. What can I say...I LOVE layers!

And here is the SOOC & ACR only...


As you can see, there is a big improvement over the SOOC shot. The exposure and WB look much better now.

And after a quick standard edit in CS4...


Now for the NOT so fun example. I will say in advance, I'm not happy with my final edit and think it's needs some color work. But I need to go to bed to get up at 5am and exercise for 2 hours, so I'm leaving it as is! Ha!

Here is the shot taken in my icky bathroom with 2 overhead lights on...


And because I shoot in RAW, I shoot with a AWB. Can you say BLECH! So the first thing I did was take a shot of my gray card, then took the shot of Haylee. I will use this to get my WB to a more accurate color.

So I open both shots in ACR. The first shot as you'll see is Haylee looking quite annoyed while holding my gray card! Oh kids! Right below that you will see the actual shot. Here is the screenshot and below I'll go over what I did step by step...


The first thing I did was select the WB picker tool on the top bar. Then I clicked on the gray card. There is an instant difference. It's not perfect, but much closer to what I want. Then I use the temp & tint slider to get it where I want it. Also knowing that I will be working in layers to polish it in CS4. So I am mainly looking at her overall skin tone, whites of her eyes etc and the wall behind her. I also know that because I have tungsten lights on, the wall won't be perfect and I'll clean it up in CS4 with layer masks. Then once I have the WB where I want it I hit Select All, then Synchronize. A pop up menu comes up allowing me to choose what options to sync. Right now I'm only worried about WB. So I click that and ok. Instantly the WB is copied onto the actual shot of her. Now I click on the shot of her and go to work. Here is the screenshot...


I brought the exposure up a bit and didn't need the recovery slider. I brought the blacks slider down a bit to keep some detail in her black shirt and upped the clarity slider a bit. And now I have a much cleaner more accurate image to bring into CS4. Not perfect mind you, but it's MUCH better. See for yourself...


Now her skin isn't glowing, the whites of her eyes are white and the wall, with the exception of the blue/cyan color cast (that I always have ugh) look like they do IRL. I did however make this image too cool. I will have my hand at this image again tomorrow because now it is the thorn in my side. I think I'll be trying my NEW MCP Bag of tricks action set! Teeehee! If anyone can fix this shot...Jodi's actions can! Have I told you just how ECSTATIC and GRATEFUL I am to have won them! THANKS AGAIN JODI! Okay...back to regular scheduled programing...

Now after my crappy edit in CS4...


And remember that although WB is VERY important, there is also room for personal preference. Some people like their skin tones warmer, some cooler. As long as you don't have a lemon or lobster there is some room for personal taste. Know HOW to correct it, then make it your own. And please do not do what I've done and still do on occasion and did with the bathroom shot and try to over correct skin tones. When you are first learning, you tend to try to find casts where they may not exist and try so hard to correct one issue that you create 10 more...like I did above. Lol!

So that's it for today. Those are the basic steps I personally do in ACR and why I love RAW so much. As you can see in the last shot, editing that mess in PS directly would've been a disaster and the final image would not be NEARLY as nice and clean if shot in JPEG. And you aren't masking for hours on tons of different layers. I actually attempted to edit the converted SOOC jpeg and gave up after about 2 layers. Also remember that you CAN open a jpeg in ACR. You won't have nearly the amount of control had you shot in RAW nor the cleaner final image. But it's still MUCH MUCH MUCH better than if you bring the jpeg straight into PS. If you are too scared to jump into RAW, then start opening your jpegs in ACR to get a feel for it. Then once you've got your feet wet you can switch that dial on your camera!

If you have any questions, PLEASE don't hesitate to ask. And please excuse the color of the screenshots. They are always a bit wonky when loaded! I'll do my best to answer any questions this week. But I'm going to Vegas for the US Open this weekend to watch my Stewart! WAHOO! So I'll be a bit busy this week getting the girls & I packed...laundry etc!

Hope everyone is having a GREAT week!

I won MCP's NEW "Bag of tricks" action set...

and I could not be more thrilled! I LOVE Jodi and her actions. She's an extremly talented photographer and editor and a wonderful person! I have several of her action sets and LOVE them! So when I saw this morning that I was one of the LUCKY winners of her new set, I was over the moon with excitement. With my recent loss of income this came at a GREAT time! THANK YOU JODI of MCP Actions!
So as always, once I've had a couple weeks to really play with them and learn to use them to the best of their and my ability, I will post about them! I cannot wait to start playing. I hope I can do them justice!

I also will start working on the Why I shoot Raw Part 2 this week! I apologize for the delay. I'm taking a step back from the computer and spending more time with my family! So I haven't forgotten, but need to find more balance in general! And my husband just bought the family the Wii game, so we are having so much fun playing it and spending time together!

I hope everyone is doing great and I will post the Raw Part 2 this week! Hope you had a good weekend and have a FAB week! :O)

Tuesday, September 29, 2009

A silly giveaway...

So I wish I could be like all the big wig blogs and have giveaways. But it's a small gig here for me so no big giveaways unless I have something to give of my own!

This giveaway is for someone who does NOT have an editing program and needs somewhere to start! When I first started, I started with Paint Shop Pro 9 (PSP9)! Yes...OLD but better than nothing right? I almost feel silly even doing a giveaway for this, but I have it and feel weird throwing it in the trash! It also comes with PSP Photo Album Deluxe Edition 5.

So...if you are just starting out and need an editing program and like FREE...leave me a comment that says..."Enter me" and your name & email addy! I'm sure this will be a small entry amount if any as many have their own programs already and most use Adobe. I'll leave it open for 1 week and IF ANYONE enters I'll have Haylee draw a name out of a bowl. If one person enters, it's yours! Ha! If nobody enters it's going to the thrift shop I guess! Ha! I am assuming this is for PC only!

Okay...lets see if I get ONE person to enter! :O)

Happy Tuesday! :O)

Tuesday, September 22, 2009

New action set...Cross Process...

I call it "MZ's XP" for "Momaziggy's Cross Process". I will say that this set is NOT for the faint of heart! If you do not like creative edits, just skip over today's post. But if you like creative action sets and are a fan of Cross Processing...scroll down.

I'm a real fan of this look lately. I will admit that I like it soft. I have many expensive pay sets that have XP actions in them and I really do not care for them. They are too strong and I don't like the color shifts. So I made mine a little softer, subtle and not so extreme. More for family portraiture I guess you could say. But I know some people like regular XP. So for that reason, I tried to go from soft to heavy and a little in between. I use the XP Soft A LOT! I personally LOVE it for shots of my girls. I think the XP Soft would be great for newborns as well. I think the whole set would be a blast for running toddlers outside, E sessions, weddings and seniors. I think that about covers the field. Ha! Again, these are not for everyone. You won't hurt my feelings if you don't like them. I also included 3 one layer quick XP actions that you can run on top of other actions or on their own.

Don't be afraid to play with these actions. Turn the layers on & off, play with the opacity of the layers and even play with blend modes. The sky, or your creativity, is the limit!

In the set...

MZ XP Soft ~ XP with softness. My personal FAV!
MZ XP Haze ~ light and airy with the XP feel.
MZ XP Xtreme ~ I think it speaks for itself. This action is heavy and thick.
MZ XP ColorFUL ~ A spin off of the Xtreme but less thick with more color.
MZ XP Decaf overlay ~ very subtle XP 1 layer overlay.
MZ XP Caffeine overlay ~ it's a bit strong & thick! 1 layer overlay.
MZ XP JOLT overlay ~ XP with a POP!

Here are the examples for the set...


But wait...there's more.

I included an optional b&w layer that is turned off. When turned on, it gives you a very unique thick, almost vintage XP b&w. I LOVE them! You may not! Ha! And remember, you can go heavier than I did or much more subtle.

So here is the main set with the b&w layer turned on and the layers tweaked a bit...


Now you could even take a step further. No examples but here are some fun things to try. Turn on the b&w layer and lower the opacity for a Vintage XP look. Change the blend mode of the b&w layer and play with the layer opacity for a totally different XP look. Again, these actions are all that YOU make them. So have fun and PLEASE do not be scared to experiment. You don't have to hit the SAVE button! Go ahead...it's fun!

Now if you like what you've seen then click HERE to get them and please tell me what you think. Remember that not all images are created equal so what looks good for some images/people will not work on others. And don't be afraid to mix other actions from me or other people together for a look that's ALL YOU! Happy action running! :O)

Friday, September 18, 2009

Why I shoot RAW ~ Part 1...

There is so much to say about RAW (good stuff not scary stuff) that I’ve decided to do them in a 3 part series.

*Part 1 is just basics and talk, no screen shots or steps. Okay, I lied. There are two screen shots. I will also post some examples! I will go over in today’s post the reasons to try RAW. The benefits and the drawbacks. Although for me they are not drawbacks. And a visual to spark your interest even more! :O)

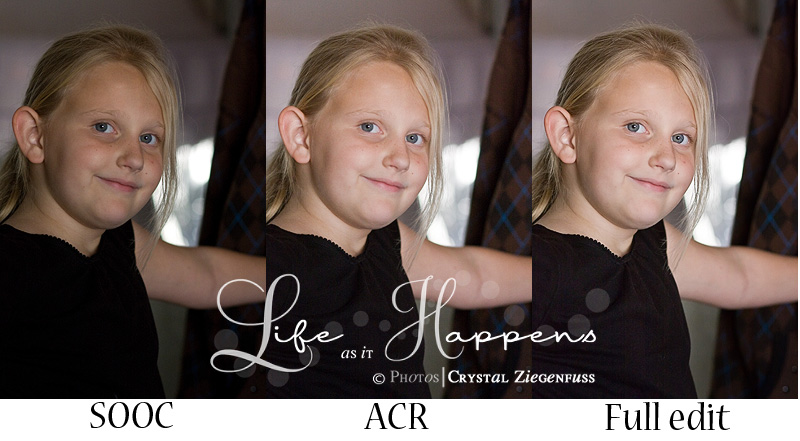
*Part 2 will be the steps I do in RAW on a single image. I will go over the tools/sliders I use. I will post examples with a good SOOC shot, an over exposed SOOC shot, an under exposed SOOC shot and a SOOC shot that has decent exposure but bad WB. Then I will show you how I correct them in ACR. Notice I keep saying * I *? Ha! My way isn’t the highway, just what works for me! :O)

*Part 3 will be more advanced options that are available to you. Batch processing, using a gray card to set your WB, the adjustment brush & spot removal tool, using presets, saving as jpegs straight from ACR, etc. There are still many advanced things I haven’t learned about ACR, so I won’t be going over ALL of the advanced stuff. Just what I know and use now!

If you already shoot in RAW, this first post probably isn’t for you and be on the lookout for Part 2 & 3. But if you’ve never shot in RAW and want to learn about it and hear why you should, read on! :O)

As any post I do, I’m not a professional, just a MWAC. And my opinions are just that…mine and what I’ve learned along the way. Some may agree and others may not. Some may do it completely different and that’s okay! Photography and editing is a personal preference, so I believe that with anything you read, take what applies to you and leave the rest! ***And a quick disclaimer...all the shots I took for this example (with the exception of the last) I took took on purpose! To highlight how you can go from bad to better. My daily shots aren't this bad! Ha! And if lighting conditions are this bad, I just don't shoot! End of disclaimer lol*** So here goes…

First…many that are new to photography think RAW is only for the professionals or those who have been shooting for a long time. I 100% disagree and this is why! RAW gives you flexibility in the learning process. Once you are a seasoned pro and nail your exposure and WB, you don’t NEED RAW. Many still shoot in RAW because it’s that awesome! But the NEED is less. When you are first starting out, you NEED to have some flexibility to adjust your exposure, try to recover blown highlights and adjust your WB. So don’t be afraid, it’s not as scary as it seems. I know I was VERY intimidated with RAW and it took me a while to try it! But I saw that it wasn’t this big scary thing and I’ve never looked back. I shoot in RAW 100% of the time, even for snaps of my girls. Well not “even”, because that’s all I really shoot! Ha!

I’ll go over the drawbacks first…if they can even be considered drawbacks! File size. They are large and will take up a lot of storage! On my little XSi (12 MP), my Lfine JPEGSs are about 4MG per image. In RAW they are about 18MG per image! So you will need a large hard drive or an external hard drive (EHD). Another thing is that RAW images are flatter than JPEGS! So they NEED to be edited. If you shoot RAW+JPEG, you will notice the SOOC images look different. You’ll even notice that the JPEG looks better! Now you are thinking…RAW sucks! Why on earth would I want to shoot in RAW if they look worse? I want the best SOOC shot I can get! I’ll get to that in the benefits section! :O) For me, those are the only drawbacks I’ve come across and again, to me they aren’t drawbacks. But some would consider them to be, so I had to put it out there! If you hate large files, and don’t want to edit every image, then RAW may not be for you! I will say though that even if you shoot JPEG most of the time RAW can be a lifesaver in mixed bad lighting and I do suggest learning it so that you CAN shoot it when needed!

Now for the benefits. There are MANY so I’m sure I’ll miss some stuff here. But here is the biggest benefit to shooting in RAW…CONTROL! Lol! WB, Exposure, Recovery. The WEB reasons of shooting in RAW! Teehee! Okay, corny I know! But those are the number ONE reasons to shoot in RAW! When you shoot in JPEG, the camera is making little edits in contrast, saturation, sharpening etc in the compression process. When you shoot in RAW it’s basically a SOOC shot! So when you shoot in RAW, YOU have control on your final image. You aren’t letting the camera make decisions for you. And isn’t that the biggest thing we photographers want…control? That’s why we want to get out of Auto! Well to a CERTAIN extent and please do not flame me for saying this, shooting in JPEG is adding a little Auto to your images! Am I ducking rocks? Ha! Try this for fun! Set your camera to RAW, then set your camera to shoot in B&W. Now look at the LCD, it’s B&W. Load it into ACR and guess what, it’s in COLOR! Freaked me out the first time I did that many moons ago! Ha! So RAW is just that…RAW!

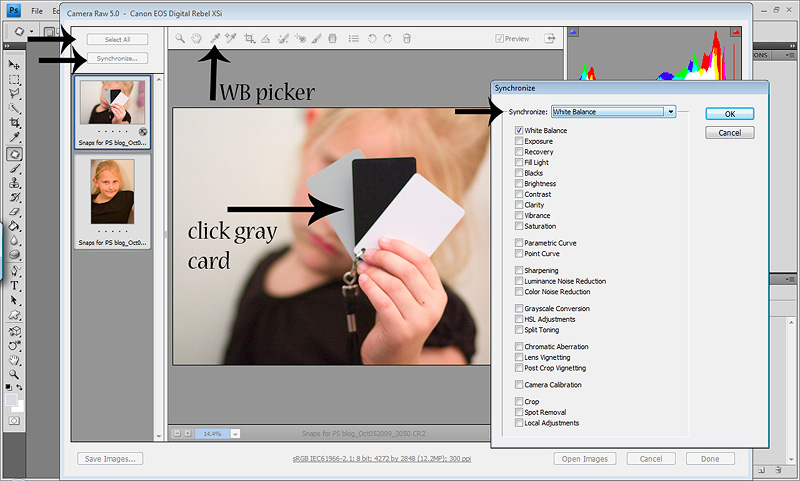
The ability to adjust/change your WB is reason enough to shoot in RAW and what brings most people in! And then to be able to adjust your exposure and use the recovery slider to even out your photo seals the deal for me! I no longer set a CWB. I shoot in AWB and when shooting in tough light, I use a gray card! I snap a picture of the gray card in that specific lighting and use that to set my WB in ACR! Pretty easy! I’ll go over that in Part 3!

So to shoot in RAW, what do you need? Well for one, a camera with the ability to shoot in RAW! Lol! ALL DSLR’s have RAW. I believe a lot of Bridge cameras have RAW and I THINK even some P&Ss have RAW capabilities! Then you need an editing software that can open RAW. The software that came with your camera will allow you to open/edit your RAW files. LR (Lightroom) & PS (Photoshop) of course will allow you to edit in RAW. But one thing to take into account is what model camera you have and what version of LR & PS that you have. If you have an old version of LR or PS and a newer camera, chances are you won’t be able to edit your RAW images there. You will ALWAYS be able to edit your RAW images with your camera software though! For instance, I had PSCS3. When I upgrade to the 5D Mark II, I would not be able to edit the RAW files from that camera with CS3. I would either need to use the DNG converter, which I’ve never used, use my Canon software (dare I say BLECH) or upgrade to CS4. So before taking the jump, make sure your version of LR & PS will support your camera. If not, look into the free DNG converter on Adobe’s site, use your cameras software or upgrade your program!

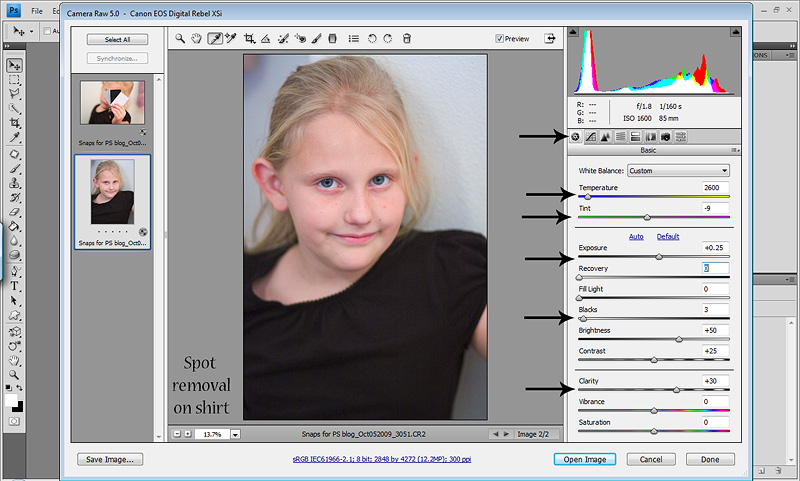
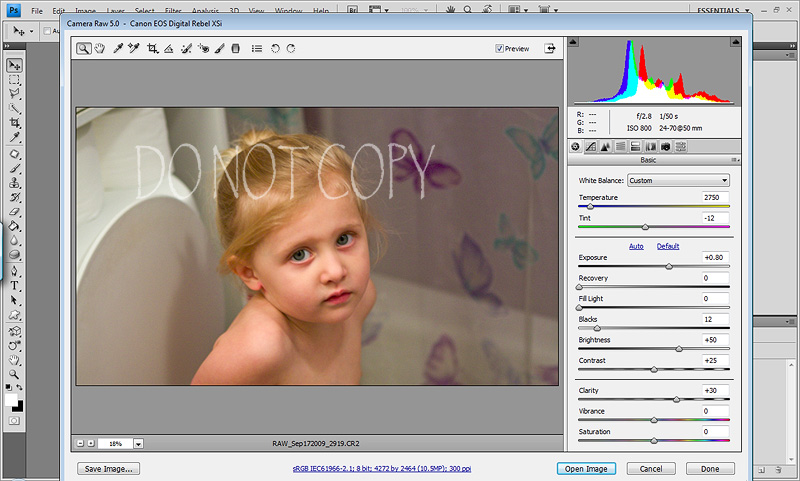
Now the other thing that confuses people is what the heck is ACR? I know I was one of them! I couldn’t grasp the concept until I tried it! So I wanted to briefly go over what ACR is and show you what it looks like, but will save the details for Post 2!

ACR is Adobe Camera Raw. It is a Plugin for PS created by Adobe. ACR comes standard with PS (not sure which versions in the past that don’t have it). Sometimes you will need to go to Adobe and download/install the most recent ACR plugin. When I used PSCS3, I had to do this to open the RAW files from my XSi. Basically ACR is a program within a program. Seriously, it’s crazy what you can do in ACR! It’s similar to LR in the aspect that you use sliders. So to open your RAW files (I use Bridge) it will open PS if it’s not already open, then a large pop up screen will open over PS and that is ACR! Not so scary huh? :O) Then you are free to slide til your hearts content. You can then save as a JPEG if you don’t want to do any further edits. Or you can click open and it will now be opened in your PS workspace or you can even just hit Done. Which will keep your ACR edits and allow you to go back and edit more or open in PS to finish up!
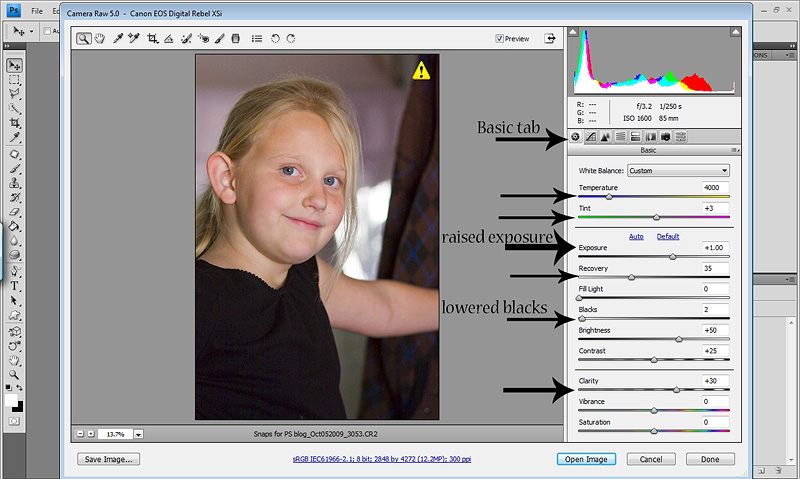
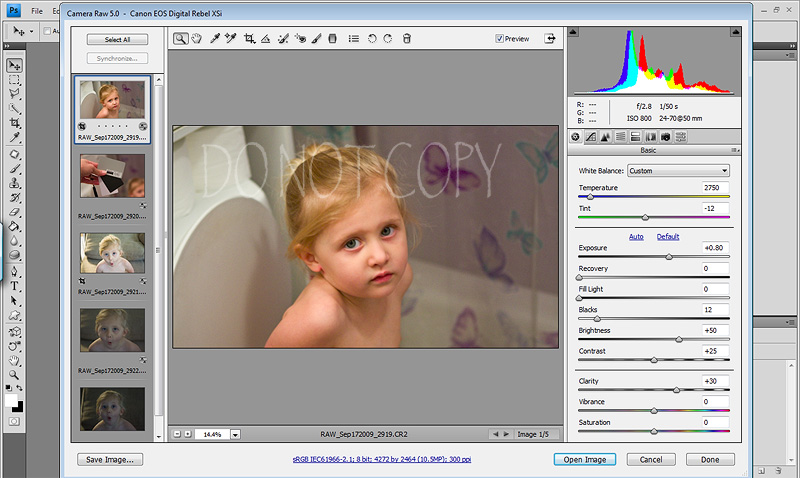
And here is a screen shot of what ACR looks like with just one image open, then one that shows what it looks like with several images open for batch ACR processing!


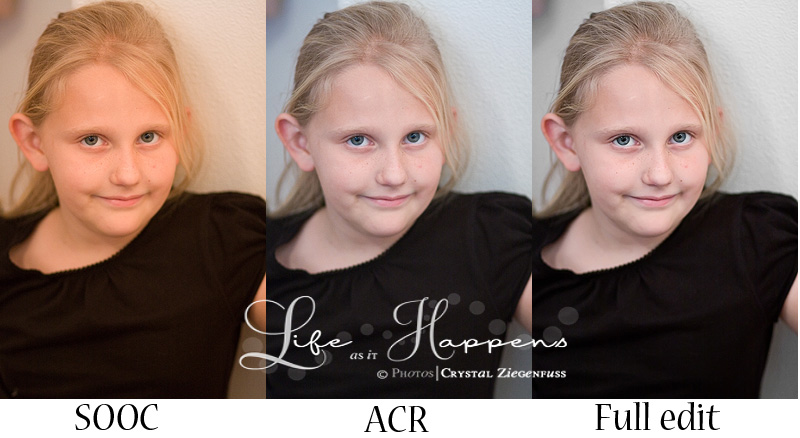
And just to give you a glimpse into what RAW can do I took a few different snaps to show you! And the edits I’ve done were ONLY in ACR, nothing done in PS besides resizing and sharpen for the web!
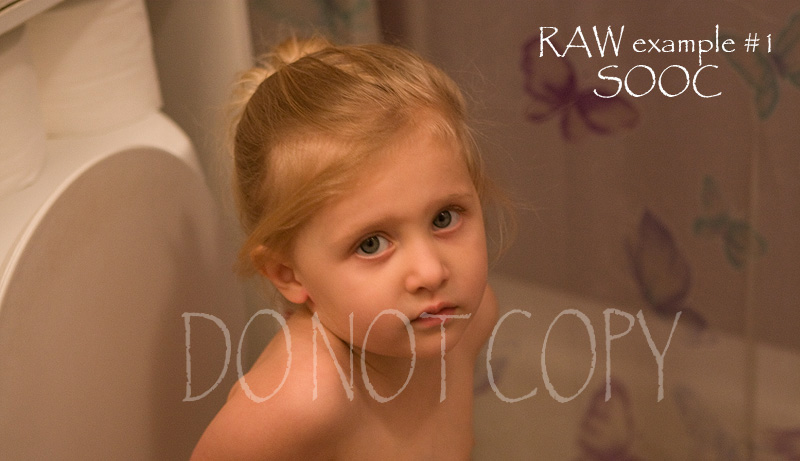
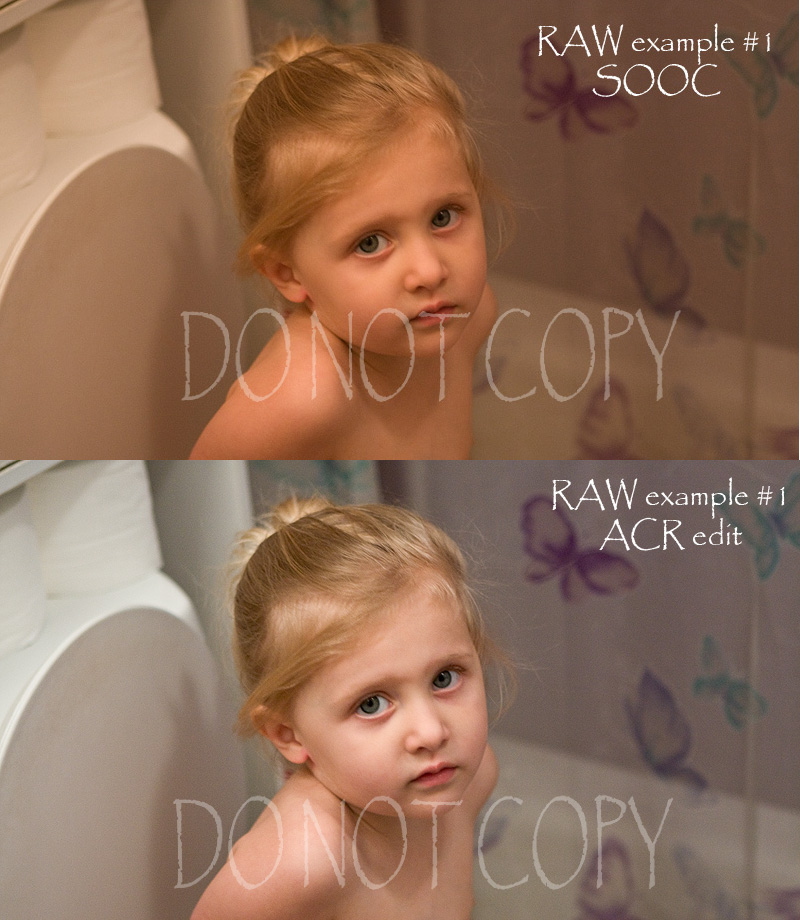
*RAW example #1…as you’ll see in the SOOC shot, the WB is off. Exposure isn’t great either and I shot at 1600 ISO, so it’s a bit fuzzy and with my aperture wide open at 2.8, my SS was only 1/50. But hey, it’s just an example! :O) I also cropped it because my little one thinks clothes are optional! Ha! I took this in our bathroom (like you couldn’t tell…teehee) and had both of my overhead lights on! For this shot I used my gray card to set the WB in ACR and did some other stuff!


Now here is after ACR edits only. First thing to notice of course is the WB. Look at the TP (blushing). It’s yellow in the SOOC and now it’s actually white! This image still needs some work, which I would do in PS. But the clean up was done in ACR so that I have the best possible starting image in PS! If I had shot this in JPEG, cleaning it up in PS would have been a PAIN, taken a lot of layers and just wouldn’t be as clean!


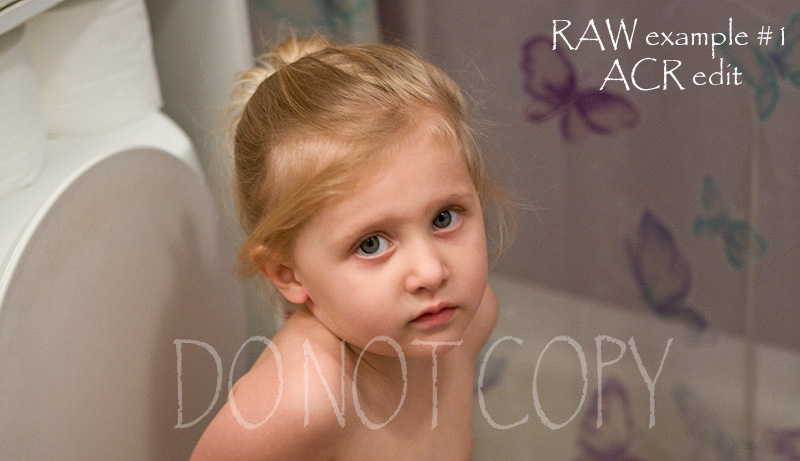
And here they are side by side…


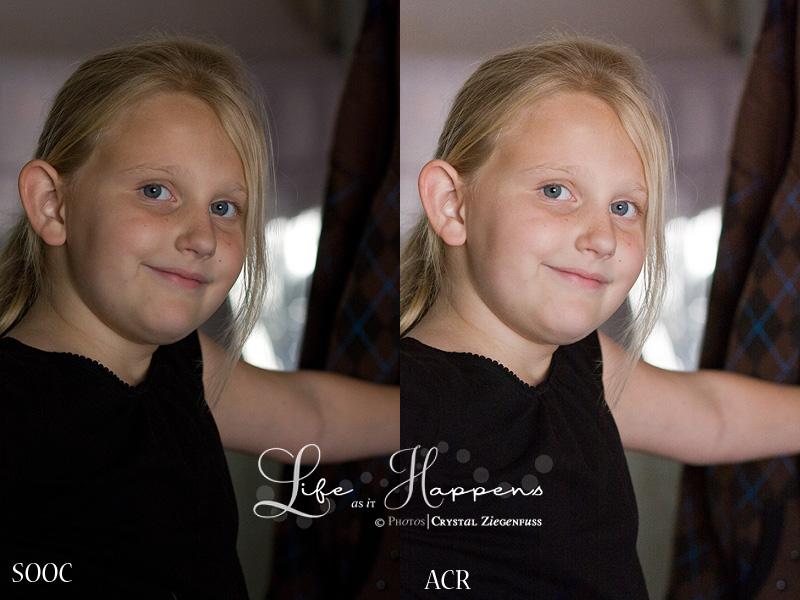
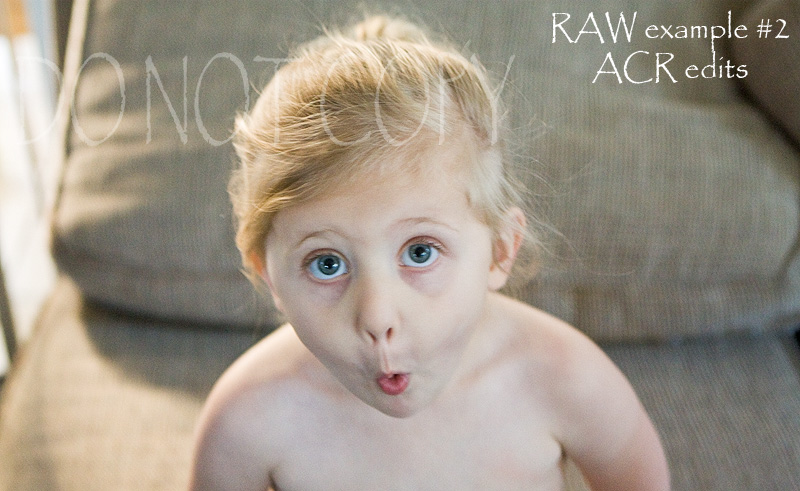
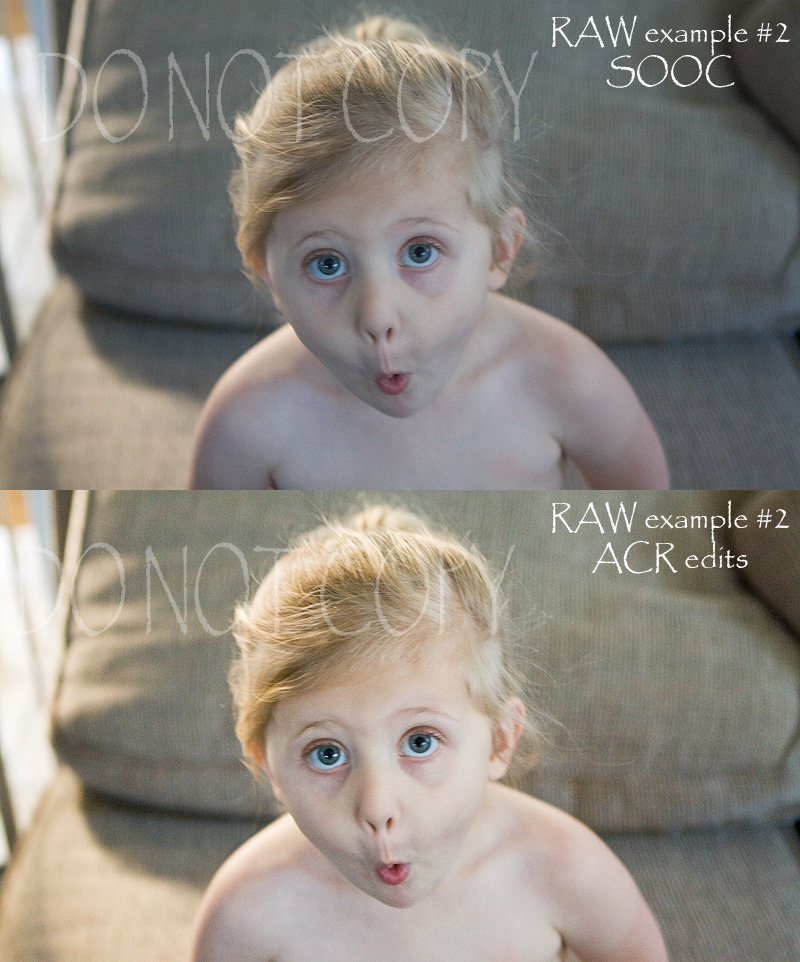
*RAW example #2…as you can see in this shot, it’s very cool from my AWB and not a lot of natural warm light and is slightly underexposed. I shot this at ISO 1600, 2.8 and only 1/25 of a SS. Note…I normally do not shoot with light this bad! Lol! You can see why good light is SO important! But again, these are just examples! :O) I warmed it up, gave it a boost in exposure and did some other stuff!


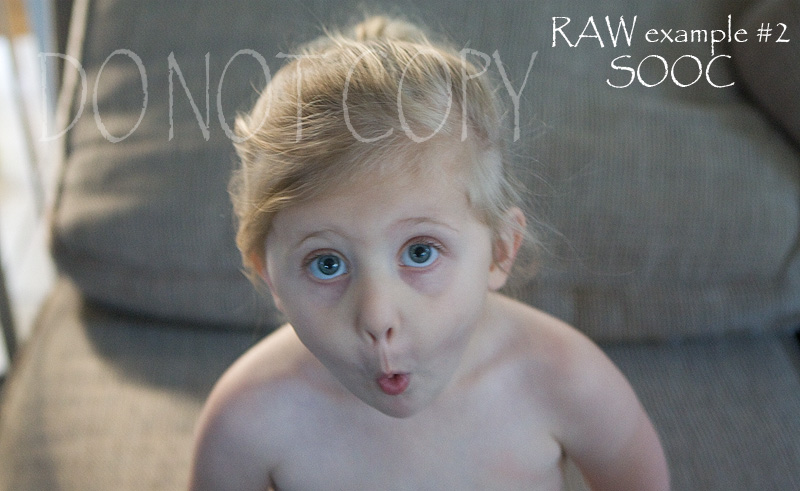
And here is after the ACR edits. Again, not perfect. We aren’t going for perfection in ACR, although I’m sure there are many who can achieve it! We are going for improving the SOOC and getting it very close before opening in PS for the finishing touches!


And here they are side by side!


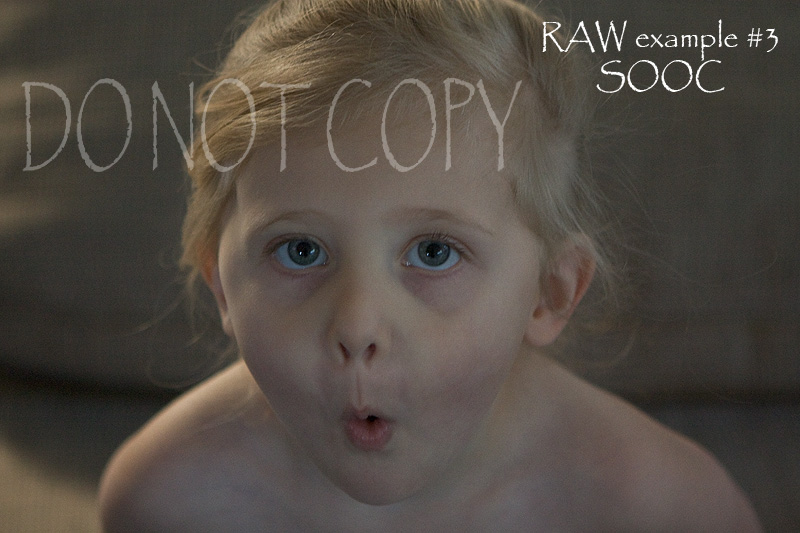
*RAW example 3. In this shot you can see it’s very underexposed. I did all these shots on PURPOSE by the way! Ha! So it will take a bit more work in ACR to clean it up! And even though these were shot in RAW, the final image will just not yield the same quality as a shot that started better off IN camera. But I wanted you to see what RAW/ACR can do for you if you do mess up or are still learning! I bumped exposure quite a bit (and will further lighten., remove noise etc in CS4), fiddled with the WB and some other stuff!


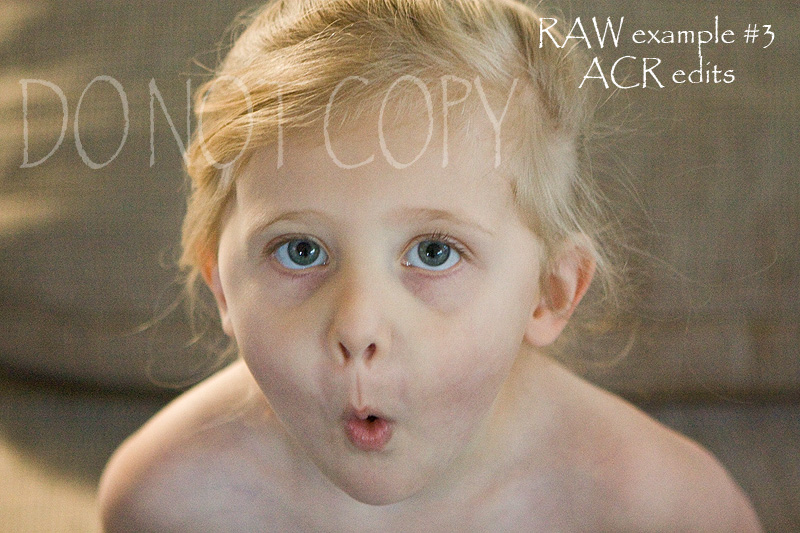
And here it is after ACR edits! It’s not great, but it’s sure a heck of a lot better than it was SOOC and if shot in JPEG…UGH…don’t even want to think about it! Lol!
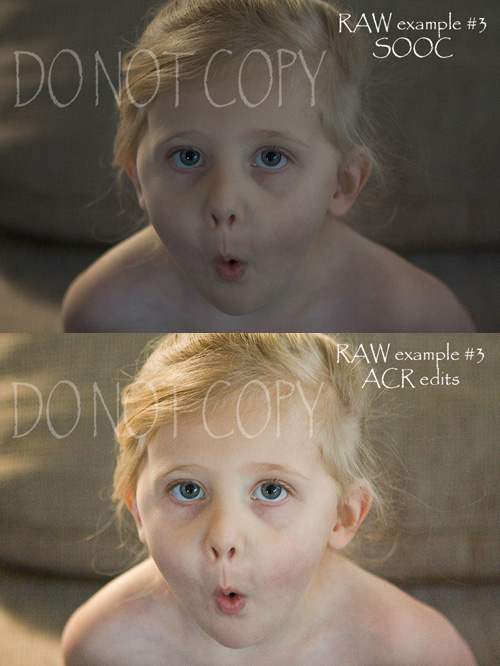


Side by side!


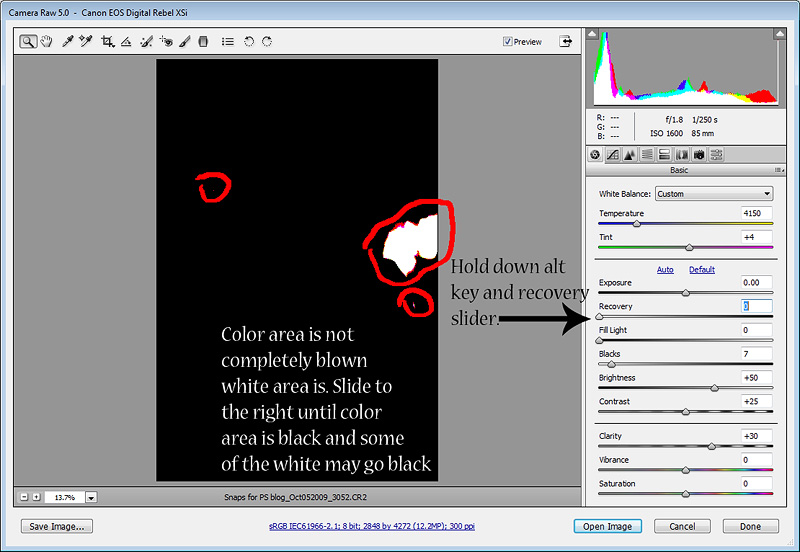
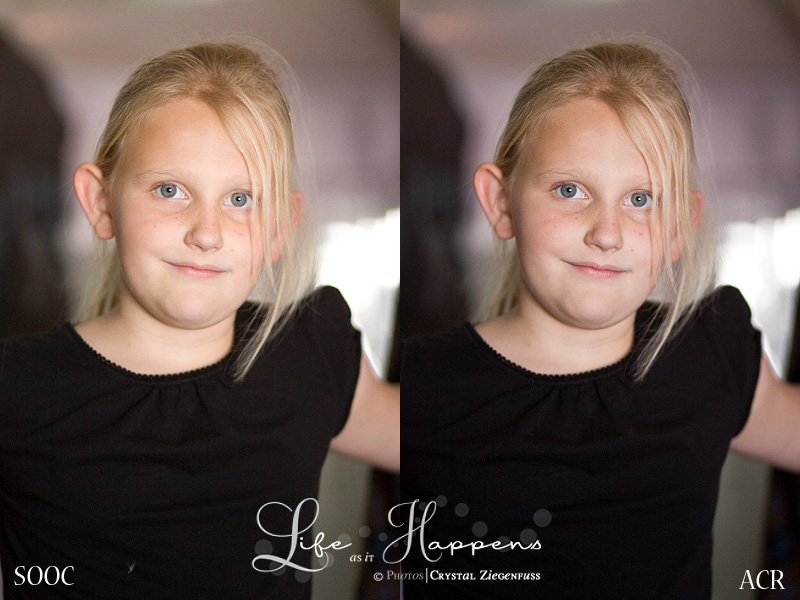
And for good measure, I pulled this one out of the archives! I shot this last year at Haylee's school for the yearbook! It was a fast paced morning & I just wasn't fast enough yet! So this was the SOOC shot. As you can see, it's badly over exposed and has some blow outs. but not all is lost because the entire picture isn't blown.


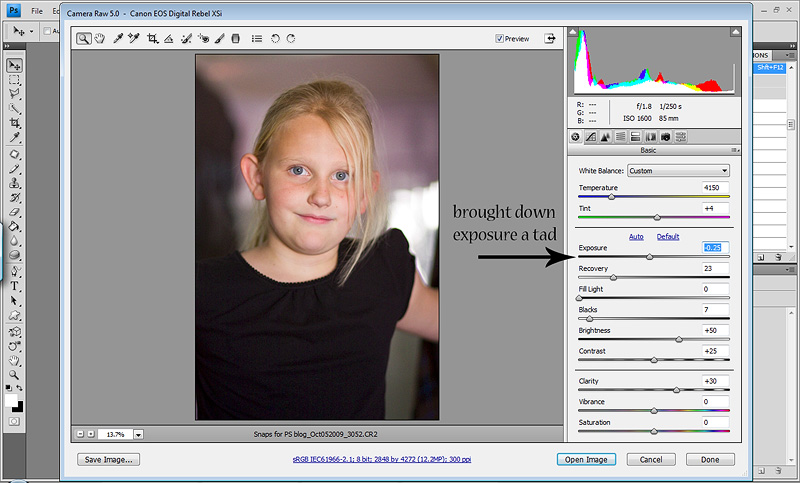
So with some tweaks in ACR (exposure slider down, blacks slider up, recovery slider, a little vibrancy slider) and some other ACR stuff, then brough into PS and finished up, this is what I came up with!


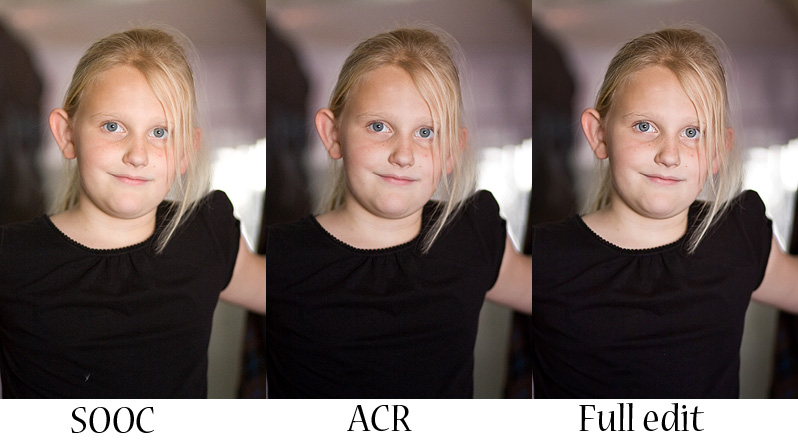
And I love side by sides...so here they are...


And remember that when you under expose an image, it will have more noise, even shot at a low ISO. And worse (like my examples), shoot at a high ISO and under expose it will not be pretty! Lol!

One last word. You ALWAYS want to strive for the best possible SOOC shot! But it’s not always possible with the light, skill level and sometimes we plain just forget things! So do not use RAW, ACR/PS as a crutch, but let it help you through your learning process. Then by the time you know what you are doing in camera, you’ll be a pro in PS and take a great shot and make it WOW! And also know that although RAW can really help you, it does have it’s limitations too! An almost black underexposed shot is well, just that! Ha! And a shot that is pretty much blown all over is well, just that! RAW can help you save/clean up and enhance your photos, but it’s not magic. So do your best to get it right in camera so you can have FUN in editing. I think we all agree that cleaning up photos is NOT what we want to be doing! :O)

So do I have your attention? Are you more curious about RAW? Did I at least make you consider TRYING it? I hope so!

And that’s it for today! If you have any questions, please don’t hesitate to ask. But remember that this is just the first post of three. So if you have questions about actual steps or sliders etc, please hold them until after Post 3 or 4 to see if I’ve answered them!
See you in Post 2! :O)

Search My Blog

Followers

About my PS Blog

Hi, my name is Crystal and I am addicted to Photoshop. I have PSCS4 and it's my other half. I love photography, but sometimes I think it's a means to edit!

So I thought it would be fun to have a place to post the free action sets I record, tips and tricks that I learn in PS and tuts for various different types of photo editing.

I hope you enjoy and find my PS blog helpful and if you have any questions, leave me a comment with your questions and your email address and I will get back to you!

Happy editing!

About Me

My photo
I am a stay at home to 2 great girls. My older daughter Haylee just started middle school and my younger daughter Avyree is in 1st grade! I have been married 11 years to my hubs Eric. I got my first DSLR June 31, 2008 and have been hooked ever since! My style is primarily Lifestyle! I like to take a natural and real life approach to my images! I want them to remind me of WHO my girls were when they were little, not just what they looked like. I love to edit and my editing style is always evolving and changing! I like variety and photography is a means to edit! I shoot Canon (full frame) and almost only primes. I pull out my wide angle zoom from time to time! Thanks for stopping by and I hope you like our story...
Background paper by Kay Miller

  © Blogger template 'Photoblog' by Ourblogtemplates.com 2008

Back to TOP