Hi & welcome to my PS blog! This blog is for full PS although some steps will also work in PSE. Most actions, unless stated are not PSE compatiable. I do try to make an action for PSE from time to time. I hope you have fun here and learn some things along the way. If you have any questions, just drop me a comment! :O)

Tuesday, December 21, 2010

Action review ~ Miabella Summer Skies...

I literally JUST bought this set. I looked through all of her sets, and this set seemed to fit my style the best! I've always heard wonderful things about Miabella Actions and the rave reviews are true! I truly LOVE this set and all I've done is test them on a couple images! I can't wait to really put this set to use and get to know them better. But I thought I'd share some examples. I ran them on the same image, with the exception of the Backlit Magic...which ROCKS by the way!

This is just a snap of my two girls {left & middle} with one of their friends while we were going 4'wheelin in the mountains!

I really love Summer Pop. It's a great addition to my workflow for the final touch! I love it so much that I ran each action in the set over the Summer Pop. So every image below this is Summer Pop + the creative action...


Kite Flying Skies is one of my favorites from the set...


Bright Blue Skies is a great quick action to give a strong or subtle pop to your beautiful blue skies...


Basic Vignette but fast & very natural...


I'm just entering the world of backlighting. I'm not very good yet. It's still intimidates me. But I grabbed this shot at my friends wedding and loved it! But the backlight was really strong. Actually, that's what I loved about it so much. But because I'm new to backlighting, I'm not always 100% certain on how I want to edit them. This is the perfect action to quickly edit your backlit photos then you can add tones etc if you choose...


I rarely purchase actions that I'm not happy with anymore. Buying actions can be frustrating because you never know if you'll really like them or get use out of them. But I think once you know your style, you know which makers to buy from or which sets will work for you. I think it's safe to say this set will work for me & my style of shooting and editing! I also think that her sets are priced well and worth the money if you find a set that fits your style!

Happy Holidays! :)

Friday, September 17, 2010

Tantalizing Tips... Center light & Crisp~a~licious...

I have several tip posts ready! So I thought I'd post two today! These will just be quick small tips that will hopefully help you!

First one today is center light! I learned this from Florabella. I also included this in my Ziggy Licious Action set for Full PS & PSE called "Dollop of Whip Cream"! It's one I use a lot and wanted to share how it's done!

This will give you a strong or subtle light in the center of your image, hence the name! Lol! I used it on a macro shot but it works wonders on people too!

First set your foreground color to white. Then go to the half black/white circle and select "Gradient" not to be confused with gradient map!


When the dialog box comes up change it to radial. If you want to make the top of your image look sunny & hazy you can also choose a yellow ish color and leave it on Linear and select reverse! :) So back to the center light! Then play with the angle and scale! You can hit reverse if you want the light on the edges of your image! Sky is the limit with PS! :) Then hit enter and you'll have your gradient in your layers panel!


Now change the blend mode to Overlay and play with the opacity! You can use a higher opacity for a stronger effect or a low opacity like I usually use for a nice subtle pop in the center of your image. Sometimes if the face is just a tad dark and the subject is in the center of the frame, I'll run this at about 10% and it gives the face just that little bit of lift that it needs to bring it to life!


Here is the before and after. I realize now I probably should've used a person so you can see it more. But give it a try, I think you'll LOVE it!


Another thing I use in my base ingredients actions in the Ziggy Licious set is this great high pass filter option that I call Crisp~a~licious. I probably shouldn't give too many of my secrets away or nobody will buy my actions...ha!

This is great at low opacity and will give your images that little bit of deminsion and depth and will appear to sharpen it, although it doesn't actually! Just be careful not to use too high layer opacity with this or it will add to much contrast and make your subject and their skin look very harsh! Now I use it at about 15-30% and if it's macro, stills, details etc I MAY go up to 50%!

First thing you do is create a new layer and name it if you want...


Then you need to "Stamp Visiable" by hitting ctrl alt shift e.


Now you want to run a high pass filter on the top photo layer. I assigned a short cut key of ctrl shift . but you can find it under Filter>Other>High Pass! I use 10 but play around with larger or smaller numbers. Your image will look really funky but no worries! Well fix that! Now desaturatre the layer by hitting ctrl shift u or going to Image>Adjustments>Desaturate!


Now change the blend mode to Soft Light {you can also try Overlay but I like Soft Light} and lower the opacity to taste! When done with the proper strength, this method can really enhance your images!


And here is the before/after. If you look at the fine details like her eyes, freckles and the tape you can see the nice subtle but effective difference!


And to comment on the picture of Haylee....it was a joke and she was not hurt, injured, treated badly! Too see the post on my Ziggy Blog click HERE!

So that's it for today! I have several other Tantalizing Tips that I'll be posting in the next couple weeks along with a few action reviews. Hope everyone has a wonderful weekend!

Wednesday, September 8, 2010

Action review ~ MCP Bag of Tricks...

Things have settled down a bit now and I have some time to post! Sorry for the absence! I have several posts already lined up and ready to post! I've actually had this specific action review in my to post folder for a couple months! *blushing*

When Jodi at MCP Actions first created this new set "Bag of Tricks", she did a giveaway on her blog! I actually WON! It was the first time I'd really ever won anything. I was very excited to win and win this particular set. It looked very promising to me and I couldn't wait to play!

Needless to say this set, I believe, is her best set yet!!! This is my go to action set when I need to correct problems and issues with my photos. This set is interactive and you can fine tune each one to your specific photo! That I love! I'm so impressed with this set that I will say that it is my favorite and most used set in my actions panel for cleaning up and correcting issues and problems in my photos. Here are a few examples of the actions I use from the set.

All wedding shots in this post were taken by me last year when I was 2nd shooting my very first wedding with my dear friend and awesome photographer, Amanda Ward...

Here is a shot Amanda was shooting and I shoot at another angle. These were taken with my Canon XSi {that I have since sold}. So there are some issues in the photos that needed to be fixed. I did shoot all of these in RAW and adjusted WB, expsoure etc in ACR then brought them into PS. So of course my MAJOR issue with this image in the color casts in her dress. One of my biggest pet peeves is color casts in whites! So that is the first thing I will address...


So I ran "Color Safe Bleach"! This is one of my FAVORITES in this set! It's SO easy to run. It will prompt you to click on three areas on the photo {or little black box} where you want the whites white! And this is what the result was...


Not bad huh for for clicking a couple spots on the image huh? It also removed the color cast in her white flower in her hair, in his white shirt & the chairs. If you have very light areas in the skin the color can be pulled them as well and that area of the skin can go grey. So on higher key images you may need to mask the skin back in...


My other issue was that I felt her dress had lost some detail that I wanted to retain! It wasn't badly blown but I did want to try to get a little more detail. So I ran "Magic Recovery" and lowered the opacity to I think about 30%.


Here is the before and after. As you can see I was able to get a little bit more detail in her dress without making the whites gray, dull and dark...


Here is a group shot that Amanda was taking & I shot from a different angle as she was shooting! Everything is fine in the image in the aspect of WB, expsoure, color etc! But it needs a pick me up, a little pop to make it stand out and show the excitement of the wedding party...


And here is the after. Below the photo I stated which of the actions from the set that I ran. Masking was of course a factor in editing this image to a clean color image...


And here is a side by side. You can see that the edit is clean, not over done but just enough to give the image some life!


This was the building where the wedding was held. This shot was more just for me. The building was backlit, so the sky is completely blown. Which normally doesn't bother me in the slightest and I would take this shot to a fun, funky creative edit. But for the purpose of the possibilty of a wedding album etc, I decided to see what this set could do to transform this image into something the bride might possibly want!


I will be honest and say that I did forget to write down every single action run. Sad considering i did this with the thoughts of the action review! But I have a pretty good memory of what I did run although I may possibly leave something out!

I started with "Magic Dynamic Range" which balanced out the the bright and dark areas of the building! Then I ran "Magic Midtone Lifter" & "Magical Color Finder Vivid". I tweaked and did any masking required! Then I ran "Fake Blue Sky Illusion" and tweaked the color and opacity slightly! Then I ran "Magical Contrast" & "Magical Clarity"! And I do believe that is all I ran on this image!


And the side by side for comparision...


And on of my VERY.FAVORITE actions in this set that is a LIFESAVER and completes me heart is..."Reflected Color Cast Vanisher"! This one action is worth $99 all on it's own! I took this shot last year on a photography gathering with the awesome girls from 2Peas! As you can see, this beautiful model is leaning up against a great cyan wall! The drawback is that she has a reflected color cast on the left side of her face from the wall. MCP to the rescue! I will usually paint with a brush opacity of about 30% to get a cleaner result!


And here it is after I ran the action, did some tweaking on the color of the skintone in the action and masked the areas of the color cast!


Here in the side by side you can really see the difference and how clean the result is! This action gets 10 thumbs up from me!


So those are the basic actions I use in this set when I need to correct issues in my photos! Here is the list of my most used from the set...

*Magic Recovery ~ at lower opacity and sometimes masking of the skin is necessary

*Magic Dynamic Range ~ for a clean bump in your dynamic range use a low opacity and for a fun artistic look use a higher opacity

*Magical Color Finder Brush Vivid ~ I rarely ever push color. It's just not my style. I prefer a much more muted softer tonal range. But when I need to push some color in specific areas of my photos, this action works great. Paint with a low brush opacity and I usually lower the opacity of the folder as well!

*Reflected Color Cast Vanisher ~ my FAV of the set hands down! It's UTTER.PERFECTION and worth the cost of the entire set!

*Color Safe Bleach ~ This is my second FAV of the set! It's clean, easy to use and REALLY.GOOD!

*Bleach Pen ~ a great little tool when you need to just whiten a small area of an image without needing to customize it to your photo. It runs with a black layer mask, paint white with a VERY low brush opacity and VIOLA...you have your own personal bleach pen

*Shiny Skin Vanisher ~ I have only used a couple times because I rarely need it. But when I have used it I've been very happy with it!

Actions in the set that I think are GREAT but I don't personally use are...

*Studio White Bright & Studio Black drop ~ I don't shoot backdrop at all! But I did play with a couple images from other photographers and I can tell you that these two actions are AMAZING for white & black back drops!

*Magic See Saw ~ I shoot RAW so I adjust my WB in in ACR. But for jpeg shooters or for a tweak in WB once already in PS, this is a great action! You do need to have knowledge of the color wheel and color correcting. But all the layers are there for you to turn on and adjust opacity and mask where needed!

*Magic Color Finder Brush Intense ~ for those who love to push rich darker colors. This will make you happy! Just keep your brush opacity low when painting and watch for neon OOG colors!

*Orange & Blue Skin Vanisher ~ I don't ever need and use but have tried and are a great tool to have in your panel

*Sunburn Vanisher ~ I've only tried once and thought it worked great. I do think however that you need to watch your opacity with this action and allow a little sunburn to show through to keep it natual looking!

So all in all I LOVE this set! I have many of Jodi's actions. To me, this is her VERY.BEST set for correcting problem areas or enhancing areas of your images! It is my go to action for this reason and gives wonderful results! The price point on this set is right on the money and now that I have it, I'd pay more for it if I had to!

I hope you enjoyed the review and it helped you understand the set more and answer any questions you may have had in regards to it!

Sunday, August 1, 2010

The Ziggy Licious Set for PSE is READY...

Hi all! Thank you for being so patient! They are finally ready for purchase and I'm very excited! They are so similar to the full PS set that I wanted to link the Sneak Peek & the Examples for the full set so you can see the variety that is capable with the set!

This set is available for PSE6, 7 & 8! They WILL work in PSE5 but I had a problem with the icons that I could not resolve. When loaded in PSE5 with the atn. file and the psd. file, there are two icons in the panel. The icon I created does not run the action, but the gray blank square before said icon runs the action. So they DO work, but with that issue. So if you have PSE5 and would like to purchase, you can at that risk. But I didn't want to completely advertise PSE5 because of this issue. Also included with the action set will be a pdf with details about the set and how to get the most out of them!

The set is $55 via paypal at momaziggy AT yahoo DOT com. Please indicate PSE and I will email you the zipped file that contains all the actions, png & psd files within 24 hours. But I will say I pride myself in getting them to you right away. I think my longest turn around time with the full set was 1 hour! Again...PLEASE specify PSE as I'm still getting orders for the full set!

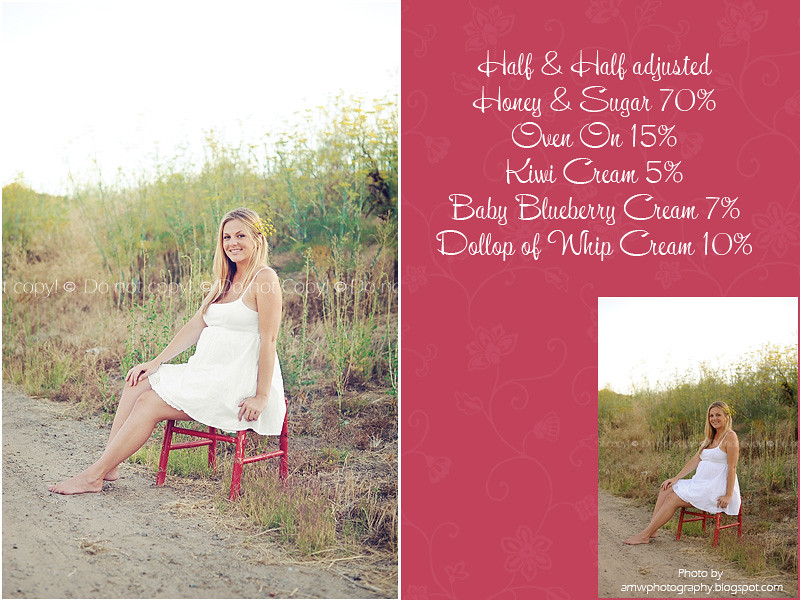
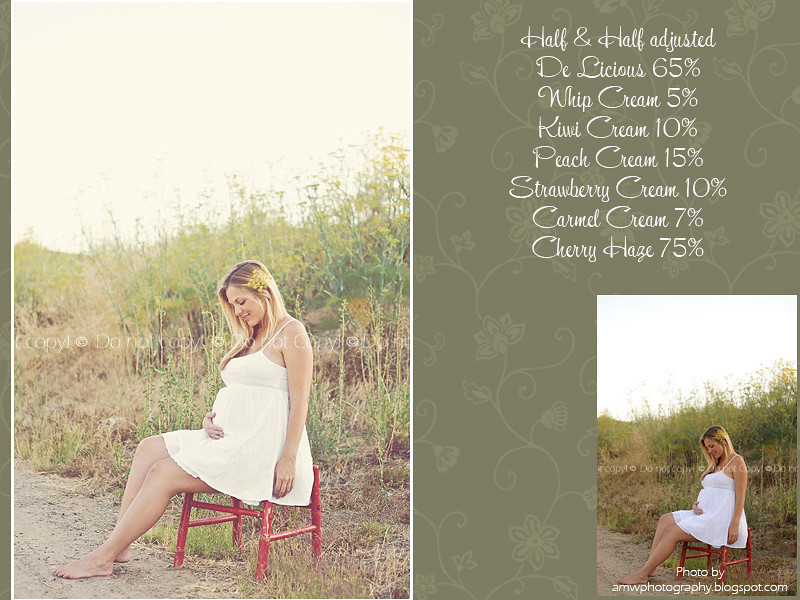
Now for a few more examples. ALL images in this post were taken by my dear friend and fellow amazing photographer, Amanda Ward of AMWphotograhy


If you have any questions, please don't hesitate to ask! I hope you love them as much as I do! :O)

Thursday, July 1, 2010

The Ziggy~Licious action set now available for purchase....

Wow..it's been a long couple months from when I first started thinking of the ideas for this set to the final product. It's been a great journey and I learned a lot about myself in the process which is always great!

This set will work in Photoshop CS2 & for for PC & MAC but is not compatible in PSE. Sorry!

So first off, if you haven't seen the Sneak Peek take a look and see what this set is capable of when mixing and matching actions from the set!

I was very lucky to have a lot of fabulous women send in images for testing and the examples that you will see on this blog. To all of you...thank you! You made this post much more beautiful than if I had to fill it with all of my own images! :O)

This set has 22 actions included. It is meant to give you a tonal shift in colors and a slight haze while keeping detail in your images and your whites still white! Your skin tones will get a slight shift as well, but remain natural!

When you purchase the set a pdf file will be included which will go over the basics of the actions, how they are set up and how to get the most out of them!

I am really proud of this set and use it on most of my images now! It's exactly what I was missing in my panel and I hope you feel the same way! So...let's get on with the show...

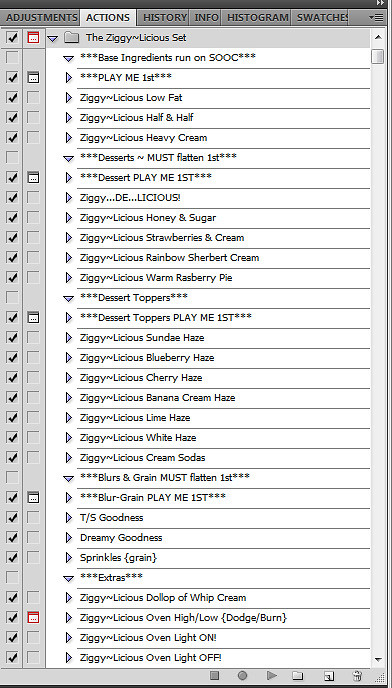
The set is broken down into 5 sections. Here is the list of actions you will receive...


The first section is your "Base Ingredients". These are basic clean work flow type actions that will help boost contrast, color and a bit of sharpness. They will not add any haze or tones and as each image is different, these are meant to be adjusted to your liking! These should be run on your SOOC images as your primer to either edit clean or to go under your creative edits.

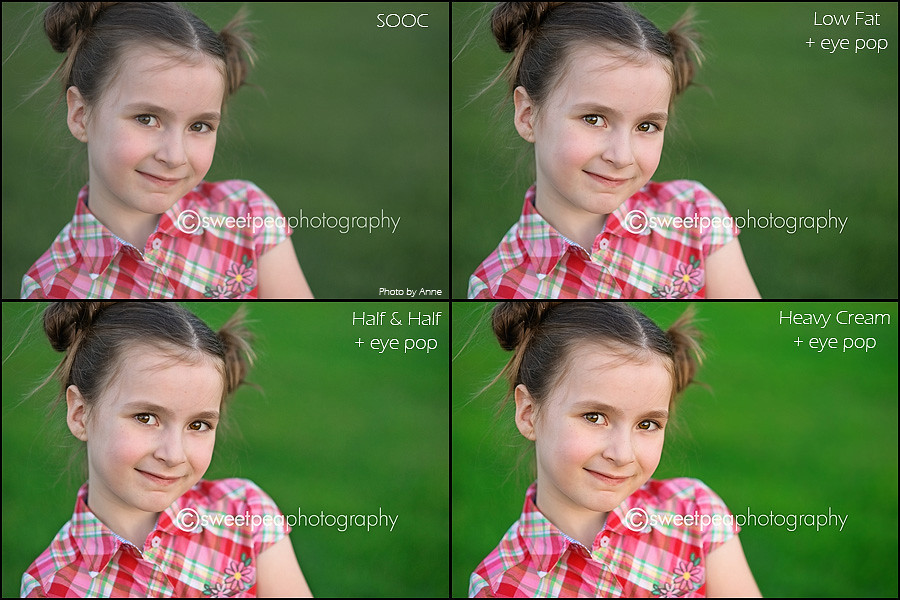
Base Ingredients contains 3 actions... "Low Fat" for those who shoot jpeg, do a lot in ACR or LR or just have that rockin SOOC image that doesn't need much. Half & Half is a little stronger with a little more umph and color boost. This is the one I use for my work flow action. Heavy Cream is pretty strong and will most likely need a fair amount of adjusting and possibly some masking of the skin. Do make sure that before running any of the "Base Ingredients" or any editing for that matter, that you have a good clean WB and your exposure is good. Any editing will only enhance problems in your photos. Here is a lovely shot from Anne Oliver of her beautiful daughter...


Then once you've ran one of the Base Ingredients {or your own work flow edits} you can move onto the best part...the creative fun!

The next section has 5 creative edits that will shift the tonal range of the image, add a bit of haze and add a bit of contrast. I call these "Desserts"! They are the most creative of the set, but still not a heavy handed action. You MUST flatten before running any in this section. One thing that was important to me as well when making this set was time! I wanted actions that didn't take forever to run but also wouldn't take forever to adjust! I spend too much time adjusting layers of actions and I wanted to minimize that for this set! So the actions in this section will leave you with 1 photo layer and a white layer mask above your background photo layer! Then you simply adjust the opacity and do any masking if necessary! Quick and easy. And for the most part, lowering the layer opacity should yield nice results. But if you would like a little more control you can use your history panel to go back to the step before "merge visible" and the layers will be opened for you or you can go back with the ctrl/alt/z button until the layers open. Usually 3 or 4 steps. Then you can adjust the layers and mask each layer to taste.

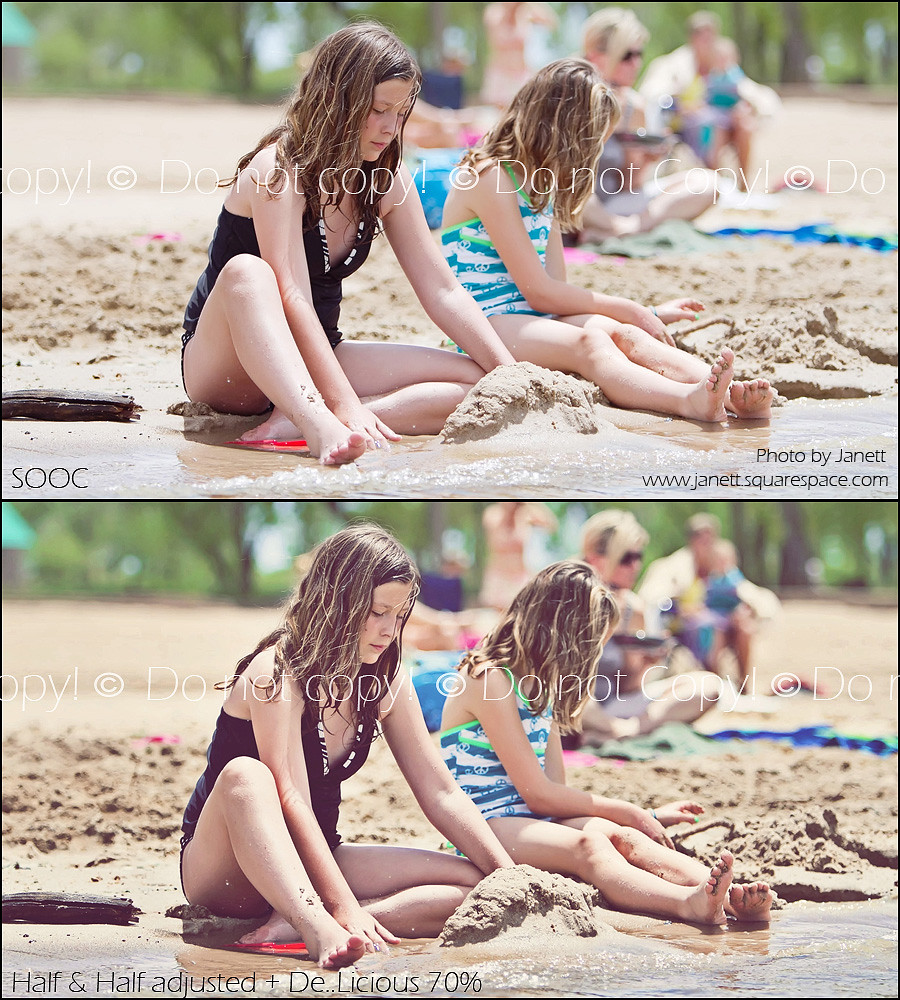
Ziggy~DE...Licious ~ The next two images were sent in by Janett McKee


Could she be any prettier! I LOVE this shot! Honey & Sugar...


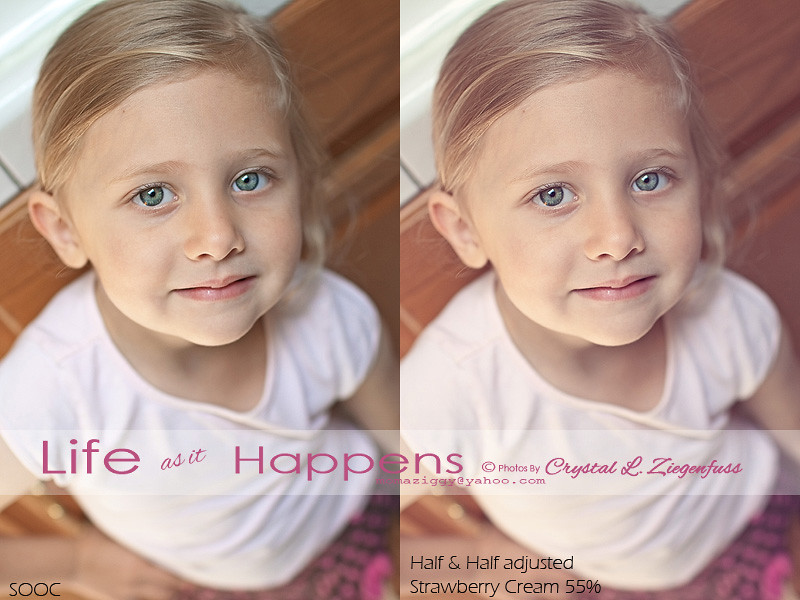
My little Nugget with some Strawberries & Cream...


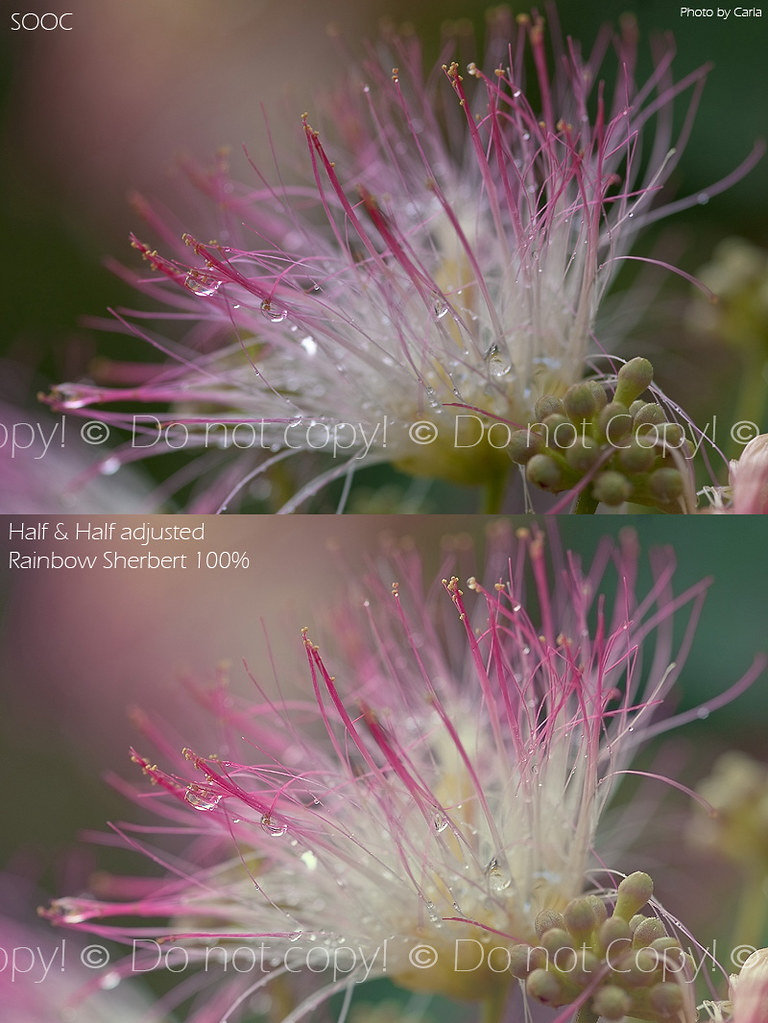
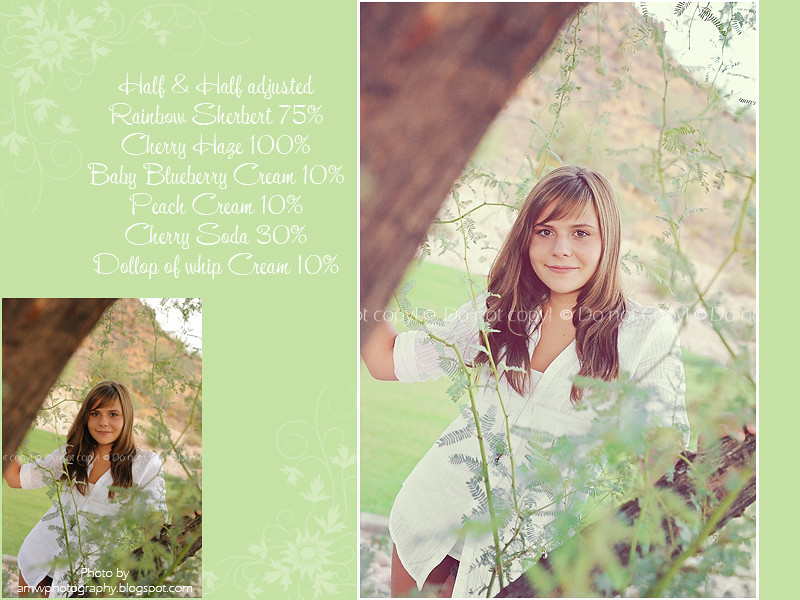
Rainbow Sherbert sent in by Carla on this soft yet sharp image...


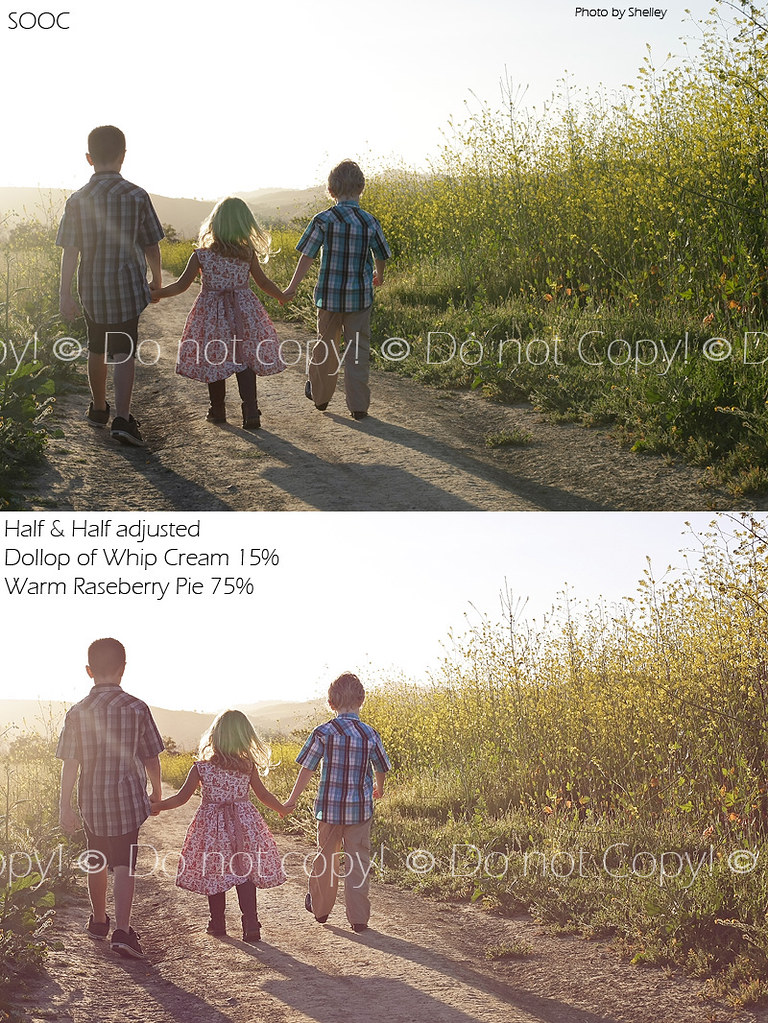
Warm Razzberry Pie on a warm sunny beautiful images sent in by Shelley Schaffer...

The actions in the next section are even lighter and great toppers to any edit. So I call them "Dessert Toppers". These are a simple 2 layer action that is grouped in a folder and can be run one on top of the other. No need to flatten before running any in this set! I often will run a couple of these on top of a Dessert and just play with the opacity of the folder. But you can open the folder and adjust the two layers if you so choose.

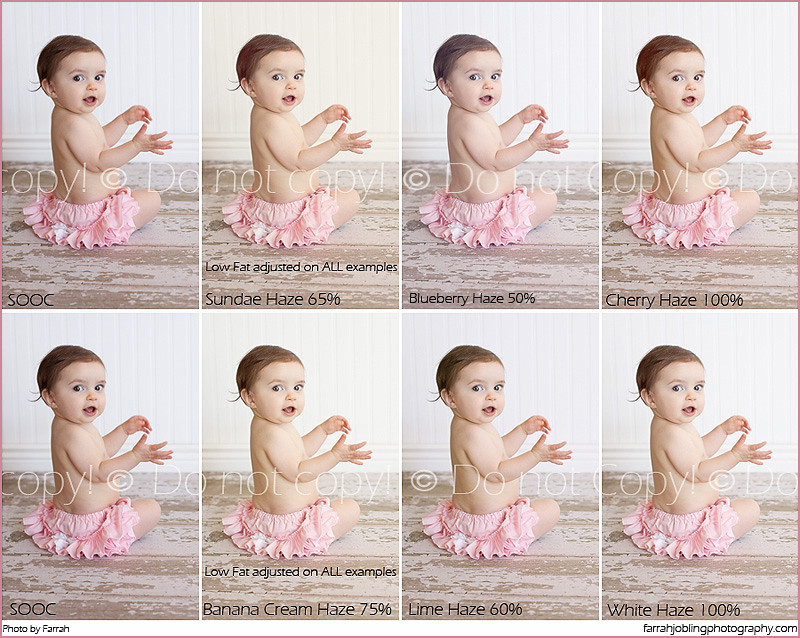
Here they are and this precious image was sent in by Farrah Jobling of her darling little Claire


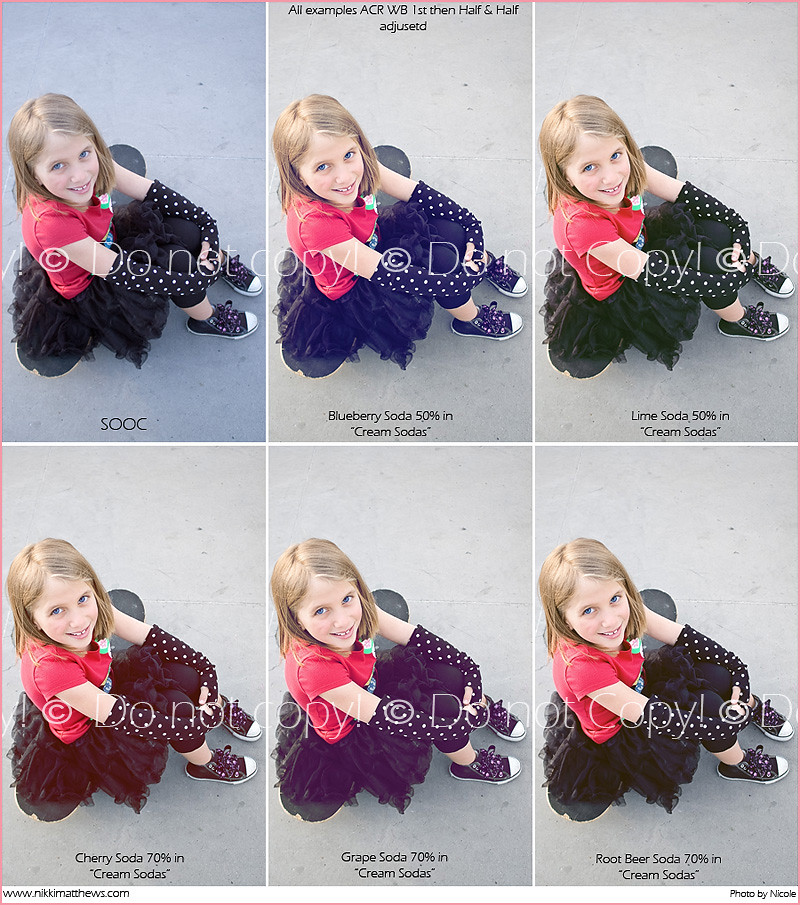
Also in this section is "Cream Sodas". This action will run 14 tones/tints for you to customize your image and top it off even more! Each layer is turned off and you can turn on any that strike your fancy for a different look every time. I also run this a lot and will turn on just a couple like the Cherry on top! :O) The creams will mostly effect anything lighter than 18% gray and are great for babies, newborns, kids...anything you want to be creamy! The sodas ROCK for urban, grunge or just that little extra something. The Sodas will tint your shadows and anything darker than 18% gray. I LOVE this look and use the Sodas a lot. And to spice it up the creams WITH the sodas give a great result. I will say that Cherry Soda is one of my FAVS...along with Cherry Haze from the section above! So def check these out and don't afraid to play and experiment!

First some examples from the Sodas...

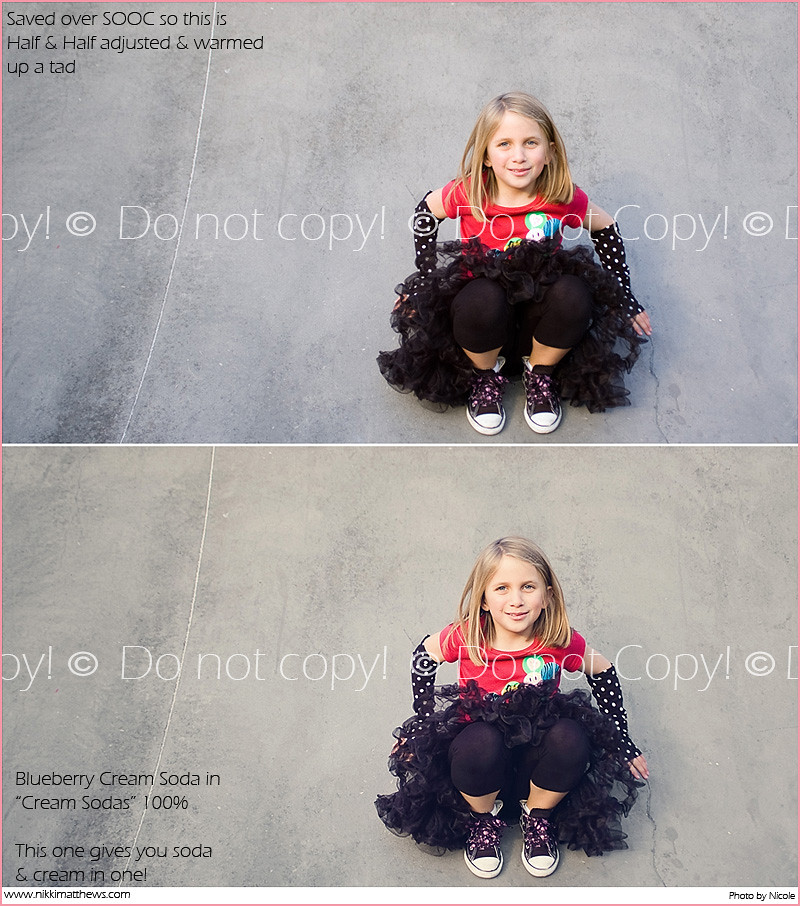
The next two rockin little girl images were sent in by Nicole Matthews


This is a Cream & a Soda combined and gives a very fun and unique look almost similar to my XP set I shared for free a while back! This one on it's own is a lot of fun as well!


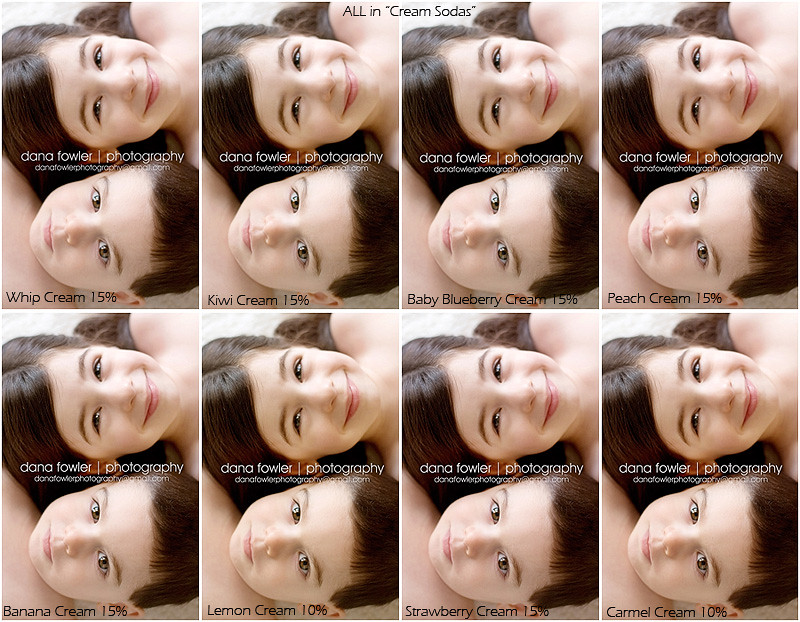
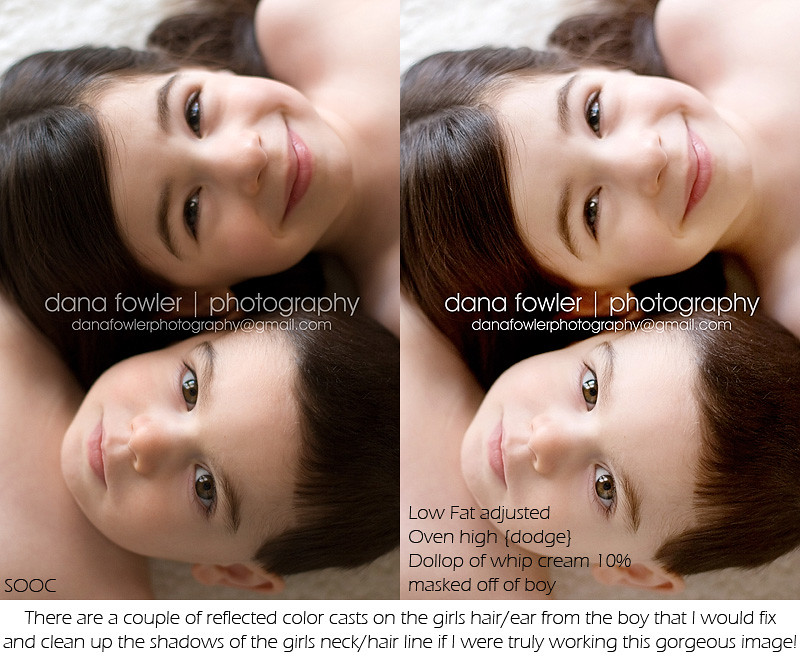
And now we have the creams. This beautiful image of these darling kiddos was sent in by Dana Fowler...

As you can see they are very subtle and you may have a hard time actually seeing a difference on here. Each one is just one layer at low opacity and these are meant to be in addition to the other actions, a final topper..like the cherry on top I was talking about versus them being used alone like in the sample. So keep that in mind!


And I loved the light in this image so much that I had a clean play with it using the actions from this set and wanted to share that example as well!


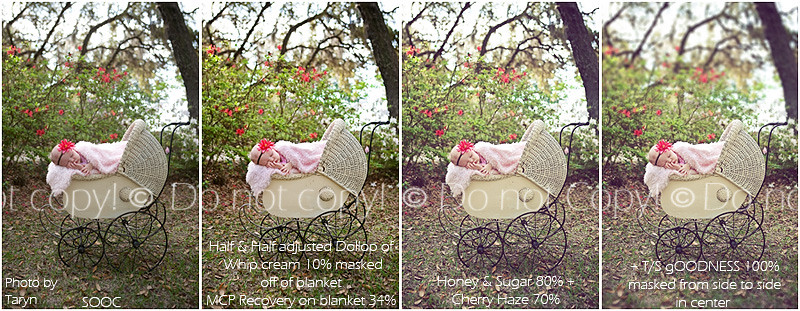
Now for even more fun stuff! The Blur/Grain section! I am VERY into the Tilt Shift lens look {t/s}. But sadly I'm on a poor sad little crop sensor! So until I can upgrade and get that expensive T/S lens, this is as close as I can get! So I included an action that I use a LOOOOT! It will do it's best to mimic a T/S lens. I also included a soft dreamy blur that mimics more of a soft focus effect for a pretty selective focus option. Both require you to paint with black where you want to remove the blur. I have two GREAT tips in the pdf that comes with the set on how to get the most natual look with the blurs. You MUST flatten to run the two blur actions.

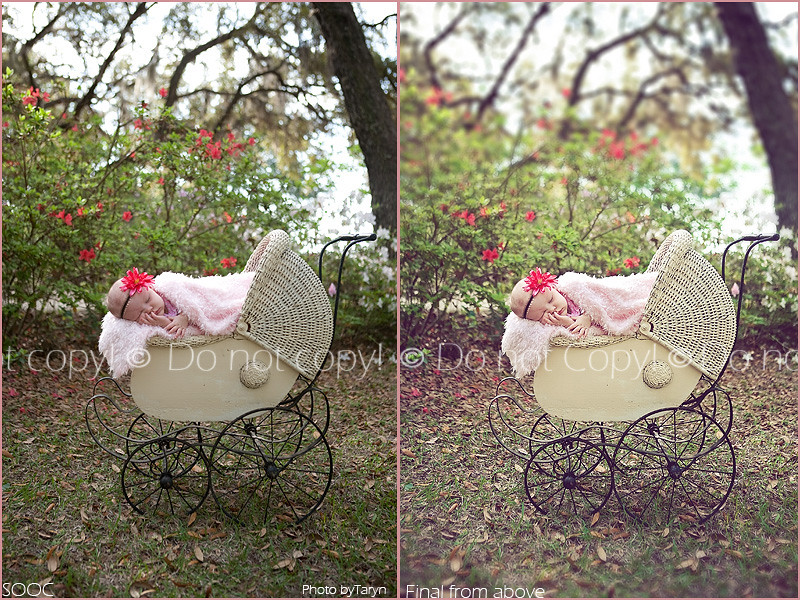
This image...be still my heart was sent in by Taryn Lewis! So I had to run the T/S action on it! Here is my editing process for this image...


And so you can see the yummy goodness close up...


In this section as well is an action called "Sprinkles". It is a simple grain action that I love and does not require you to flatten before running. There is also a white layer mask for any masking needs and runs at 50% opacity. So you can raise or lower it to taste!

Then the last section is the Extras. Very simple, basic tools to help you get a little more out of your images. All of these actions can be run at any time, no need to flatten first! Dollop of whip cream rocks and I use it like crazy. It's basically a center light and you can raise or lower the opacity! Then there is Oven High/Low which is your standard dodge/burn action. To get more out of the dodge layer, change the blend mode to screen and to get more out of the burn layer change your blend mode to multiply. Be CAREFUL when doing any type of dodge/burn. Go light with the brush opacity for a natural look and use a larger soft edge brush so that it blends and enhances. The worst thing you can do is have your dodge/burn efforts wasted by screaming it's been done! It's takes practice and patient. It took me a while to get it! :O) Then you have a basic brighten and darken layer called Oven On & Oven Off!
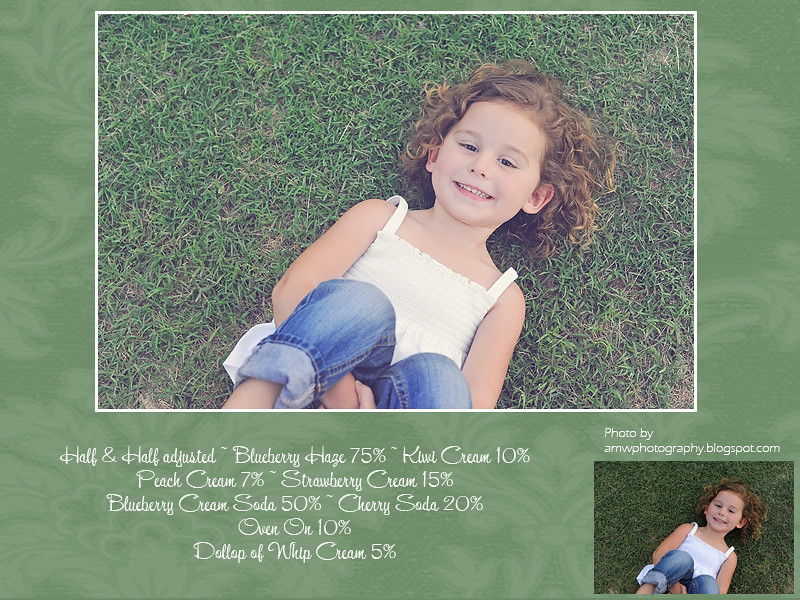
So...if you are still with me and are as excited as I am about this set....lets get to the details! I'm not a fancy bloggin action seller as you all know! Lol! So I do not have a fancy blog like MCP or the other girls that allows you an instant download. I am sorry about that. But I do not plan on going into the action selling business, so I cannot justify paying for that option!

To order this set paypal $50 to momaziggy AT yahoo DOT com and make sure you check your email for your paypal account as that is where they will be emailed, along with the pdf file! Your actions will be emailed to you within 24 hours of your order, but in all honestly...most likely MUCH less time! You can email me anytime as well at momaziggy AT yahoo DOT com

So I think that's about it. Head over to 2Peas to see more examples I've posted, I'm on FB as well and let me know if you have any questions. I hope you buy them, LOVE them and get as much out of them as I do! :O)

Search My Blog

Followers

About my PS Blog

Hi, my name is Crystal and I am addicted to Photoshop. I have PSCS4 and it's my other half. I love photography, but sometimes I think it's a means to edit!
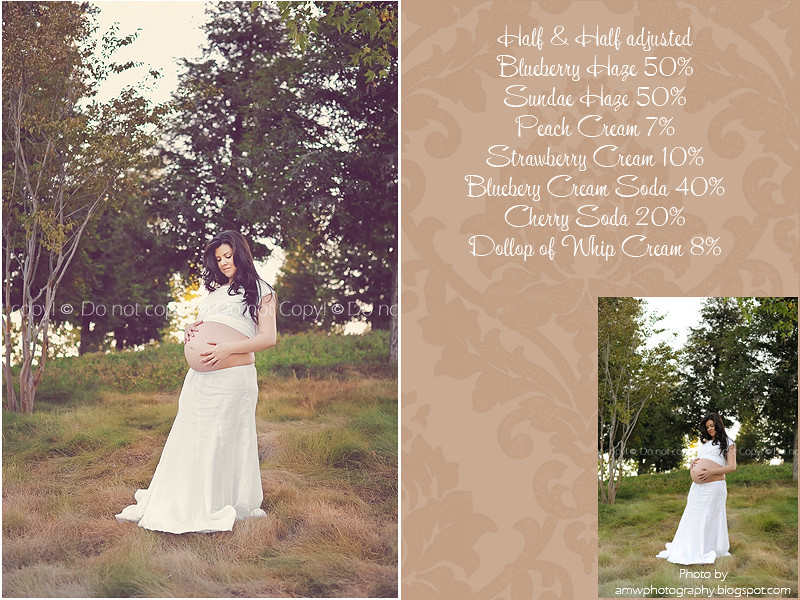
So I thought it would be fun to have a place to post the free action sets I record, tips and tricks that I learn in PS and tuts for various different types of photo editing.

I hope you enjoy and find my PS blog helpful and if you have any questions, leave me a comment with your questions and your email address and I will get back to you!
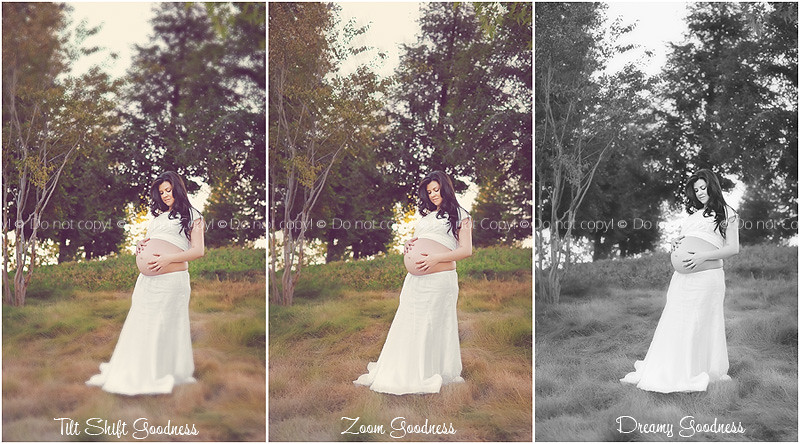
Happy editing!

About Me

My photo
I am a stay at home to 2 great girls. My older daughter Haylee just started middle school and my younger daughter Avyree is in 1st grade! I have been married 11 years to my hubs Eric. I got my first DSLR June 31, 2008 and have been hooked ever since! My style is primarily Lifestyle! I like to take a natural and real life approach to my images! I want them to remind me of WHO my girls were when they were little, not just what they looked like. I love to edit and my editing style is always evolving and changing! I like variety and photography is a means to edit! I shoot Canon (full frame) and almost only primes. I pull out my wide angle zoom from time to time! Thanks for stopping by and I hope you like our story...
Background paper by Kay Miller

  © Blogger template 'Photoblog' by Ourblogtemplates.com 2008

Back to TOP