Hi & welcome to my PS blog! This blog is for full PS although some steps will also work in PSE. Most actions, unless stated are not PSE compatiable. I do try to make an action for PSE from time to time. I hope you have fun here and learn some things along the way. If you have any questions, just drop me a comment! :O)

Thursday, July 1, 2010

The Ziggy~Licious action set Sneak Peek...

Hello all! I am VERY excited about my new set. This set is a labor of love and very personal to me! I have decided that I will be selling this particular set. I know I said I would never sell my actions, that they would always be free. I still feel that way. So I do want you to know that I will still be sharing action sets I make for free. This set is different though which is why I've decided to sell this one.

I was at a point where I felt my processing was missing something. I have an action panel full of amazing actions, that I love and use regularly. But something was missing. So I finally asked myself what was it that was missing and what I needed to do to achieve it. And VIOLA I created "The Ziggy~Licious" set!

I had a few things that were very important to me when I made this set. First was I wanted a set that would change the tonal range of my images and add a slight haze without adding too much contrast and losing the detail I work so hard to get in camera and that wouldn't make the whites and skin tones wonky. Don't get me wrong, I have actions that add a lot of contrast and I LOVE them. But I wanted the option of both. Lilyblue {LB} is as close to what I wanted as possible. But I wanted different tones and a slightly different feel! The other thing that was really important to me was that this set be fast and easy to use. I wanted a set that I didn't have to do too much tweaking of layers so that it would help speed up my workflow. I spend too much time playing in PS! Lol!

So all in all I really could not be happier with this set. I met my goals and am thrilled! I've gotten so much use out of this set already and I truly hope that you guys love it as much as I do.

They are almost ready for release. I'm just fine tuning everything and should be up within a couple weeks.

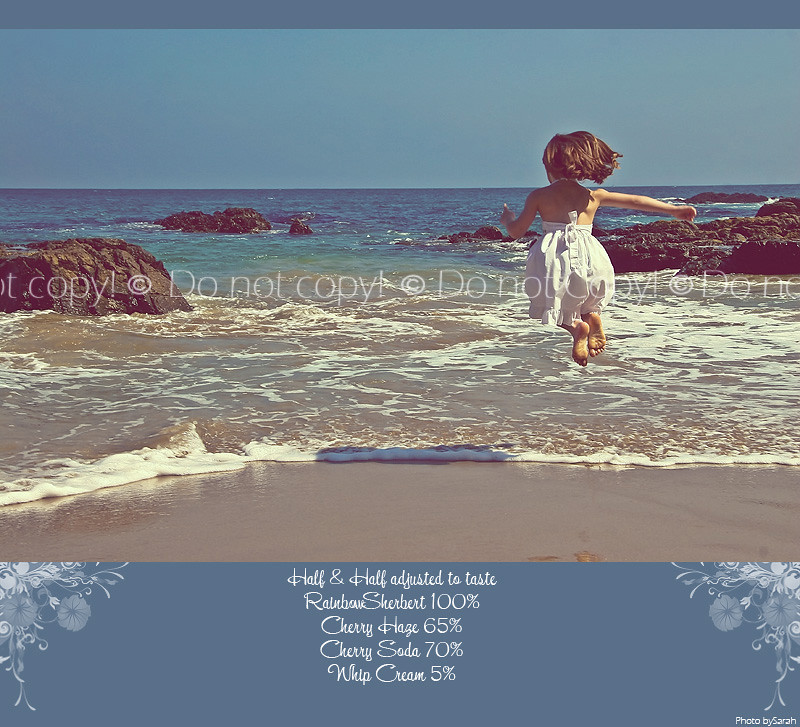
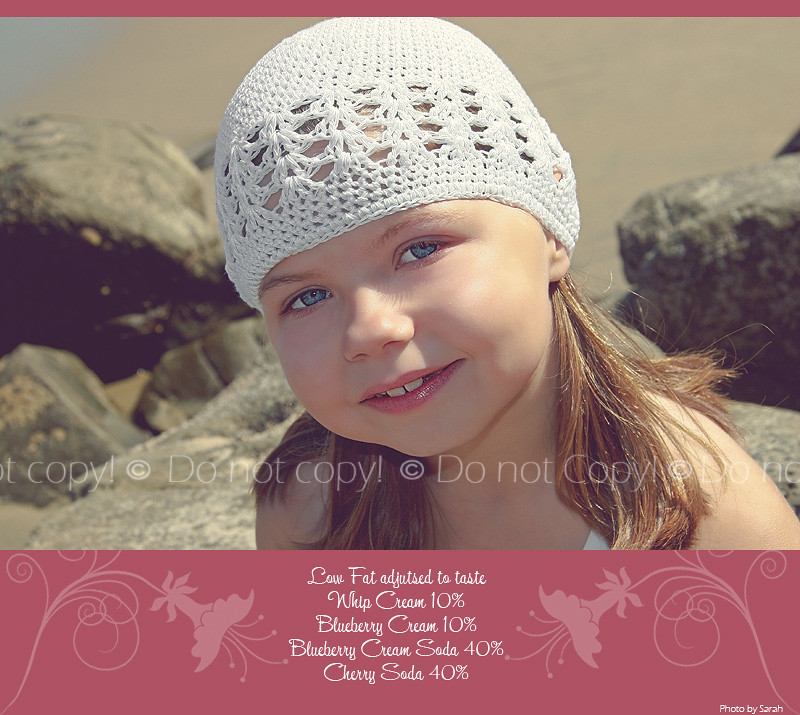
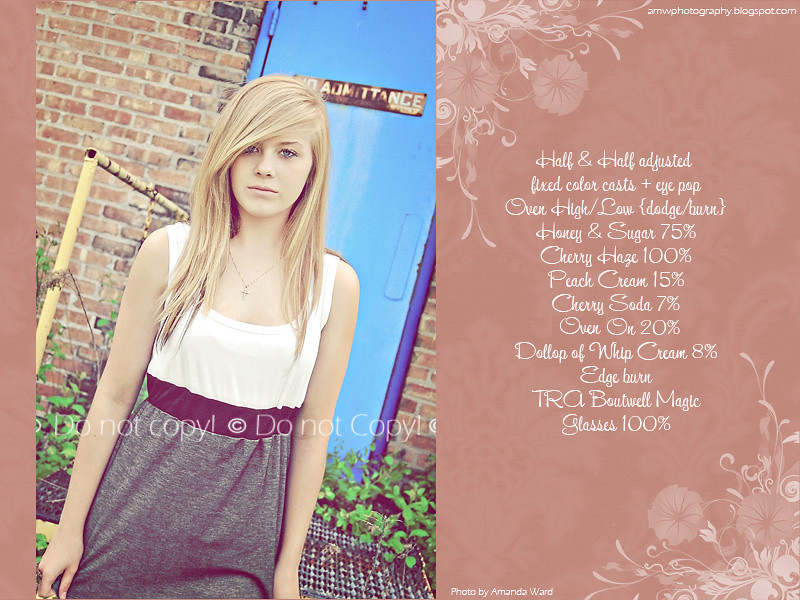
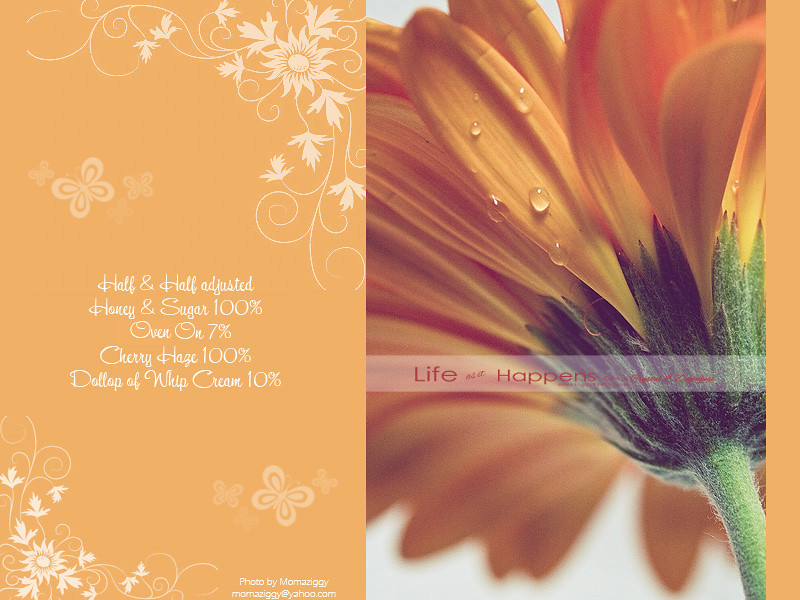
I wanted to share a Sneak Peek of images that were sent in to me for testing! The images themselves will blow you away and I hope you love the actions run on them as well. This is meant for you to see what is capable of achieving with this set. The actual post where they will be for sale will have all of the before and after examples. These simply show different looks you can get combining the actions in this set! Note...I did use TRA Boutwell Magic Glasses on a couple that of course is not included in this set.

These will work in CS2 & up PC & MAC but are not PSE compatible. Sorry PSE girls!

Here we go...

This beautiful image was sent in from Anne Oliver...


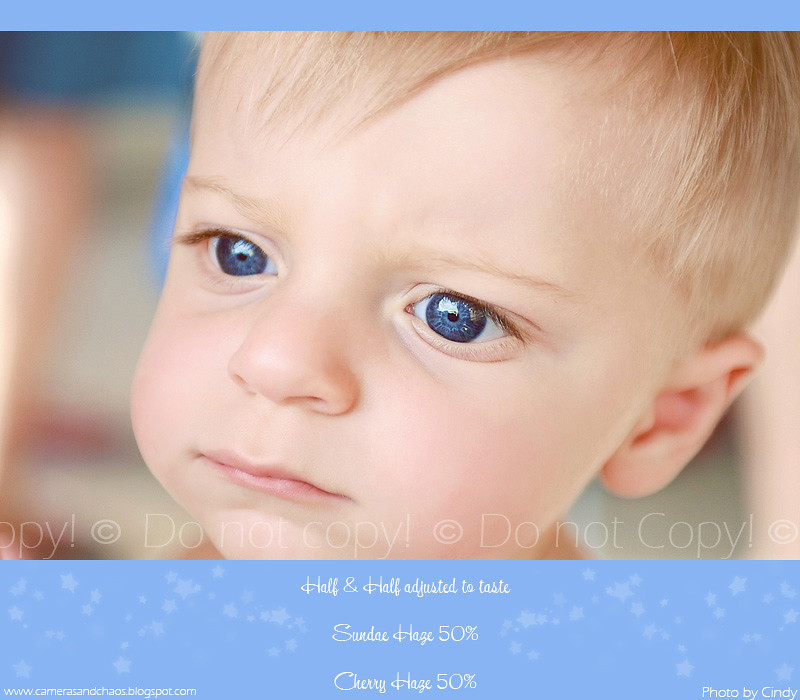
This gorgeous baby with the most amazing eyes I've ever seen was sent in by Cindy Mandernach ...


This sweet candid moment was sent in by Tiffany...


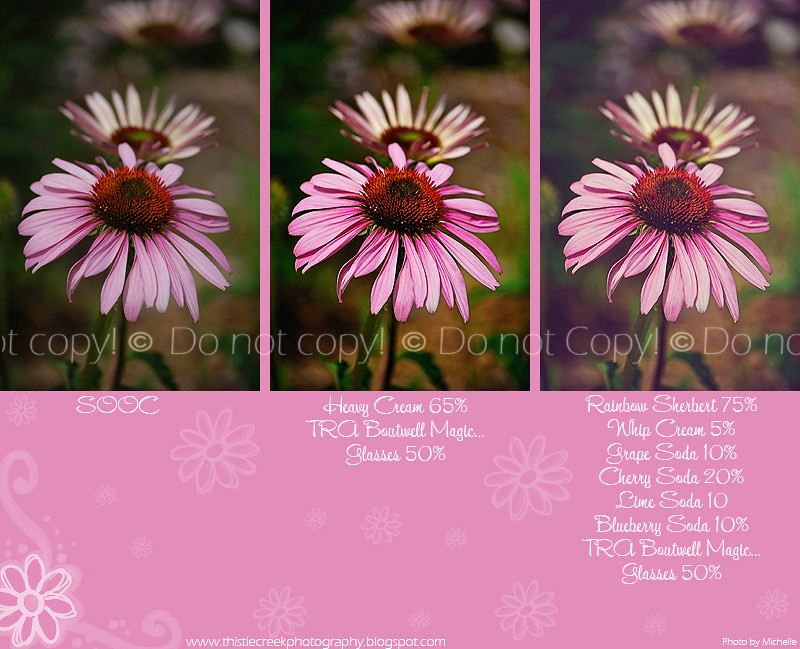
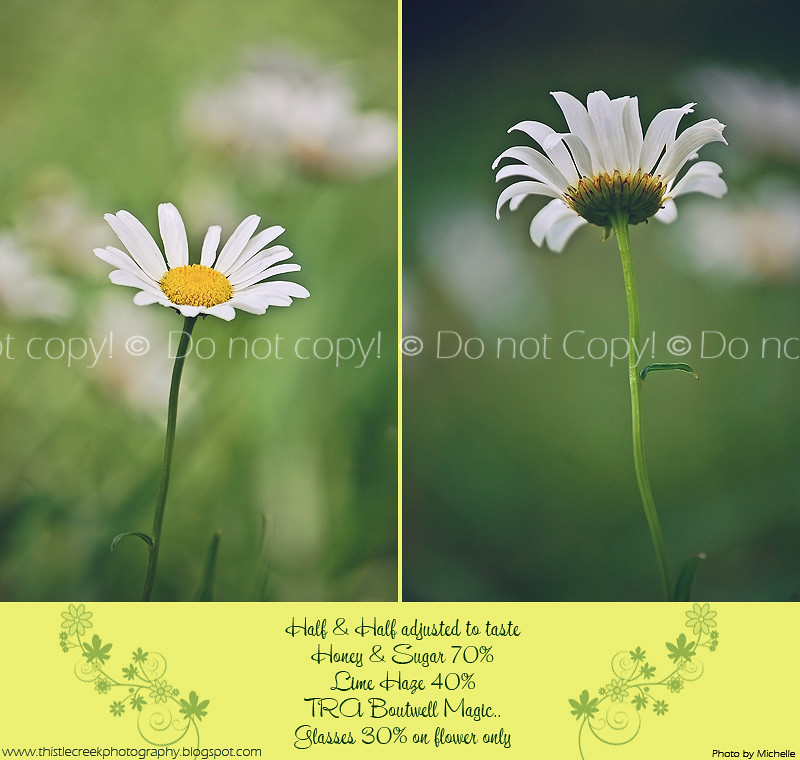
These next two beautiful flower images were sent in by Michelle Olson ...


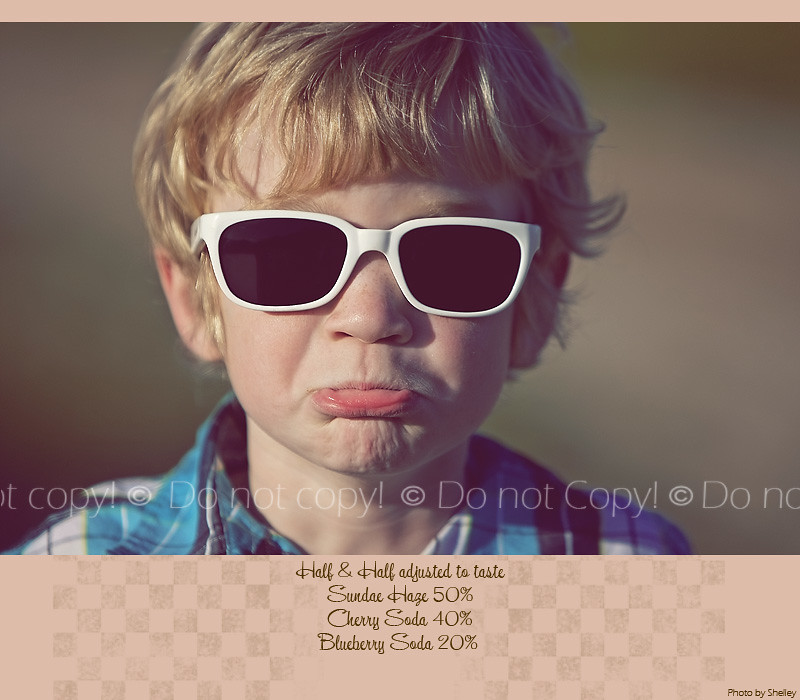
This awesome shot/expression was sent it by Shelley Schaffer...


The next two beautiful beach images were sent in by Sarah Seibert...


This awesome urban shot was sent in by one of my dearest friends and also an amazing photographer Amanda Ward


This shot was sent to ME by ME! Lol! Macro shot taken with my 100mm 2.8 {non L version}...


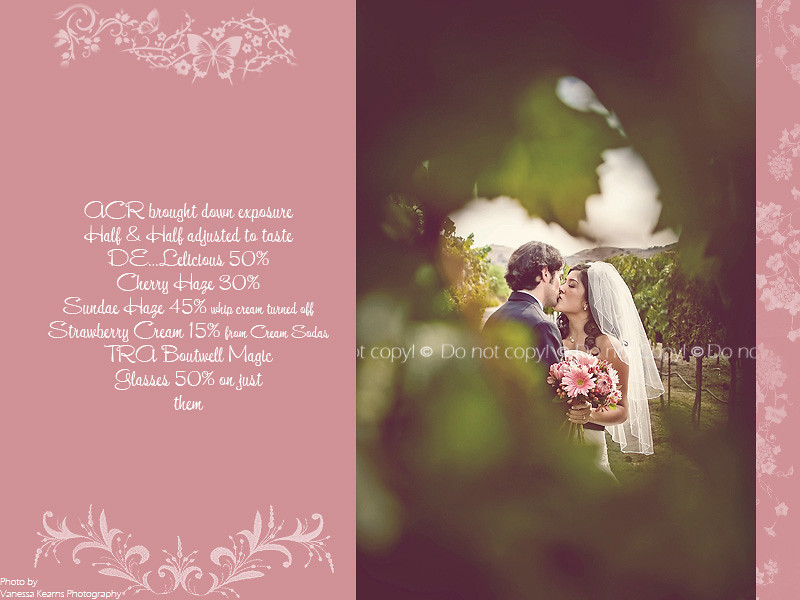
This stop.your.heart.romantic.moment shot was sent in by Vanessa Kearns ...


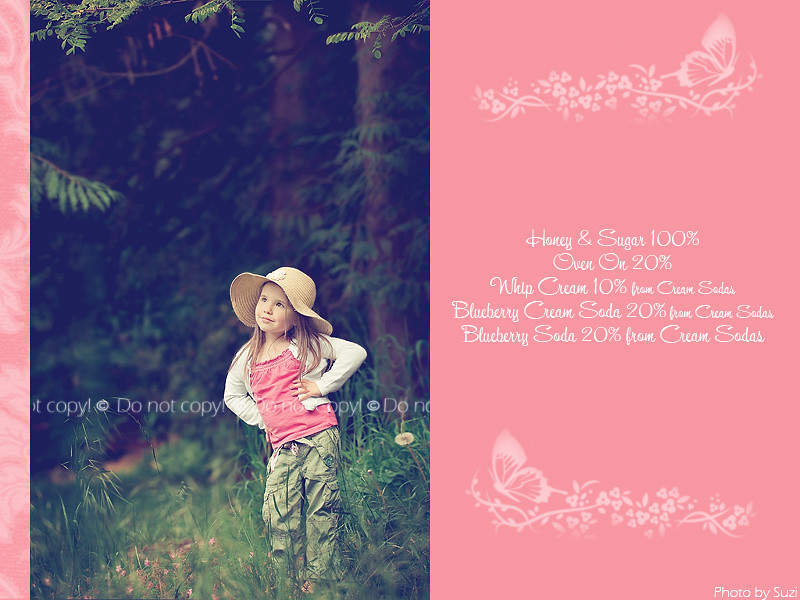
The next two images of this adorable little girl and beautiful setting was sent in by Suzi...


Here I wanted to show that you can take the same image and get different looks and tonal ranges depending on which actions you use! :O)


And I'm sure after looking at all of those amazing.beautiful.breathtaking images you are feeling happy and positive! Beauty does that to people! :O)

So that is the Sneak Peek. I hope you enjoyed it, it's gotten you excited about the action set and that you can imagine these actions on your images! I would love to hear any feedback you have about the action set and I will post when they are ready!

Thank you very much for stopping by and supporting my first attempt at selling one of my action sets! Have a beautiful day! :O)

***PSA...for those of you who do not know me...I am a down to earth easy going person and with that comes good and bad! I use caps too much when writing and :O)! I also am the typo queen of the world, use the wrongs words all the time and am also known as the run on sentence queen of the world! I'm also VERY long winded! So now you know and might not run away too fast! :O) I've come to terms with who I am and am at peace! Lol! Oh...I use LOL a lot too! Hope you stick around...teehee! End of PSA***

Thursday, May 20, 2010

Before and after with new stuff I'm trying...

Wow..can you believe I'm actually posting! Lol! The more I learn the more I find out what I DON'T know. Which is the main reason why I haven't posted much. I haven't felt I've had anything to share and when you realize you don't know nearly as much as you thought you did..it makes you leery of teaching others! Lol! One reason why this blog is called "for FUN" tho. It truly was never a place to teach, but to share fun things I've learned! But I started posting some more serious color correcting tuts etc before I even got a great grasp on it. Not to say that those methods aren't good methods. Just that I probably shouldn't be teaching that important stuff and need to keep it more about the "FUN" stuff!

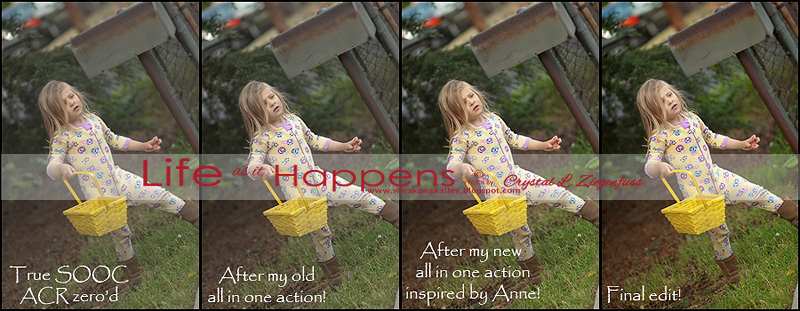
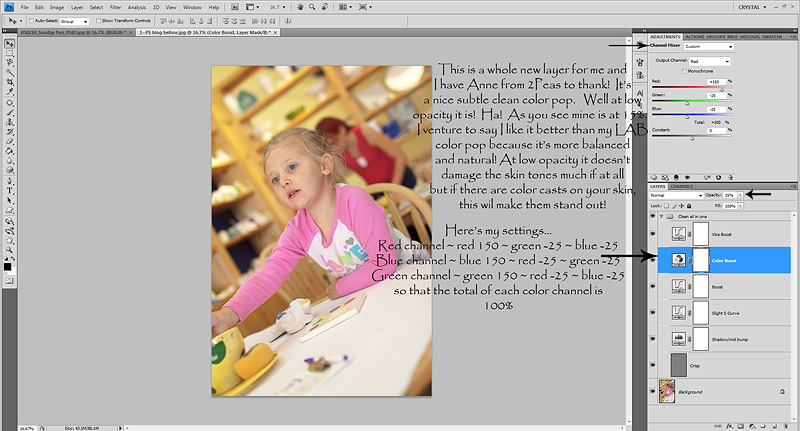
I've learned some things from Anne on 2Peas and have been playing around. And it's made a big impact on my editing. I was having a bad time with muddy colors and skin tones. Just blah and lifeless! So here is just a little peak at what a difference her methods {that I'll share a bit below and link you to her tut on 2Peas} have made! Much better than before and I'm learning that the true next step to stepping up my game and images is starting to mask more and working on specific parts of the image with different layers rather than just a couple all over adjustments. I think that's part of what separates those really rockin edits and mine. Well that and the fact that the images rock and mine are mostly snaps of my girls! I bet you missed how long winded I am..NOT! Ha! Okay...here they are...


I'm also trying a new method of doing most of the typing on the actual screenshot. For two reasons. One..it's just easier and more time efficient. It takes forever to do all the instructions in between the screenshots, two you can right click and save and will have the majority of the instructions right there and an extra...three...I can't talk quite as much on that little screenshot! Ha!

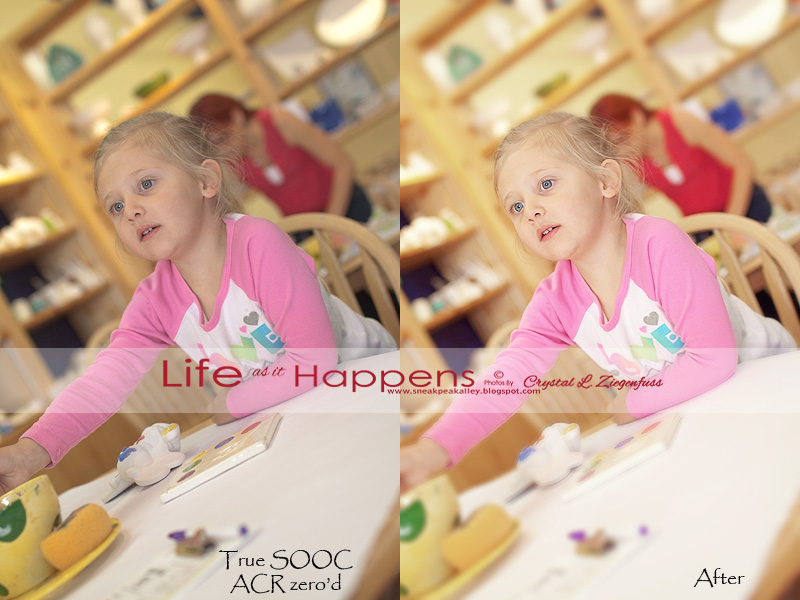
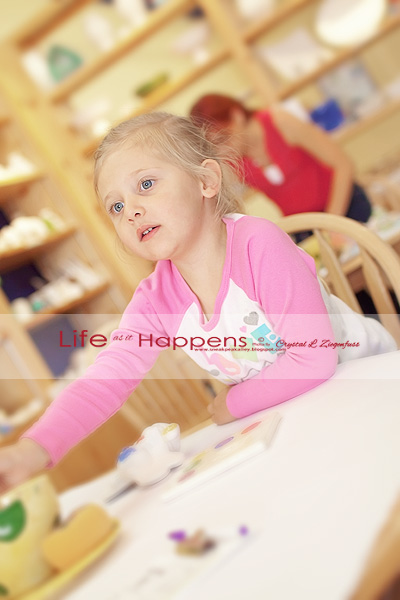
So here is a snap of Avyree at a place where you can paint your own ceramics and they fire them for you. It's for my mom for her bday! I'm in the process of editing the folder {my last of mine and I'm finally caught up..yay} and this one jumped out at me! The light was nice, focus was good and I was happy with the edit. So I thought I'd do a before/after with it!

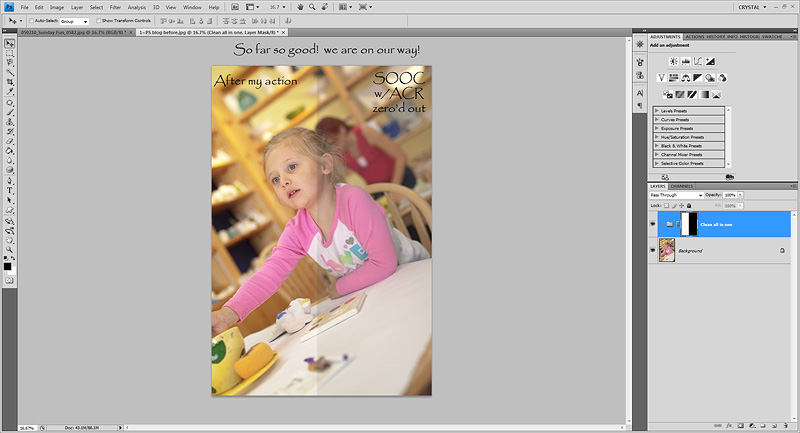
So here is the zero'd out ACR SOOC. Just so you know and something I never thought about. When you load a RAW file into ACR, it's instantly no longer a SOOC image. ACR applies a medium contrast S curve, 50 brightness, 25 contrast and 5 blacks. That's the default. So it's already been slightly edited for you. Then bring it into PS and do your normal editing and you could end up with clipped shadows, blown highlights and an image that overall just has too much contrast which looks wonky, throws off your colors and enhances any color issues including reflected color casts! And not to mention that each image {even in the same lighting but different angles} may need different things. And if you changed your settings while shooting, that will also require different settings per shot! Soooooo....I now have my RAW saved to zero out everything on import! Sure it's ugly and gray BUT it allows me to see the image for what it really is...naked! Then I can really analyze what it REALLY needs and do my ACR adjustments for each image then go into PS! So when you see my SOOC example, you'll know it's a TRUE sooc image and as I've also learned, is pretty right on with a good SOOC RAW image! So that makes me happy!

Here is the before/after...


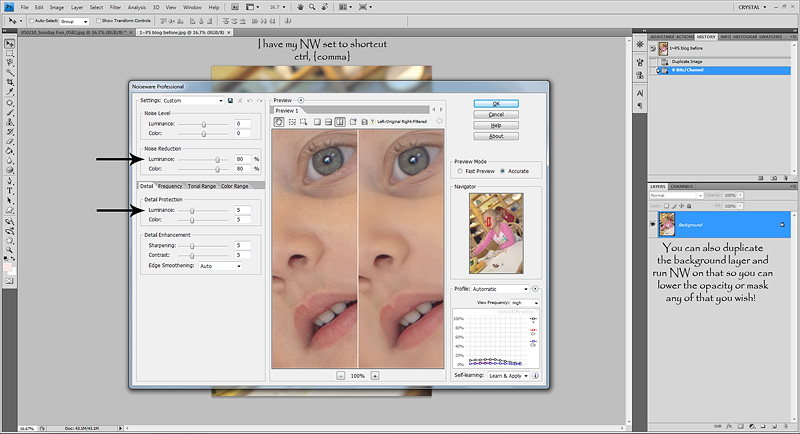
I'm also trying this new method from Anne about Noiseware. The theory is removing the noise without making the image too soft and silky also making the skin looked too smooth and plastic! To see the full tut about her clean post processing with some fun great extras to help you really pop your photos head over to 2Peas PhotoClassroom ~ Post Processing!


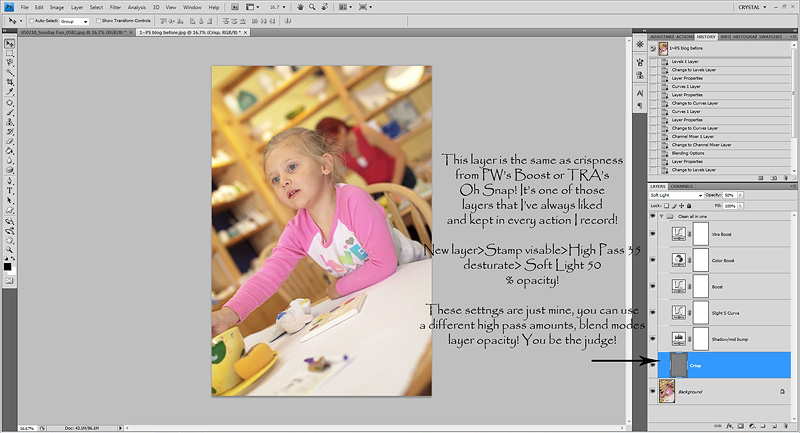
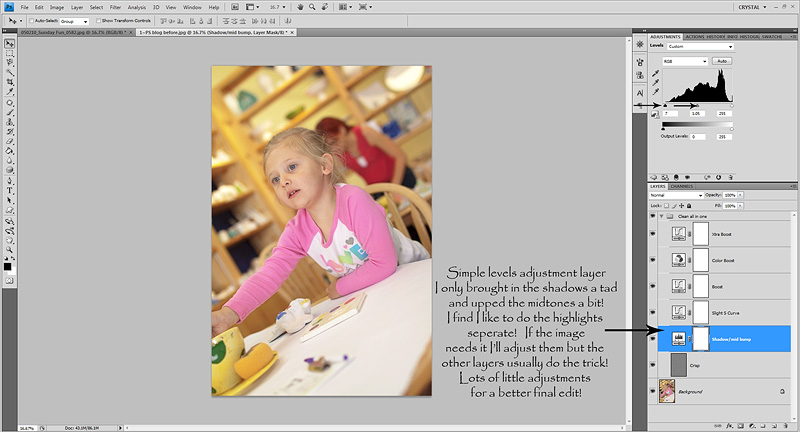
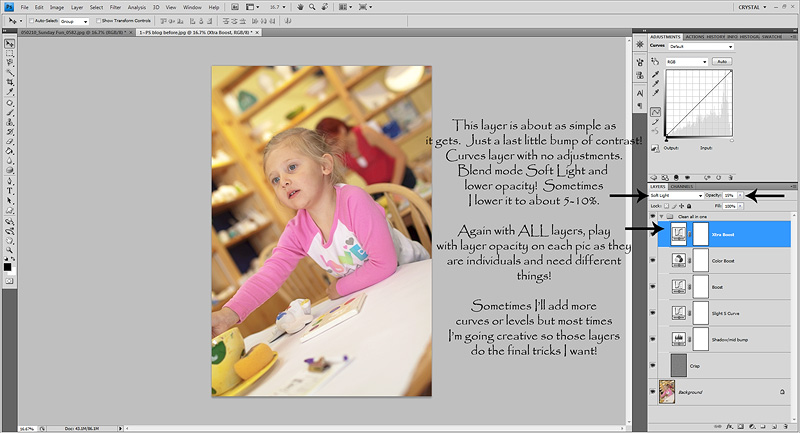
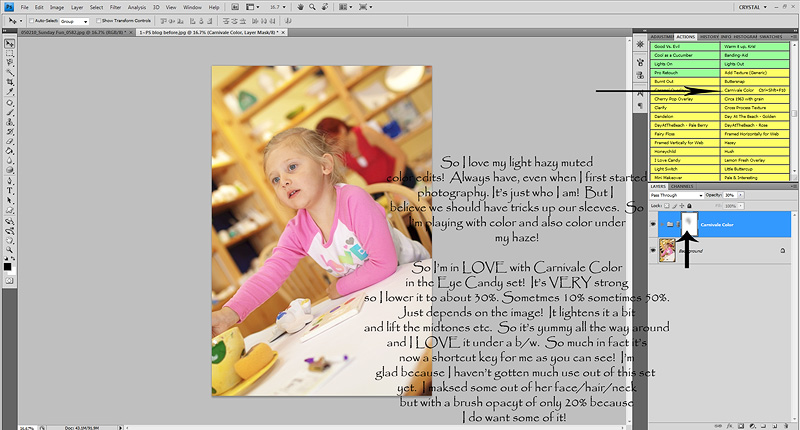
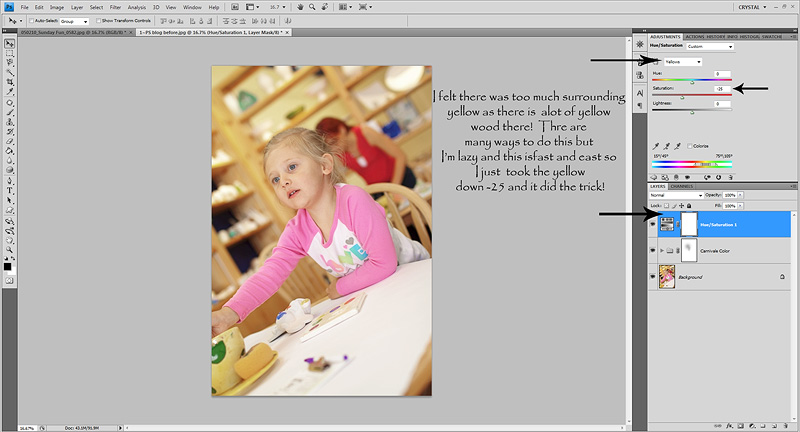
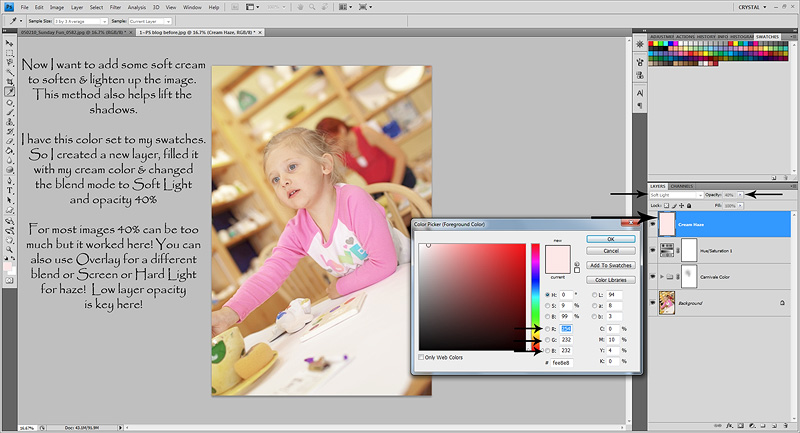
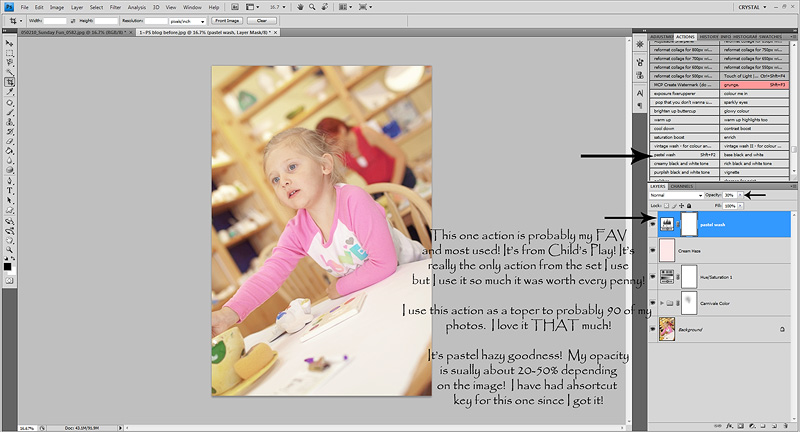
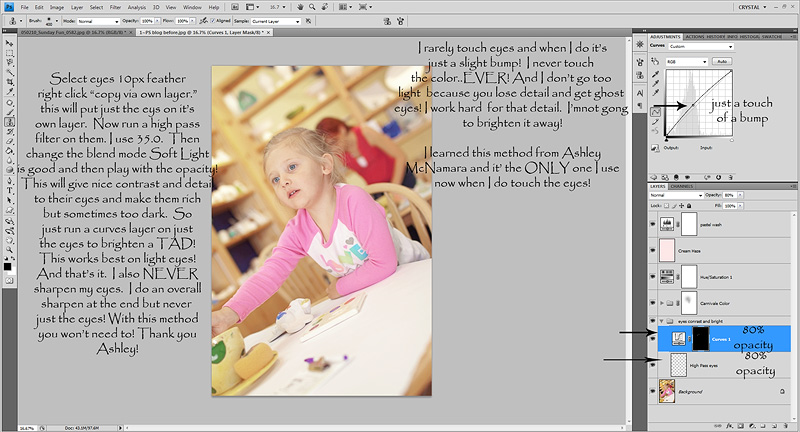
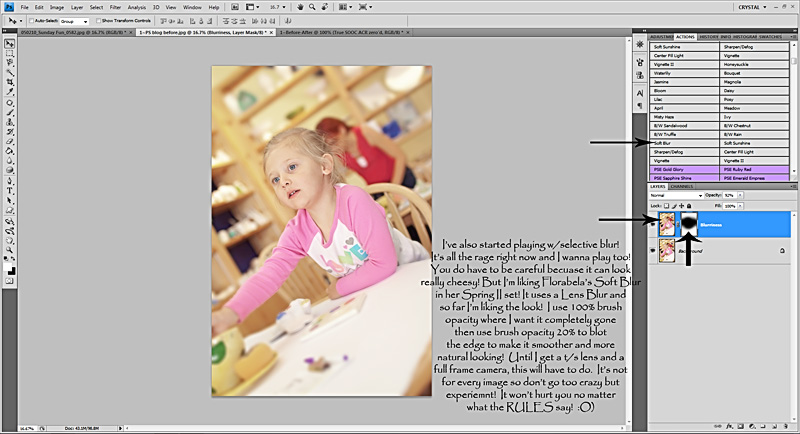
And here I went over each layer in my new action! So there are lots of screenshots but I know when you are beginning and just learning screenshots with specific settings are so important and give you a starting off point! :O)


Go check out Eye Candy Actions if you are interested in them!


Another tip for the cream layer, at 10-15% over a b/w can make a nice soft creamy b/w and it helps lift the shadows of a b/w too! :O) My b/w cream actions that I shared here use this layer on top at low opacity!


Check out Child's Play Actions if you are interested!


Check out Ashely McNamara's Tut for this method! Check out her blog! She's great and has a great photographers section, actions and tuts! :O) Oh...and I went a bit lighter on the eyes here than I normally would or did with my original edit. I was rushing since this was a re edit for the tut! Normally I'd lower the eye curves a bit more but I'm really freaking about over popped eyes! So even Avyree's in this after are a bit much for me!


Florabella is my HERO and I LOVE her! I have everything she's sold and will buy everything she sells in the future! Lol! I have all 5 of her action sets and both of her texture sets and her textures are the only ones I use now! So you have to go check out her GOODS!


Then after I ran this and flattened I ran my Luminosity USM that I still use at the end of EVERY edit unless it's like crazy underexposed 3200 ISO! Lol! I lowered the opacity to 75%. I have a tut here on the blog on how to do the LUSM but am way too tired to search and still have to finish the editing I stopped to do this tut that took like 3 hours! Lol!

And after all of that...here is the after! :O) Isn't she a cutie!


And I actually have another post idea. It will be more random but with some fun tricks that I've learned for fun creative stuff! So hopefully in the next week or two I'll get it up!

Hope everyone is great and thanks for being so patient with me. Now that my 700 Idaho pics are done, 600 small wedding pics are done and 500 event pics are done and I'm on my last folder of personal files, maybe I'll be able to start posting again! Lol! I don't know how you girls do the biz thing, daily life and still get your own pics done, blog posts up etc etc! I bow down to you!

And a special THANK YOU to Anne on 2Peas. The amount of time she gives to us on the board is truly amazing. She's so gifted and generous with her knowledge. She truly wants to give back and help others learn how to get what they want out of their images. The amount that I've learned from her posts out number any classes I could ever take! And she does it simply for the goodness of her heart! So if you don't know about 2Peas...get your butt over there because it ROCKS and tell em Momaziggy sent you! Lol! Cause I rock like that! Teehee! Oh geeze...I need sleep!

Have a GREAT Friday and weekend!

Friday, March 19, 2010

Organzing your actions panel and button mode...

So I am finally getting around to doing this tut! It'll actually be a quick and easy tut! Once I finally did this, it made a world of difference in how efficient I am in PS!

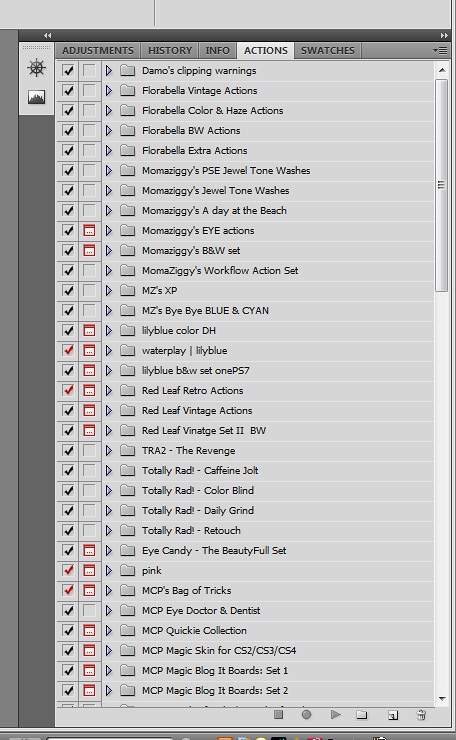
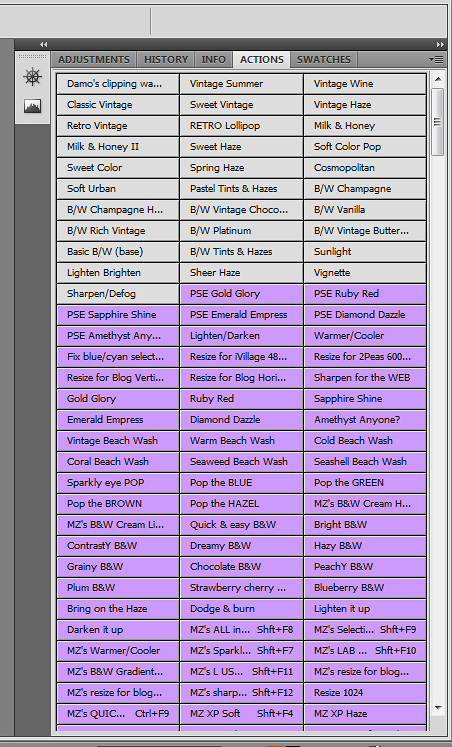
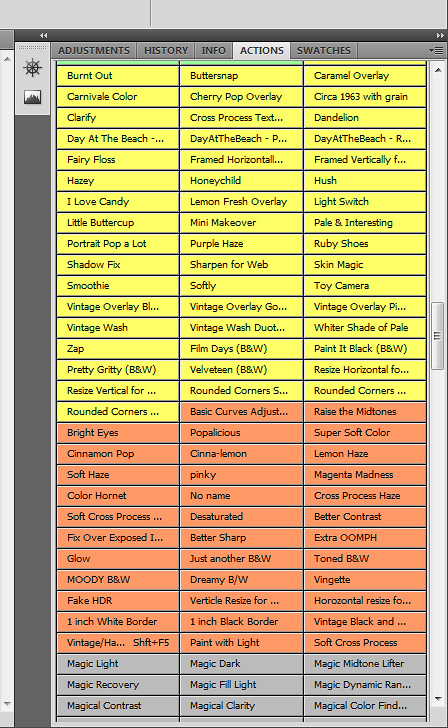
So the first thing is to clean out any actions you do not use. We all know that we accumlate a LOT of actions...many wonderful free shares and some we've bought and just didn't care for! So the first thing I did was delete ALL sets and single actions I NEVER use. When I say delete, I mean just from my panel. They are still in a folder on my hard drive and backed up on disk! ALWAYS back up your actions, plugins, textures etc on disk!!! I have a few I only use once in a while, so I did leave those but moved them to the bottom of my panel. Then once you have your actions panel cleaned up, it's time to put it in order! Very easy and simple. Simply collapse the action folder then drag it where you want it. The ones you use the most should be at the top of your actions panel, then go in order of how often they are used! So all my Florabella actions are first, well actually Damien's hightlight/shadow action is first. Then after FB I have all of my actions. Then Lily Blue cause I use these A LOT...and so on! So far so easy! Here is a screenshot of what my actions panel looks like once I have them all on order.


Now comes the NOT so fun time consuming part! We are going to assign colors to each action set. The only thing that bugs me is that you cannot assign a color to the whole folder...you have to assign it to each and every action in the set! So it's takes a long time, especially if you have a lot of actions. But the time it takes is SO worth it! It took me almost a full afternoon to do it and I was really grumpy and annoyed at the process, but once it was done I was happy as a clam...if clams are actually happy! Lol! And while we are assinging colors to our actions, we can also assign short cut keys to our most used actions. I have just about every short cut key used for my actions that I use a LOT. It's a BIG time saver! :O)

The reason it is important to assign colors to your actions is so that you can quickly tell them apart by maker! I wish PS had more colors for this!

So for Damien's awesome action and FB's FAB actions, I left them at the default gray because I ran out of colors! Lol! Then I started with my actions. My favorite color is purple, so I assigned purple to ALL of my actions.

Here's how...

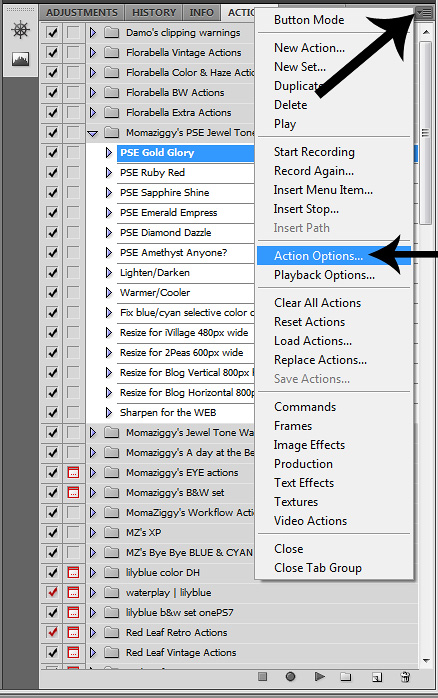
First start by opening the folder so that you can see all the actions. Then I click once on the first action in the set to highlight it. Then I click on the little arrow thingy and it gives me the following options. You want to click on "Action Options".


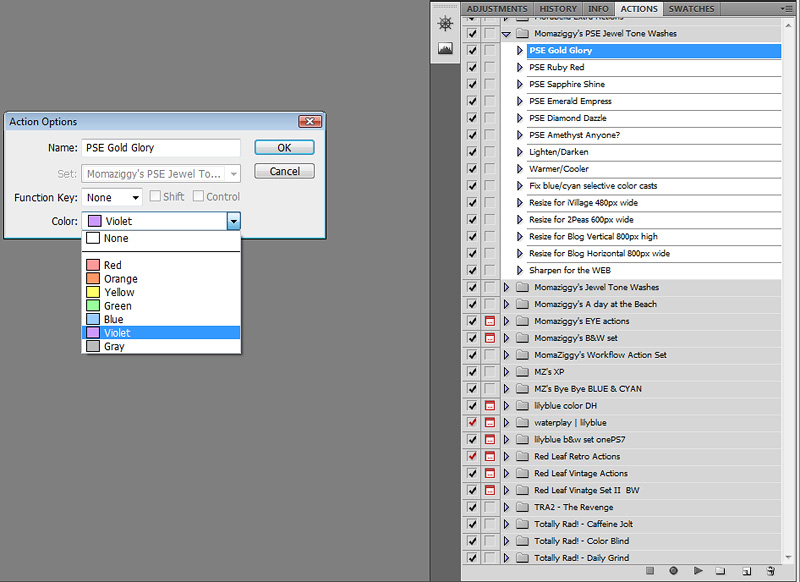
This is what you'll see...


So now you just click on the arrow for the drop down menu and select your color. The important part is that you use the same color for all the actions from the same maker. So ALL of my action sets are purple! The PITB now is that you HAVE to do this step for EACH individual action! So once you select your color for your first action, click ok then select the next action in that set and do the same steps assinging the color you chose for that maker! Rinse, lather and repeat...a thousand times! Lol! Then when you get to the next action maker, chose a different color. If you run out of colors like I did you can use default gray in between other colors to make the different makers stand out. Again the key is to be able to tell color wise each action set from each maker! Or it'll take you more time to browse through your actions in button mode defeating the purpose of button mode!

So now lets say you want to assign a short cut key to an action you use all the time or on every pic. I have a very basic all in one action I use now! I use it on EVERY photo!!! It's a high pass filter, strong S curve at low opacity {blend mode set to Luminosity} and a levels adjustment layer for the middtones. Since I use it on every photo I don't want to have to click on my actions panel every time. So I assinged a short cut key to it. Here's a screenshot of it...


So you go back into "Action Options" the exact same place you assigned your color. Now you use the Function Key drop down menu to choose what F key you want assigned to this action. They also give you the option to choose Shift and/or Ctrl. This helps if you run out of short cut keys. So for my action that I use on all my photos I assigned Ctrl-F9 since I have SO many already assigned! Then you click ok and that's it. Now while you are assigning your colors, if you come across an action you use all the time, then you can assign the color AND the short key at the same time. Another time saver. So now the 1st thing I do after I run an image through ACR and bring into PS is hit Ctrl-F9 and it runs that action for me. I never have to touch the actions panel to run this action...another time saver! And as you can see in my actions panel, I've assigned many short cut keys! I wrote them all down and have them on a piece of paper to remember them. I've got almost all of the memorized now but there are a few I don't use as often, so I sometimes have to refer to my little cheat sheet. So I HIGHLY suggest writing them down on a paper next to you until you have them memorized!

And that's the hard time consuming part. Now we are almost done. You noticed that when you clicked on the little arrow thinging the first option is Button Mode! So go back and select it! Now you are in button mode! Here is what my actions panel looks like now that I've got them all done...

Like I said I have a LOT of actions so it's a really long actions panel! Lol! So I did a few screenshots while scrolling down.

This is the top of my actions panel. 1st action is Damien's which really ROCKS! Then Florabella in gray then mine in purple...


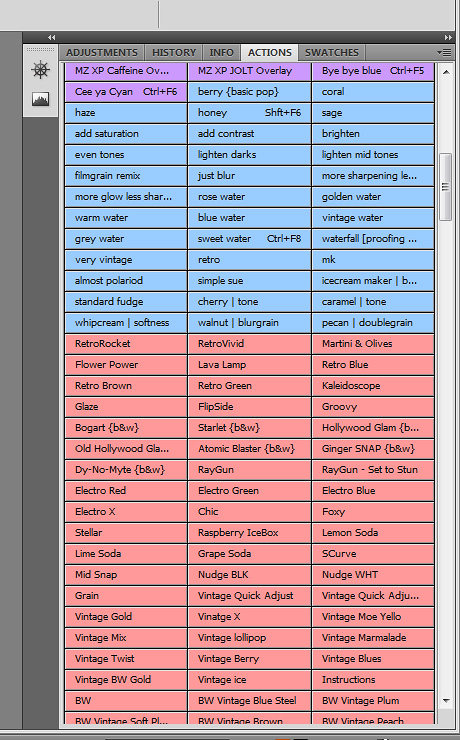
After mine I have Lily Blue's in blue and Red Leaf in red! Lol!


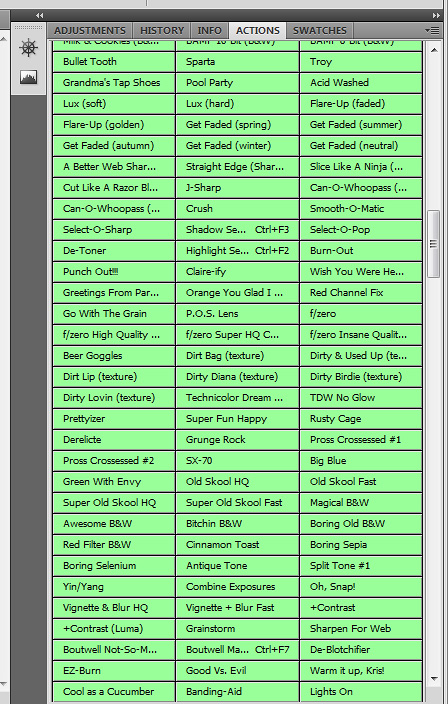
TRA in green...


Eye Candy in yellow, Ashley's McNarma's in orange and MCP in gray again...


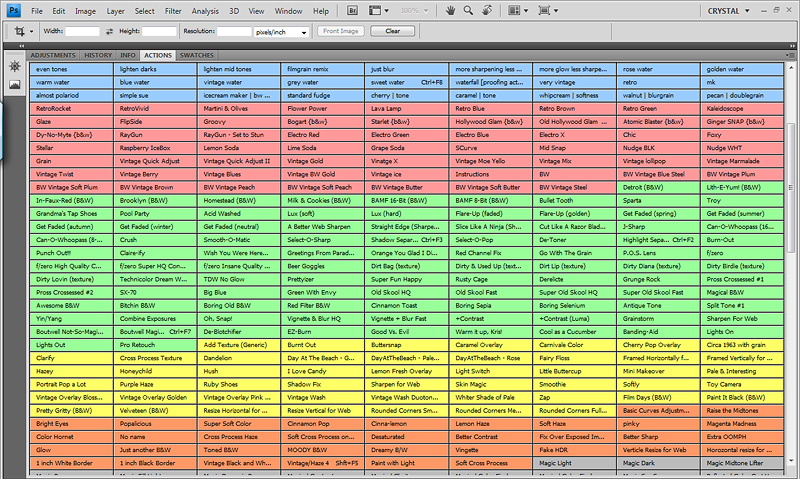
And so on. And to show you the color differences and why it's so important I made my actions panel take up my whole workspace so you can see most of it! Sadly it still wouldn't all fit in my screen...lol...


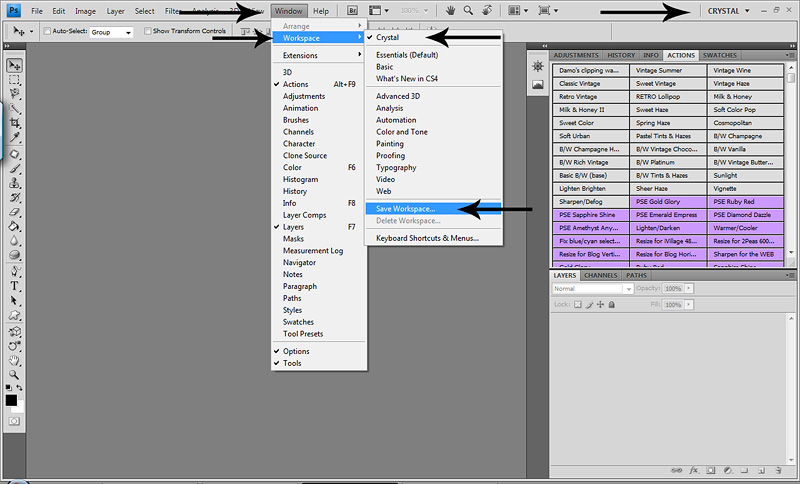
And one other quick thing I wanted to show you that is a huge time saver as well is setting up and saving your own workspace! We all process different and all have different workflows. I find myself using certain things for my workflow and some things I never used. My screen is only 15 in, so I need all the workspace I can get! So I started moving things around, using the Window tab up top to select the things I use and have them all tabbed up where the adjustment panel is. CS4 has an adjustment tab. Older versions do not. But you can still set it up to your liking. Here is my workspace...


Once you have it set up the way you like it go to Window>Workspace and select Save Workspace. It will give you a pop up menu and allow you to name it. You can see where mine is and it also puts the name you assign at the top right!

So now if I accidently move something {which happens if I'm working fast or the girls are running a muck all round me} or PS goes all wonky, all I have to do is go to Window>Workspace and click on the workspace I saved it's instantly back to MY workspace!

PS is such a powerful tool with so many different options. Some will be used and some won't. So to use it to it's fullest and get the most out of it without it ruling your life, it's important to learn all the little time saving things you can do and get it set up for you so that editing is faster, easier and more efficient. Every one's workspace will be different depending on what you use! This is just what works for me. Find your own way and then customize it so PS is working for YOU instead of you working for IT! Lol!

I hope this was helpful and as you can see, it's REALLY easy to do, just time consuming. Oh...one last tip for the day! Once you've made your changes, CLOSE PS then reopen. Because if you spend most of the day doing this and PS crashes on you, NONE of your changes will be saved and you'll have to start over!!!! Trust me...I KNOW! Lol! After it crashed and I lost all my work {luckily I was still doing it not completely done} I started closing PS down a couple times to save my progress! The first time I was about half way done. So I was NOT going to start over again! Lol! So close it down and reopen as you go to save yourself the headache of wasting half a day just to start over! :O)
So you may be wondering why would you want to use button mode?! Really it's just a time saver. I'm an organized person and it allows me to be more efficent and work faster. With your regular actions panel, you have to open each folder, then select the action you want to run then hit play! A few steps. With button mode ALL you have to do is scroll down and find the action you want to run and hit it! That's IT! Once you use it for a day or two you'll wonder how you lived without it! I will say that if you aren't familar with your actions, button mode can be harder to use. It took me a while to switch because I didn't know my actions well enough. Now that I know and have them in order, it's a BREEZE! So try it for a few days and you'll be IN LOVE!

If you have any questions, feel free to ask and I'll do my best to help! I am by NO means a PS pro. One of the reasons I haven't been posting much. I realize there is just too much I don't know yet to be teaching others! Lol! Reading Damien's posts have shown me that. So for now I'm sticking to posts like this and creative editing post, but nothing on clean processing or skin tones until *I* get better!

Happy Friday and I hope you all have a wonderful weekend! :O)

Thursday, February 4, 2010

Action recipes...

So...if you are like me you have an actions panel full of wonderful and fun actions. The fun part is getting to know your actions and what each one does. And learning each layer in each action is so important. Then what happens when you know your actions inside and out and you have fun using them but then your images start looking similar because you are running the same actions over and over? It's time to start mixing actions from different makers to get special recipes that are unique and fit your style. I've got my actions panel all cleaned up and I only have the ones I use all the time loaded. The ones I love and cannot live without. I have a few that I only use once in a while at the bottom of my panel. But I have MANY that I never use and I finally cleaned those out. If you have too many actions it can be overwhelming. So I took the time to get to know my actions so I could decide which fit my style. Then the best thing I did was organize and switch to button mode!

So today I'd like to just quickly show a couple examples of actions recipes and how you can take an image from nice to creative, fun and unique. They will be creative edits of course! Lol! And how fun and unique it can be to mix it up and think OUT OF THE BOX! It's a little hard to do this if you don't really know your actions. So I do highly suggest that you take the time to get to know your actions and what they can do for you and what you can do with them. Especially if you've paid for them. Get your money's worth! I know what each actions {for the most part} does and what look it will give me. So I can visualize how different actions will look together on an image. And no image is the same, so some will look good on one image but not the other.

The first one I'll start with today is a snap I took of my girls while camping in the desert. Since I'm only talking actions today I won't be sharing SOOC and screenshots as to how I got to my Before. This image has been ran through ACR with the sliders etc to where I like them. Then I ran my new all in one {yes ever newer than the last one I posted} with the layers adjusted. I'm doing more in ACR now so what I need in CS4 is much less. It's basically just 3 layers...a high pass filter {like in PW's Boost & TRA Oh Snap}. I keep the opacity at about 50%. Sometimes higher for non people or non face shots. Then a strong S curve {also like PW & TRA} that I keep at about 20-40% opacity with a blend mode of Luminosity {keeps the skin from going too yellow}. Then the last layer is just a basic levels adjustment layer which now I really only use for a mid tone bump if needed. Between ACR and the strong S curve I don't really have the need to touch the shadows or highlights.

So this is the image I started with after ACR & my basic action...
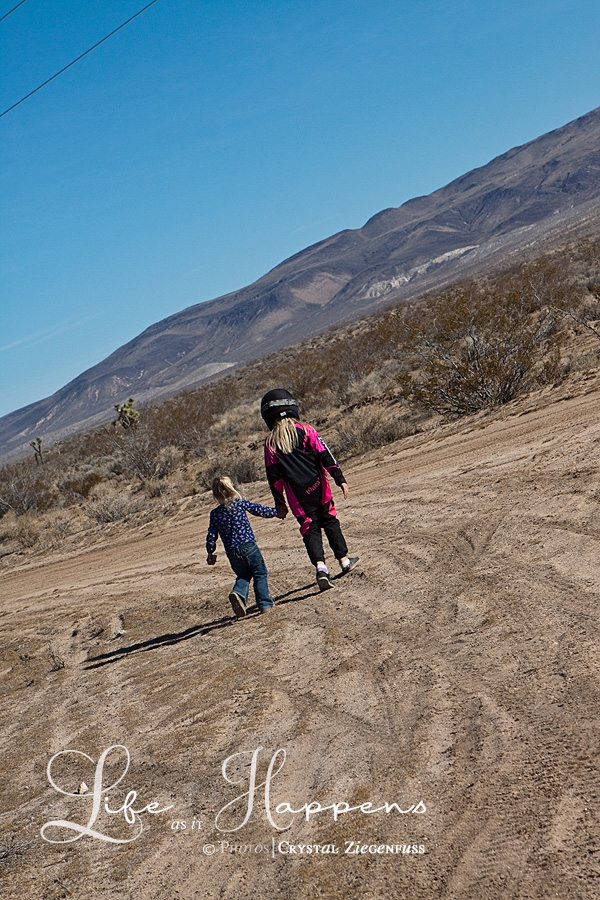


And here is the final edit...


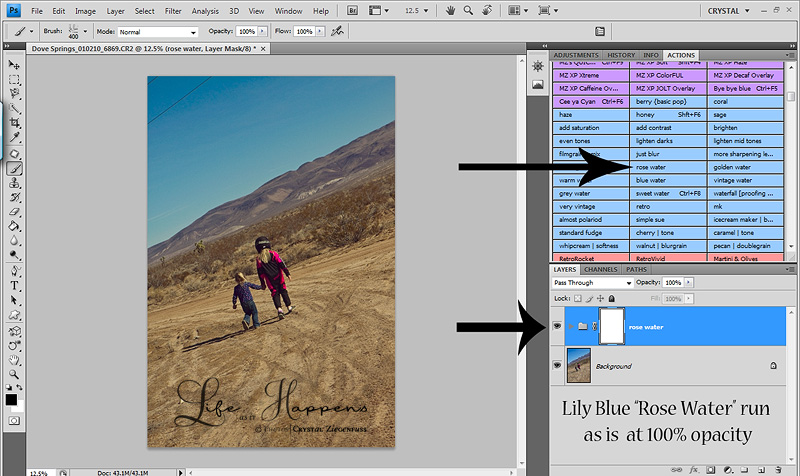
The first thing I did was run Lily Blue "Rose Water". I knew I wanted warmth. I love this action and I left it run as is and full strength...

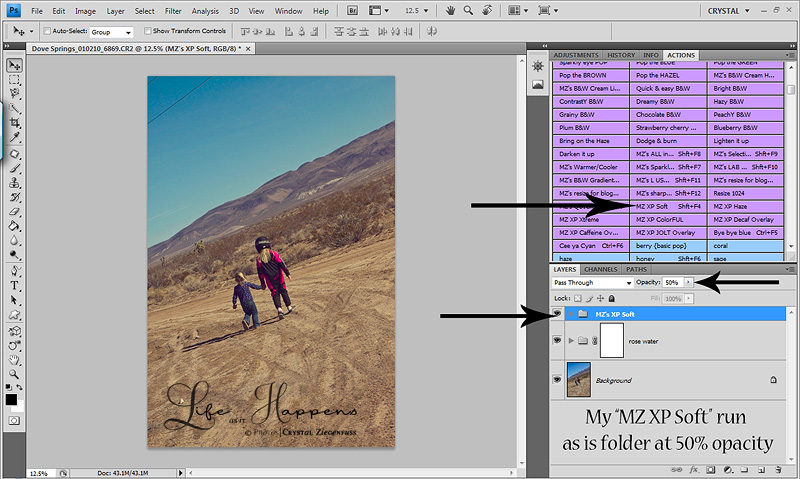
Then I knew I wanted a little pastel tint to it so I ran my MZ XP Soft. I left the layers as is but lowered the folder opacity to 50%...

Then I used one of my FAV and FREE actions from 2Peas Indie Jane called Grunge. I knew in order to run this action I'd have to flatten first. Then I grabbed all the layer and grouped them in a folder and named it. Sometimes I will adjust the individual layers other times I just adjust the opacity of the entire folder. Here since there are no faces in the shot I just lowered the whole folder to 50%. I LOVE the feel of this action...
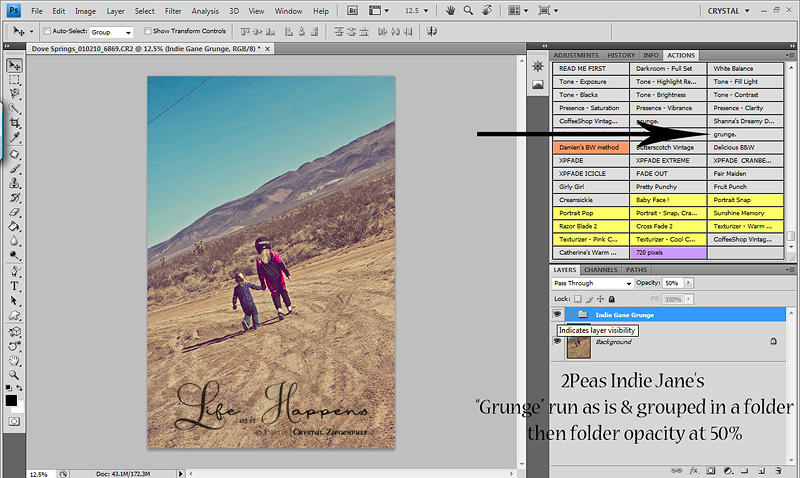

Now I really wanted to go creative and have a fun artistic feel to this shot. So I turned to my FAV textures and the ONLY ones I use now...Florabella Textures. I now apply textures the EASY way. File>Place...find the texture and it brings it in as a Smart Object, brings the name of the action on the layer with it and adds the Transform tool so all you have to do is stretch it and hit enter! Wish I'd tried this method so much sooner. So first I added Ethereal b/w and lowered the opacity to 30%. I use this opacity for textures a lot! Then I played with each blend mode til I found the one I liked which was Overlay. Then I added Mai Tai b/w and lowered the opacity down to 30% and blend mode Soft Light. Then finally I added French Canvas at 30% blend mode Multiply because this texture is pretty light and I didn't want to wash out the feel of the photo. I like to group my textures in a folder too so I can turn it on/off and see how they are all effecting the photo. Sometimes if I know my opacity for each texture will be the same then I'll just change blend modes on each layer then lower the opacity of the entire folder to about 30%. It will put each texture at 30% opacity...
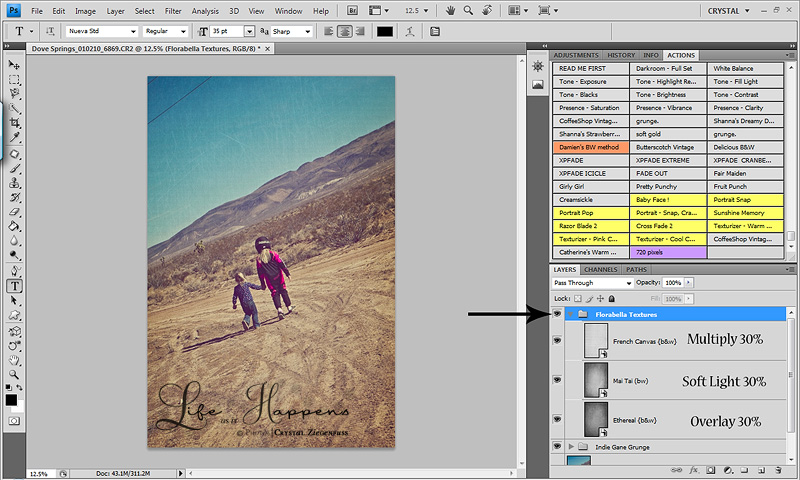

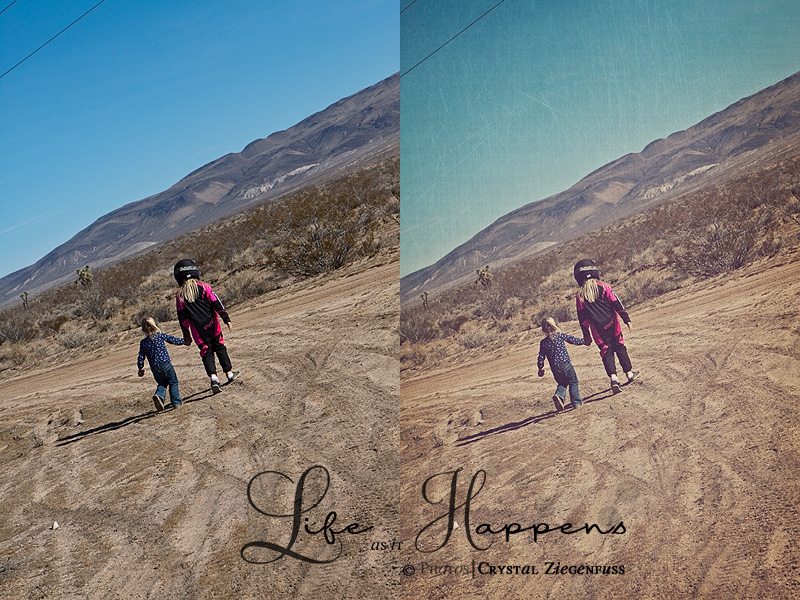
Then I flattened and ran my L USM at 70%. So here is the before and after side by side...
Here is another example. This is my little Avyree aka Nugget. I love this photo. She seems to peaceful and sweet. So to fit the mood of the photo I knew I wanted a soft light sweet pastel type edit.

Here is the before...
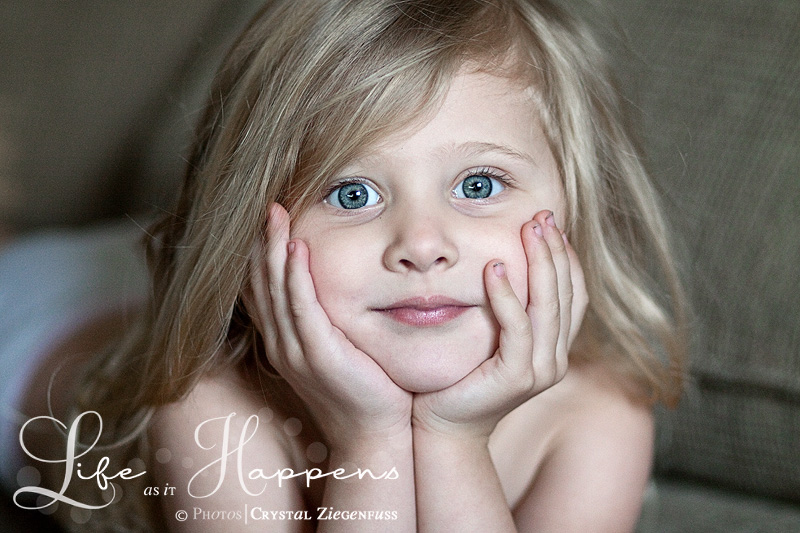


And here is the final edit...
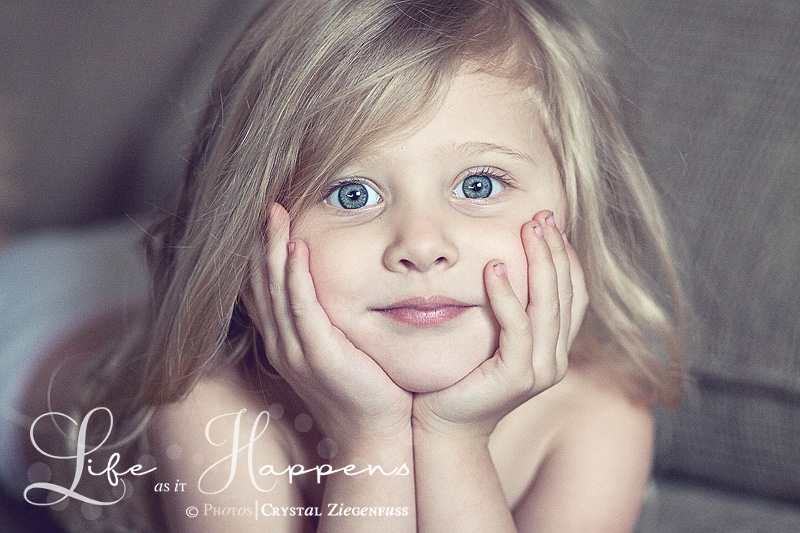

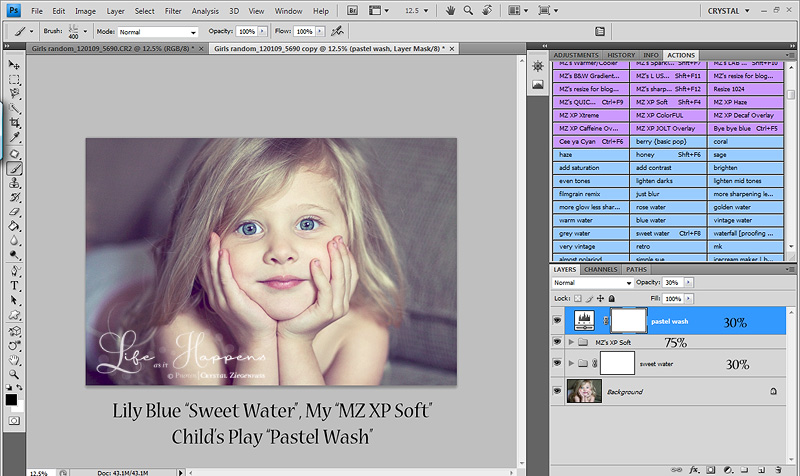
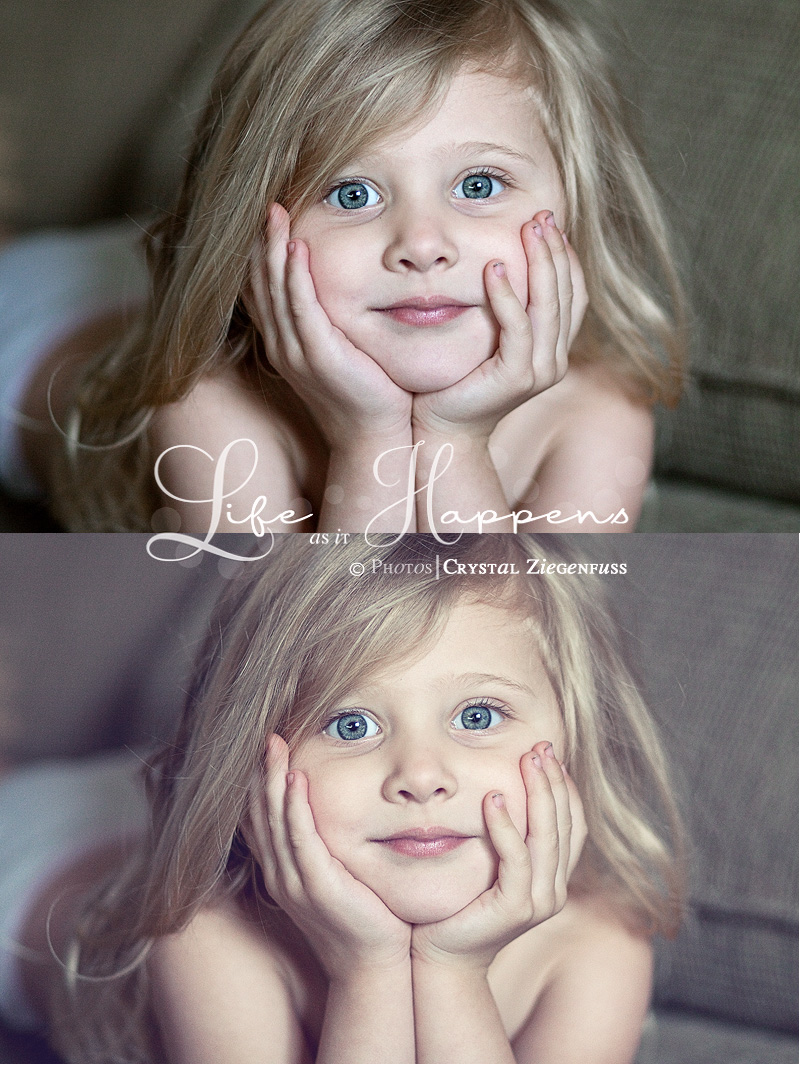
I only did one screenshot for this one. I ran Lily Blue "Sweet Water" which is one of my fav actions. I love her actions so much rarely do I mess with the actual layers, just the folder opacity. I brought it down to 30%. Then I ran my much used MZ XP Soft and lowered the folder opacity to 75%. This is one of my actions that I actually use on a regular basis. I love this action and it's one of my favs. I shared this action here on the blog. Then I used a one layer action to top it off that I use a LOT too and LOVE. Child's Play "Pastel Wash". I LOVE this action so much that I run it on top of so many different actions and recipes. I almost always lower the opacity. But I love the tones of this action. And then I flattened and ran my L USM at 60%. That's it...3 actions from 3 different makers to get a unique look that fits my style and the mood of the shot.

Here's the screenshot and what my folders looked like...

And the before after. Probably should've made this a bit smaller...

Now finally my last example is my sweet Haylee. I thought I'd show you how you can use action recipes for b/w's too.

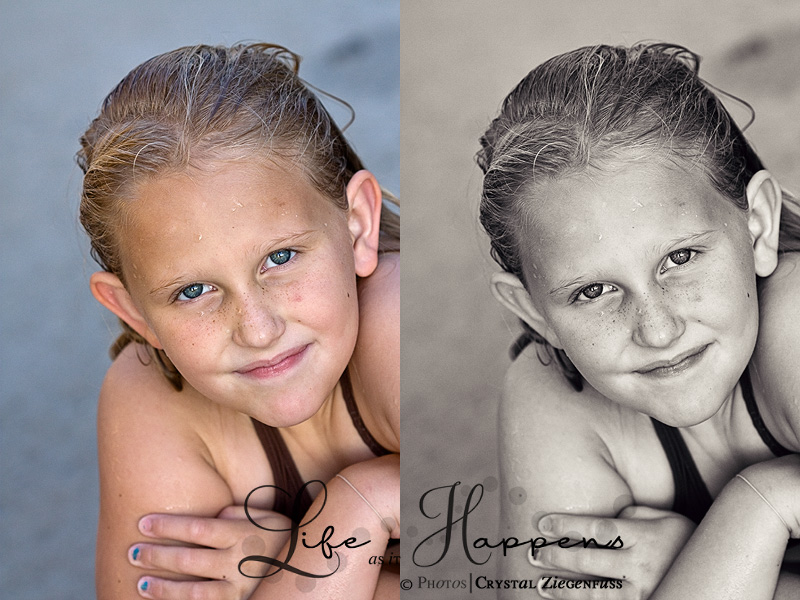
Here is the before which I printed in color. This is one of my all time FAV shots of her that I took at sunset with my EF 100mm 2.8 Macro. I wanted to have a play with it in b/w...
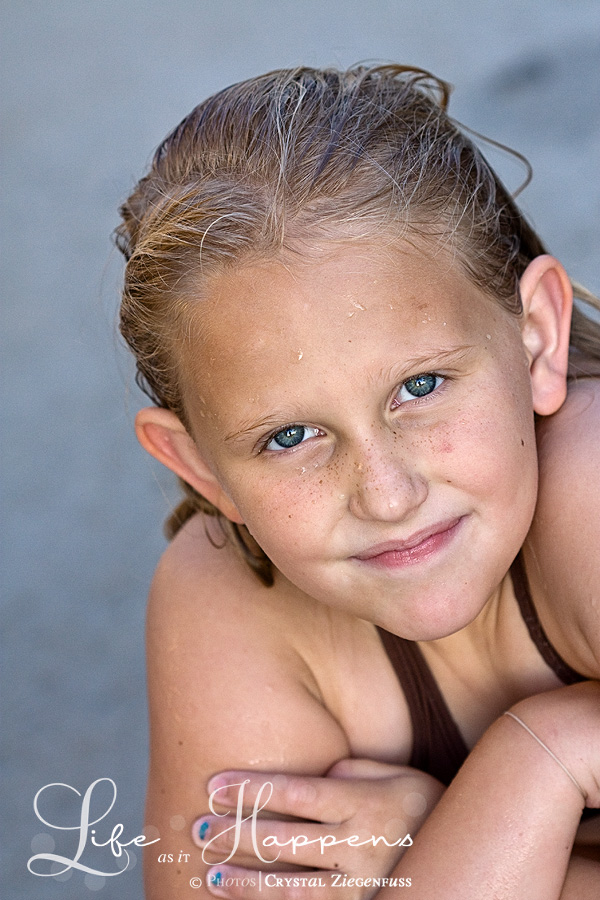


I didn't do any screenshots for this one because I flattened a lot in the process. But for this shot my main concern was keeping detail. I knew that I didn't want to go too light and washy because I'd start to loose detail. Her freckles were especially important to me in this shot. So I knew it would be a darker richer b/w but I really wanted a fun tonal range as well.

So here is the after and below it I'll go over the actions I used...
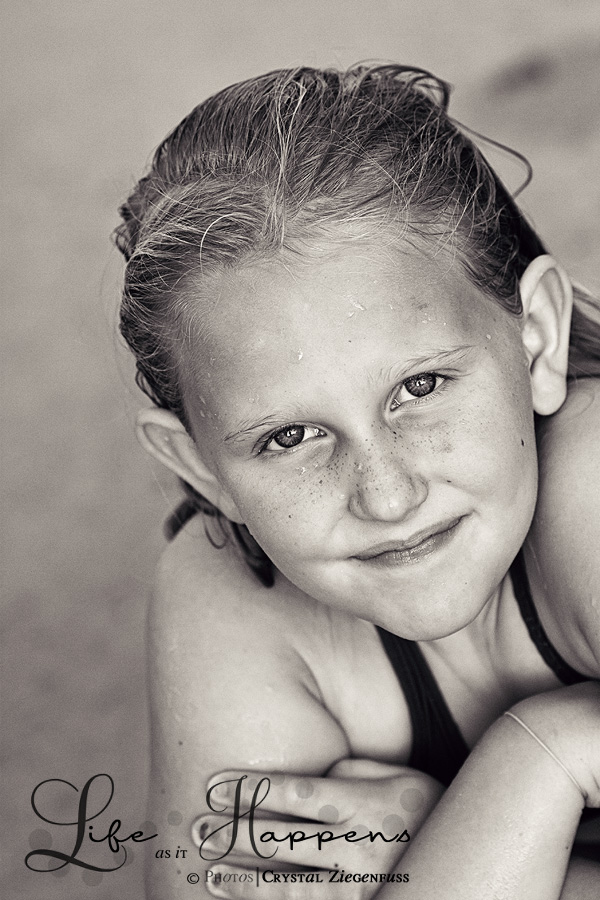


The first thing I did was run my "Quick & Easy B/w". Which is basically just a gradient map, dodge/burn layer, and a lighten layer. This action does duplicate the photo layer, change the blend mode to Soft Light 30%, flatten and run the layers that you can see. So with the Soft Light blend mode already there, it gave it the perfect contrast it needed. I turned off the Dodge/Burn layer as well. So basically dup layer, soft light 30% and a gradient map over the before. Then I use Florabella B/W Espresso Tint and put the layer opacity at 30%. Now onto Lily Blue Cherry Tone and put the layer opacity at 35%. I was happy with where it was going but I wanted a slight pastel type lift. So I ran my trusty MZ XP Soft. Told you I use it a lot. I started off by turning off the b/w layer or it would cover the 2 tints I already added. I then lowered the opacity of the XP Soft layer to 20%, turned the Blue Soft layer off and changed the opacity of the Cream layer to 20% as well. I then ran MCP Touch of Light/Dark and lightened the eyes just a tad with a very low brush opacity. I don't like to go too light on eyes because the lighter you go the more detail you loose. And for me, the details in the eyes are what it's all about. My girls have crazy detailed eyes so the last thing I want to do is over process them and lose that. Then I used the Dark to lightly go over her freckles with a very low opacity brush {10% brush opacity} to darken the freckles a bit. Then flattened and ran my L USM at 50%. I always run my L USM lighter on b/w's because they tend to look over sharp quicker than a color edit.

So here is the before and after side by side...
So..these edits may not be for you. But it shows you how you can really change it up and make each image you shoot ONE OF A KIND by using that actions panel and the different sets to their fullest. And you also see why it's so important to KNOW your actions inside and out and look at each image as an individual. Look at the image, find what's important to you to convey with that image then go to those actions in your panel that will give you the look/mood you want to display. Some images and the mood of the image calls for dramatic, urban, darker and others may call for a softer, washy pastel type etc etc. The more you know your actions panel, the better and faster you can create recipes to fit your style! That's the great thing with having a variety of actions! I'm ALL about variety in shooting and PP'ing! :O) It will help you better use them together in fun different ways. I hope this post gets you thinking and gets you combining actions and thinking outside the box. Cause let's be honest..it's MUCH MORE FUN outside the box. At least it is for me! Ha!

If you are interested in any of the actions I used I've linked where to buy each...with the exception of my freebies...

Lily Blue Actions ~ These actions are one of my FAVS. I use them all the time! I LOVE LB! I have her Color One Actions & her Waterplay Actions and they are SO YUMMY! I don't use her presets because I prefer to go creative with layers than in ACR. Her b/w actions are great too! But basically anything she makes/sells I will buy!

Florabella ~ I love FB as much as LB. Lol! I've had her 1st set of textures for a long time and after buying them quickly deleted all my free textures. Then I bought all 3 sets of her actions and LOVE them and have also now bought her 2nd set of textures which is just as good as the first, but slightly different. I LOVE FB and will buy all her stuff too!

Child's Play Actions ~ I don't use this set much with the exception of the Pastel Wash. I use it so much that I have a short key assigned to it! :O)

MCP Actions ~ Her Touch of Light/Dark FREE and a great quick way to dodge/burn. I also have this assigned to a short key. I have lots of Jodi's actions and you can't go wrong with any. My FAVs are Bag of Tricks and Blog it Boards.

My actions are here on the board on previous pages. So if you haven't downloaded them for free look back and you'll see several different free action shares.

Happy Thursday and I hope everyone has a great Friday and weekend! :O)


Search My Blog

Followers

About my PS Blog

Hi, my name is Crystal and I am addicted to Photoshop. I have PSCS4 and it's my other half. I love photography, but sometimes I think it's a means to edit!

So I thought it would be fun to have a place to post the free action sets I record, tips and tricks that I learn in PS and tuts for various different types of photo editing.

I hope you enjoy and find my PS blog helpful and if you have any questions, leave me a comment with your questions and your email address and I will get back to you!

Happy editing!

About Me

My photo
I am a stay at home to 2 great girls. My older daughter Haylee just started middle school and my younger daughter Avyree is in 1st grade! I have been married 11 years to my hubs Eric. I got my first DSLR June 31, 2008 and have been hooked ever since! My style is primarily Lifestyle! I like to take a natural and real life approach to my images! I want them to remind me of WHO my girls were when they were little, not just what they looked like. I love to edit and my editing style is always evolving and changing! I like variety and photography is a means to edit! I shoot Canon (full frame) and almost only primes. I pull out my wide angle zoom from time to time! Thanks for stopping by and I hope you like our story...
Background paper by Kay Miller

  © Blogger template 'Photoblog' by Ourblogtemplates.com 2008

Back to TOP