A couple more quick lightening and darkening tips...
Well, it's Wednesday and I'd normally be doing an action set review, but since I still can't load my calibrator, I cannot do the action review yet. I'm taking my laptop in tomorrow to the shop. The good news is with my 2 year extended warranty, I get a loaner laptop if they can't fix it in one day, which I doubt they'll be able too! So atleast I won't be without and I'm hoping that I'll be able to load PS and calibrate it while I have it, so I can still get some stuff done.
So as a filler post this week I wanted to further go over a couple of other * beginner * tips on how to lighten or darken your photos. This will be a short post and really easy. But I just HAD to post SOMETHING! Ha!
So as a filler post this week I wanted to further go over a couple of other * beginner * tips on how to lighten or darken your photos. This will be a short post and really easy. But I just HAD to post SOMETHING! Ha!
And since I've already gone over how to lighten with a curves adjustment layer, I thought I'd go over a couple of other options that may work for you. Remember, every shot needs something different, so try your hand at all of them and see which fits you and your shots the best!
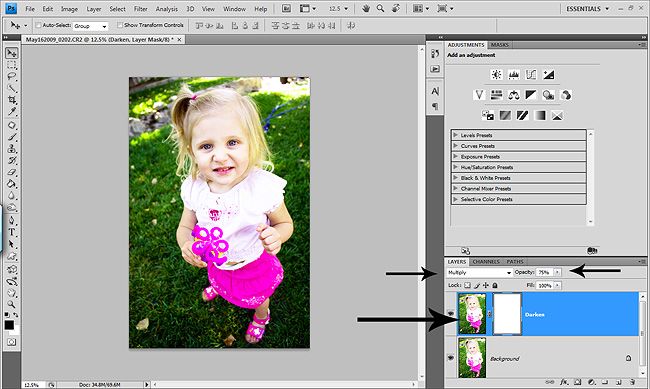
So probably one of the most popular ways to lighten or darken a shot is done with duplicating the photo layer and changing the blend modes. To lighten you would choose screen blend mode and then play with the opacity of the top photo layer and you can always add a layer mask and do some masking if needed. And to darken a shot, instead of using Screen as your blend mode, you would choose Multiply. This is a great method and can be very successful at saving shots that didn't turn out right SOOC, or you want a different affect. The drawback with this method is it makes your file sizes larger.
Here are a screen shots of the Screen & Multiply blend modes. I didn't do before/after pics because I can't tell the colors without my calibrator. So for now, it's screenshots only!
This shot SOOC was underexposed. I upped the exposure a tad in ACR, but not too much so I could show you the duplicate photo screen method.

Before I go any further, I do understand that the shot in this screenshot looks lighter than the one above, but this is because I purposely ligthen the pic A LOT to be able to do the duplicate photo layer with Multiply blend mode. So don't look too much at these quick examples, just the technique themeselves and try them out.
Now, as I said, the above technique is great and works when you need a LOT of help with making your shots lighter or darker. But what if you don't want larger file sizes or don't need THAT much help? Here is a really QUICK way that will keep your file sizes a bit smaller and the way I do my basic brighten or darken the whole pic.
Chose a levels or curves adjustment layer. But don't make any changes. Just hit okay, or if you are using CS4, just click on the levels or curves adjustment layer. Now to lighten, just change the blend mode of the adjustment layer to screen and VIOLA, a nice subtle ligthening!
And to darken a pic, same steps, curves or levels adjustment layer and change the blend mode to Multiply. And as with any layer, always play with the opacity of the layer if needed and also as always, add a mask if you need to mask stuff in or out!
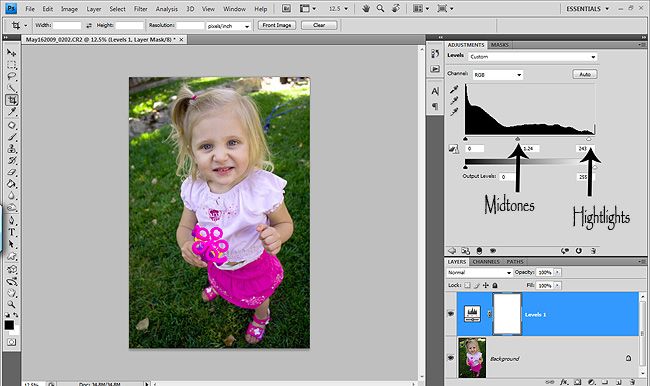
Now if you want a little more control and have a couple more seconds, you can lighten your photo with a levels adjustment layer as well. Just take the top middle slider (midtones) and slide it to the left a bit which will lighten all the midtones in your shot. Then take the top right slider (highlights) and give it a gentle boost to the left to give your highlights a little pop. Now you are lightening certain parts of your photos, without washing out the shadows! YAY!
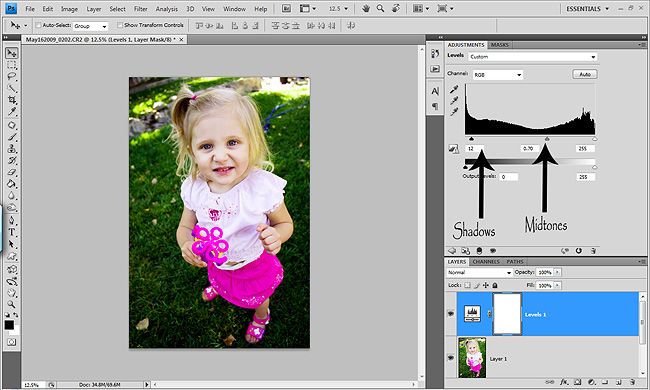
And to darken using the levels adjustment layer, just take the top left slider (shadows) and nudge it to the right a tad deeping the shadows in your shots. Then take that midtones slider and bring it to the left a bit to bring down your midtones. Unfort you cannot bring down your highlights with the levels adjustment layer. I won't go into setting your target points YET. That's for another post!
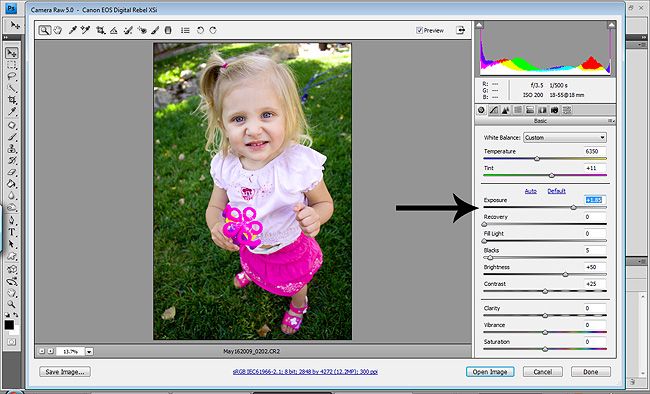
And for those of you who shoot in RAW (which I HIGHLY recommend if you don't or atleast TRY it) you have a lot of control to lighten and darken your shots in ACR. This shot was the first I took and I just snapped it quickly without checking my light meter. DUH! Ha! So for this tut, I'm just showing you how I lightened it. I'll post another full ACR tut on how I use ACR another day.
So all I did was take the Exposure slider and slide it to the right, which lightened my whole shot. It's ALMOST like being able to change your settings after the fact. You can do a good amount if you shoot in RAW without loosing too much quality in your shots in ACR. I shoot in RAW 100% of the time.
When using the Exposure slider, you can hold down your alt key (PC) and it will turn your screen black so you can see if you have any clipping. Again, I'll go over that and all of the other sliders and some other stuff in another post. As you can see in my screenshot, I had to up it quite a bit to lighten the shot. And if it had been overexposed, I would've taken the Exposure slider and slid it to the left a bit.
And there you have it, a couple other options for lightening and darkening your photos. One of the things I love about PS so much is that there are SO many ways to do one thing. It's nice to have a lot of different options, so that you can find the best option for you and your shot(s). So try these out and make notes in a notepad. And before you know it, you'll have the basics of PS and you'll be editing like crazy
Hopefully Friday or next week I'll be posting a fairly in depth tut on layer masks and how they work and how to get the most out of them. If you don't know how to use them yet, make sure to check back because once you start using them, you won't know how you ever edited without them! Then the ACR tut!
I hope everyone had a wonderful Memorial weekend and once all my laptop stuff is worked out, I'll be posting lots of fun new posts!
Have a great rest of your week!

2 comments:
Nifty Nifty! I've never tried that before, but I'm going to have to use that sometime! Thanks for the tip lady!
I never would have touched the blend modes until you came into my life! thank you thank you thank you! I love learning from you!!!
Post a Comment