Layer Masks, adding textures & a TIP..
Layer masks are the BEST thing EVER created. And if you use them already, you know what I'm talking about. If you don't, they will change your LIFE! :O)
Quick notes on layer masks...white layer masks SHOW the effect of that layer and you paint with black as your foreground color to paint something OUT. Black layer masks HIDE the effect of that layer and you paint with white as your foreground color to bring it back IN! And the great thing about a layer mask is that when you mask in & out, you aren't touching/damaging the pixels of your photo. And you can always go back and mask in or out later in editing. They give you complete control! And if you over paint somewhere you didn't want to, just switch your foreground color to the opposite (if you are painting with white, switch it to black and vice versa) and you can redo where you went over. Layer masks are LIKE erasing without actually erasing. All of the info is still there...just hidden if you will.
I have a great tip to share in this post as well. I wish I remembered where I learned it so that I could give proper credit. It's cut my masking time in more than half and taken away ALL my masking frustrations. Have you ever been frustrated when masking something in or out of your photos? Especially a texture. Always wondering if you got it all? Frustrated with the time and precision it takes? Well this should help you greatly.
First I'll show you examples with white layer masks, then black.
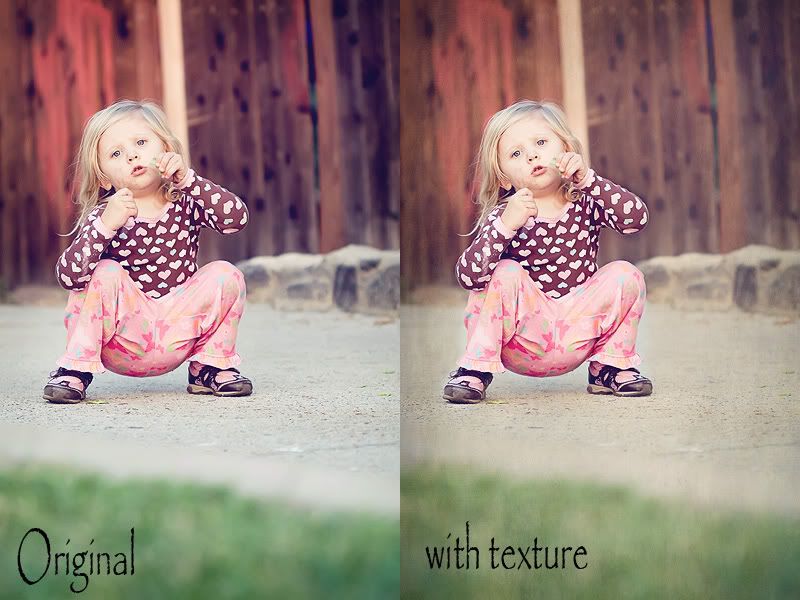
Here is a snap of my youngest...Avyree or as we call her "Nugget". I want to add a texture to this shot, but I don't want the texture on HER...just the backgrond.
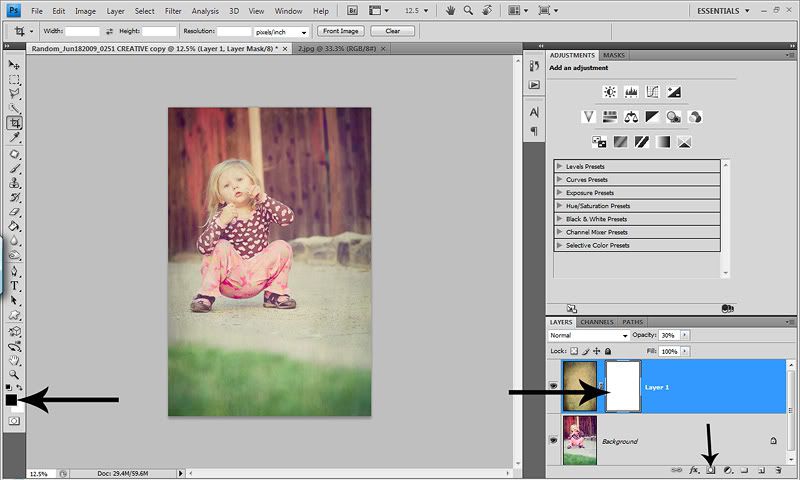
So the first thing you want to do is open the texture you want. Paste it over your image. Hit ctrl/t and stretch it to fit your canvas. Now lower the opacity of the texture layer to taste. I used 30%. Now you need to add a white layer mask so that the texture is SEEN and you will mask out where you don't want it. So on the bottom right hand side you'll see a little icon that looks like a camera. Click it. Now you have a white layer mask on your texture layer.
This is what it looks like right now...
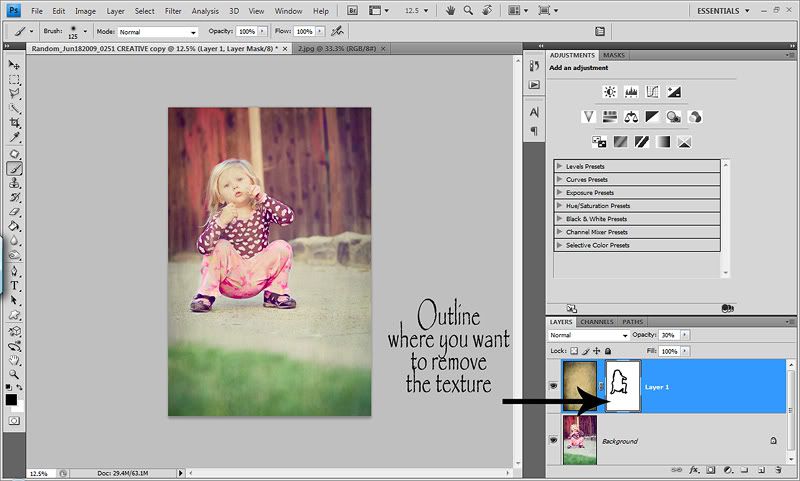
Now comes the fun part. We are going to mask the texture OFF of her. Select your brush tool, a smaller soft edge round brush. To remove the texture completely, use an opacity of 100%. To keep some texture, lower your opacity and flow rate. Then make sure your foreground color is set to BLACK. Start by outlining your subject with a small brush. You can see it over in the layers panel.
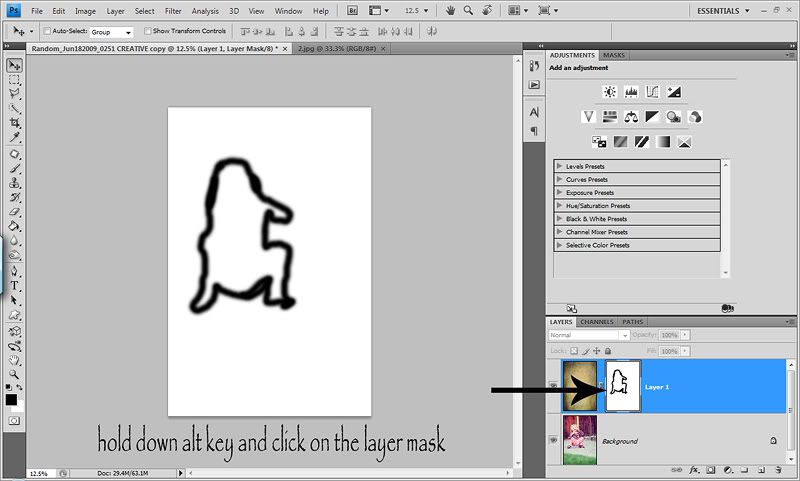
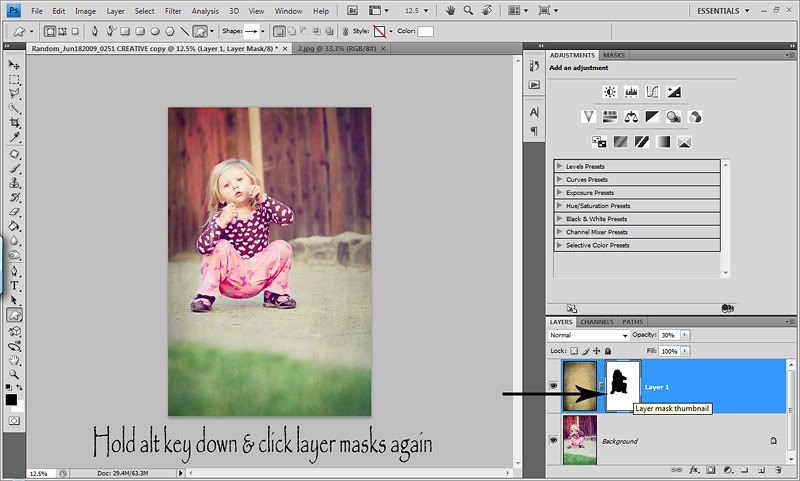
Now HERE is the awesome tip. Hold down the alt button & click on the white layer mask! Now the layer mask is all you see...really nice and big. Now continue to mask out the middle of the outline. You can use a larger brush for the middle and use a smaller brush for the edges.
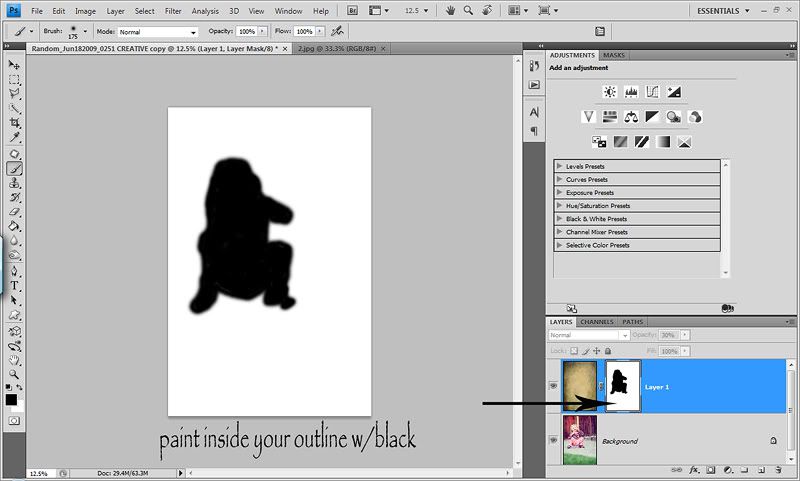
Once you fill it all in, this is what it will look like. Now you can see if you got it all! Pretty COOL huh?
Then to get your regular screen back, just hold the alt key again and click on the layer mask. Now you can play with the opacity of the texture layer some more and you can spice it up by changing the blend modes too.
Now lets say that you have a shot that you only want the texture on a SMALL portion of the image. It would take forever to mask it all out. We want the least masking possible right? Ha!
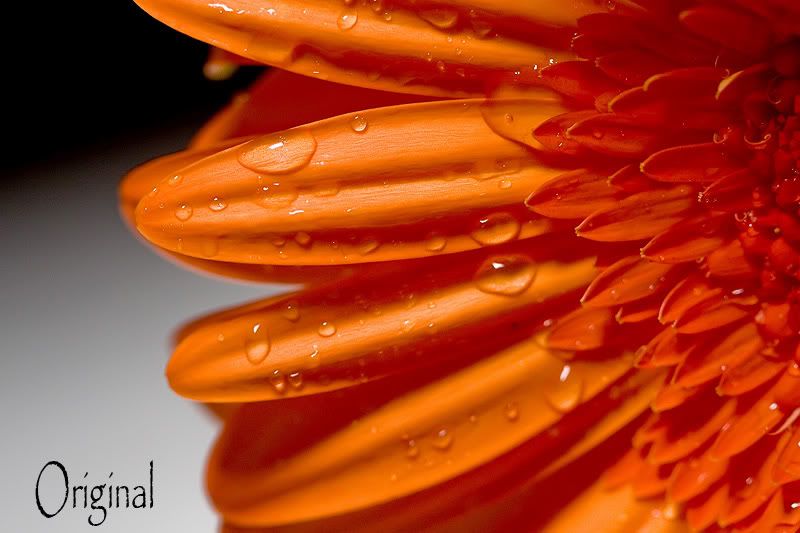
So...say we are working with a texture again. I have this Macro flower shot I took. I want to add a subtle texture to the left side but not ON the flower. I know I don't want to use a white layer mask because it would take longer to mask the flower out since it's the biggest part of the picture. So....I'm going to add a BLACK layer mask to this one. That way, the texture is HIDDEN and will only show where I paint/mask!
So again, get your texture on your image, stretch it, lower the opacity, change the blend mode...whatever floats your boat.
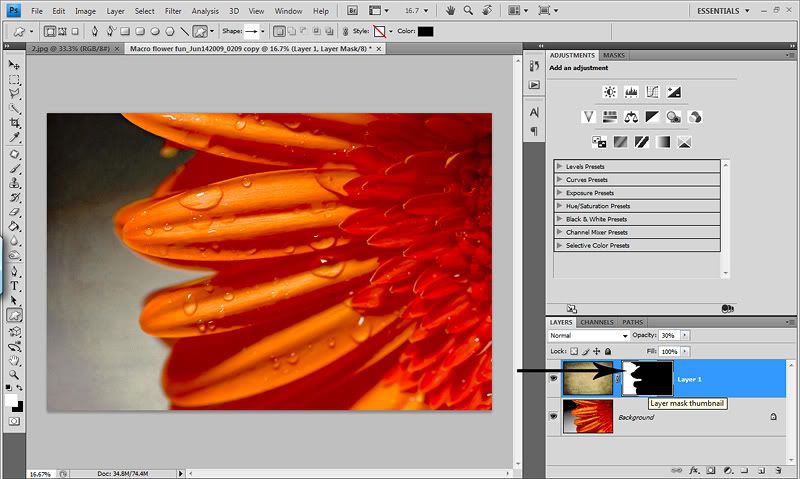
Now go back down to the same little camera. But this time, hold your alt key down then hit the layer mask icon. And VIOLA...you now have a black layer mask on your texture layer and you will notice that you can no longer SEE the texture. Don't worry, it's still there...hiding!
This is what it will look like...
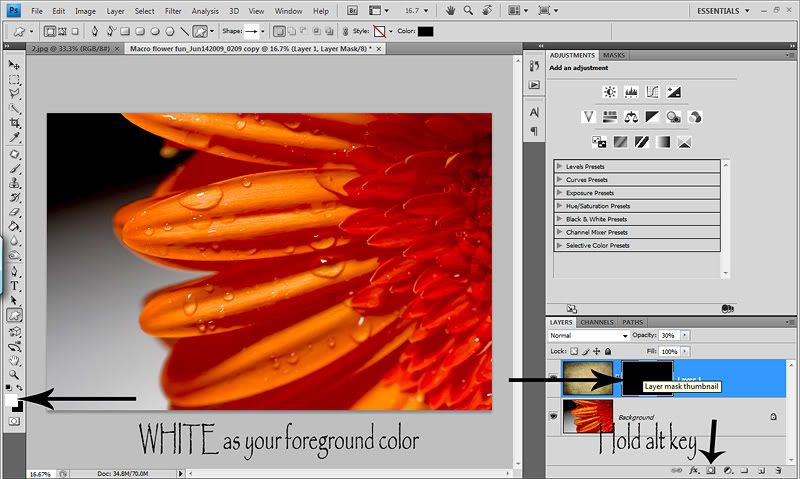
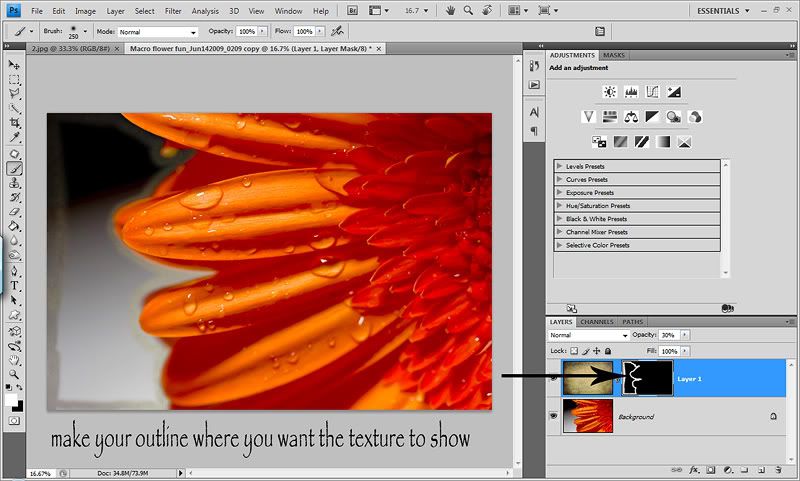
Now you are going to do the outline again. Select your brusth tool, size, opacity/flow. Now make sure your foregrund color is set to WHITE. Always the opposite color of the layer mask. And this time, as you paint your outline where you want the texture to show, you will see it only where you paint...
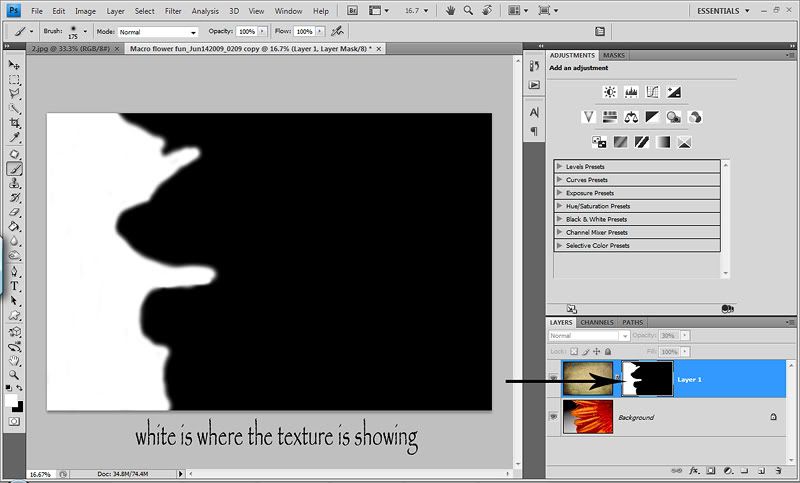
Once you have your outline of where you want the texture, hold your alt key down again and click on the black layer mask. Now your screen is black, with the white outline showing. Now paint the center so that the whole outlined area is filled with white. Now your texture is showing where the white is and is hidden where the black is.
Then to get your screen back, hold the alt key down again and click on the black layer mask. Now you have your texture in a small area where you want it. Now you can play with the opacity of the texture layer some more or play with blend modes.
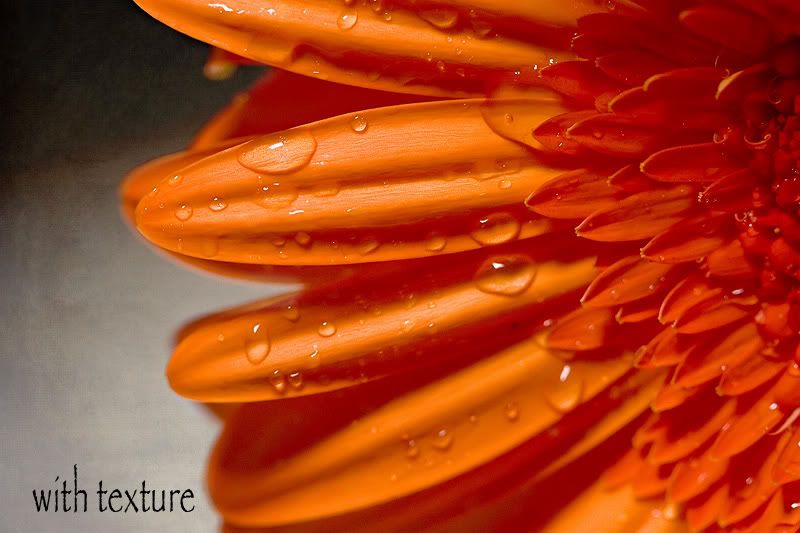
And for fun...here are the before/after shots...
And you can use layer masks for much more than just textures. All adjustment layers come standard with a white layer mask. So when you use any adjustment layer, the effect of that adjustment layer is SHOWN with the white layer mask, and you would mask with black where you want to HIDE the effect. But lets say you do an adjustment layer and only want a small portion of your image effected by it. With the white layer mask, you would have to mask out everything but the tiny section you want it on. That would take FOREVER and probably drive you MAD. So...all you have to do is click on the layer mask, hold down the ctrl key and hit i. That will INVERT your white layer mask to a black layer mask. Now the effect of that adjustment layer is HIDDEN and you can paint with white where you want it to show! One thing I should've said earlier...when you are going to paint on a layer mask, make sure you are ON the layer mask. All you have to do is click on the layer mask in the layers panel and your are ready to mask!
Layer masks can be a bit intimidating, confusing and take a little time to get used to. But I PROMISE it's worth the time to figure them out. Once you have your CLICK moment (pun inteded) you will wonder how you ever edited without them. And you will NEVER use your eraser tool again! :O)
Please don't hesitate to ask any questions. Just practice over and over til it CLICKS. Happy masking.
Okay...off to Vegas. Have a GREAT weekend everyone!
Quick notes on layer masks...white layer masks SHOW the effect of that layer and you paint with black as your foreground color to paint something OUT. Black layer masks HIDE the effect of that layer and you paint with white as your foreground color to bring it back IN! And the great thing about a layer mask is that when you mask in & out, you aren't touching/damaging the pixels of your photo. And you can always go back and mask in or out later in editing. They give you complete control! And if you over paint somewhere you didn't want to, just switch your foreground color to the opposite (if you are painting with white, switch it to black and vice versa) and you can redo where you went over. Layer masks are LIKE erasing without actually erasing. All of the info is still there...just hidden if you will.
I have a great tip to share in this post as well. I wish I remembered where I learned it so that I could give proper credit. It's cut my masking time in more than half and taken away ALL my masking frustrations. Have you ever been frustrated when masking something in or out of your photos? Especially a texture. Always wondering if you got it all? Frustrated with the time and precision it takes? Well this should help you greatly.
First I'll show you examples with white layer masks, then black.
Here is a snap of my youngest...Avyree or as we call her "Nugget". I want to add a texture to this shot, but I don't want the texture on HER...just the backgrond.
So the first thing you want to do is open the texture you want. Paste it over your image. Hit ctrl/t and stretch it to fit your canvas. Now lower the opacity of the texture layer to taste. I used 30%. Now you need to add a white layer mask so that the texture is SEEN and you will mask out where you don't want it. So on the bottom right hand side you'll see a little icon that looks like a camera. Click it. Now you have a white layer mask on your texture layer.
This is what it looks like right now...
Now comes the fun part. We are going to mask the texture OFF of her. Select your brush tool, a smaller soft edge round brush. To remove the texture completely, use an opacity of 100%. To keep some texture, lower your opacity and flow rate. Then make sure your foreground color is set to BLACK. Start by outlining your subject with a small brush. You can see it over in the layers panel.
Now HERE is the awesome tip. Hold down the alt button & click on the white layer mask! Now the layer mask is all you see...really nice and big. Now continue to mask out the middle of the outline. You can use a larger brush for the middle and use a smaller brush for the edges.
Once you fill it all in, this is what it will look like. Now you can see if you got it all! Pretty COOL huh?
Then to get your regular screen back, just hold the alt key again and click on the layer mask. Now you can play with the opacity of the texture layer some more and you can spice it up by changing the blend modes too.
Now lets say that you have a shot that you only want the texture on a SMALL portion of the image. It would take forever to mask it all out. We want the least masking possible right? Ha!
So...say we are working with a texture again. I have this Macro flower shot I took. I want to add a subtle texture to the left side but not ON the flower. I know I don't want to use a white layer mask because it would take longer to mask the flower out since it's the biggest part of the picture. So....I'm going to add a BLACK layer mask to this one. That way, the texture is HIDDEN and will only show where I paint/mask!
So again, get your texture on your image, stretch it, lower the opacity, change the blend mode...whatever floats your boat.
Now go back down to the same little camera. But this time, hold your alt key down then hit the layer mask icon. And VIOLA...you now have a black layer mask on your texture layer and you will notice that you can no longer SEE the texture. Don't worry, it's still there...hiding!
This is what it will look like...
Now you are going to do the outline again. Select your brusth tool, size, opacity/flow. Now make sure your foregrund color is set to WHITE. Always the opposite color of the layer mask. And this time, as you paint your outline where you want the texture to show, you will see it only where you paint...
Once you have your outline of where you want the texture, hold your alt key down again and click on the black layer mask. Now your screen is black, with the white outline showing. Now paint the center so that the whole outlined area is filled with white. Now your texture is showing where the white is and is hidden where the black is.
Then to get your screen back, hold the alt key down again and click on the black layer mask. Now you have your texture in a small area where you want it. Now you can play with the opacity of the texture layer some more or play with blend modes.
And for fun...here are the before/after shots...
And you can use layer masks for much more than just textures. All adjustment layers come standard with a white layer mask. So when you use any adjustment layer, the effect of that adjustment layer is SHOWN with the white layer mask, and you would mask with black where you want to HIDE the effect. But lets say you do an adjustment layer and only want a small portion of your image effected by it. With the white layer mask, you would have to mask out everything but the tiny section you want it on. That would take FOREVER and probably drive you MAD. So...all you have to do is click on the layer mask, hold down the ctrl key and hit i. That will INVERT your white layer mask to a black layer mask. Now the effect of that adjustment layer is HIDDEN and you can paint with white where you want it to show! One thing I should've said earlier...when you are going to paint on a layer mask, make sure you are ON the layer mask. All you have to do is click on the layer mask in the layers panel and your are ready to mask!
Layer masks can be a bit intimidating, confusing and take a little time to get used to. But I PROMISE it's worth the time to figure them out. Once you have your CLICK moment (pun inteded) you will wonder how you ever edited without them. And you will NEVER use your eraser tool again! :O)
Please don't hesitate to ask any questions. Just practice over and over til it CLICKS. Happy masking.
Okay...off to Vegas. Have a GREAT weekend everyone!

3 comments:
LOVE the tip on masking! Thanks so much!!! Funny story- I was doing some eye popping (thanks to you) and I accidentally hit alt on my mask instead of ctr when I wanted to re-select the eyes. I thought I messed something up and was relieved when I got it back to "normal". Now I know that I can use it to my advantage!!!
Found your Blog from the iVillage message board. You always have such wonderful tips and advice over there. I'll be checking your Blog often. This is a great post. I just started using Layers this week and have had so much fun. Love your tips. Thanks.
Great to know the -- in depth from this blog.This will really help for my forward steps to be taken.
Clipping Path in dmt
Post a Comment