My basic workflow...
**Quick disclaimer…I am not a PRO, I am not in business. I am just a MWAC who is obsessed with taking and editing pictures. I have had no formal training. Just what I’ve learned online and in books. So please take what works for you out of this tut and leave the rest. Each photo needs something different. And as with everything in PS (Photoshop) there are a million and one ways to skin a cat! Ha! This is just the process that I have found works for me. I am constantly learning and evolving and my steps do change. But for the last 6 months or so, this has been my consistent workflow and I’m pretty happy with it!**
I finally have a good consistent work flow and I thought I’d share how I edit my photos. This is just a basic clean it up standard edit. It will not go into fixing blemishes, how to even out skin tones (which this pic could use lol), enhancing eyes or color correcting. I will go over how * I * do that in another post. It’s nothing to write home about but is meant to give you a starting point and then you can adjust it from there. This is for good SOOC shots, or cleaned up in ACR and good images when brought into my CS4.
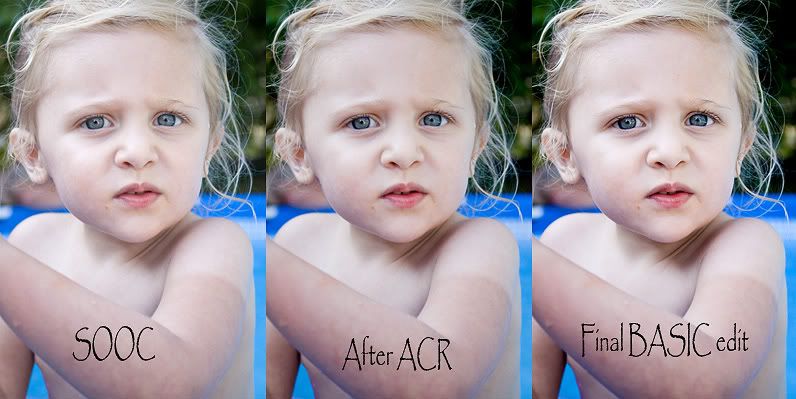
Here is what the SOOC camera, ACR edits and final edits look like side by side...
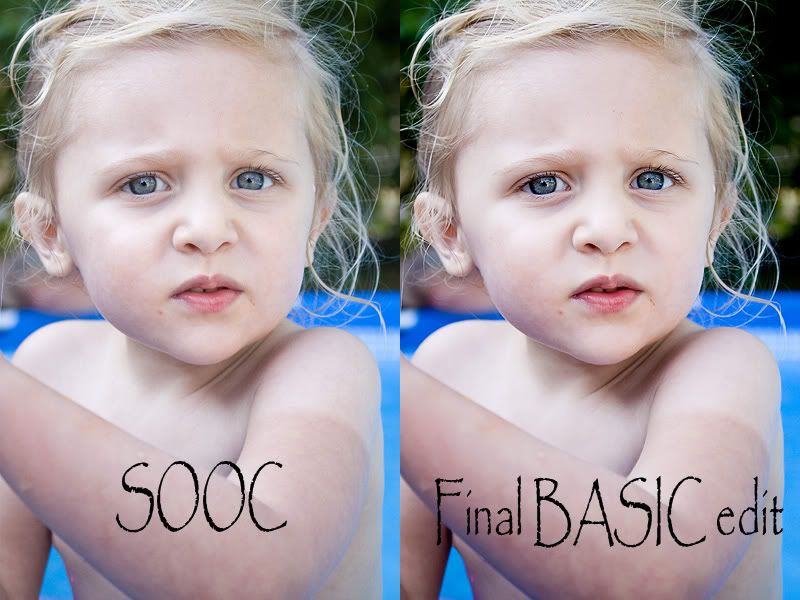
And here is the SOOC & final basic edit side by side...
I shoot in RAW, so the first thing I do is open my RAW images (.CR2 for Canon and I believe it’s .NET for Nikon) through Bridge. It opens my images in ACR (Adobe Camera Raw). I won’t go into the boring details that I do in Bridge. But I do love me some Bridge! Ha!
I first take the WB (white balance) picker and try to find a neutral gray area to check. If I can find one, this works the best because it reads your photo and gives the most true WB. If I cannot find a neutral gray color, I will click other areas that are close and sometimes get lucky and sometimes will find a decent spot but still need to play with the sliders a bit to get it more accurate. If I cannot find any neutral area in my photo, then I start with the presets. Most of the time As Shot works just fine for outdoor photos with some slider adjustments. Indoors is a whole nother world. Lol! I shoot in AWB (Auto White Balance) because I shoot in RAW. If I try a preset, I will usually try Auto and it works pretty well, but always always play with the sliders after I select the preset because they are still usually off a bit. I find the Daylight preset to be too warm for outside shots, even though I do prefer my images on the warmer side vs the cooler side.
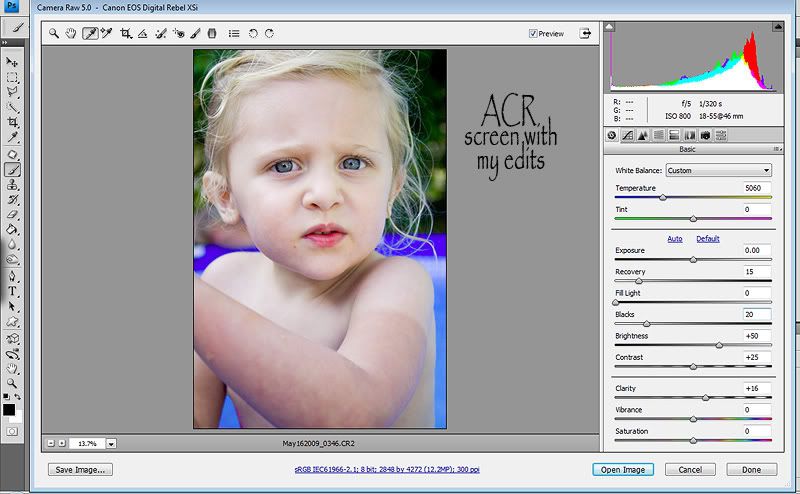
Once I have my WB where I want it, I will play with the Exposure slider IF needed. If my image is a bit underexposed I will up it. If it’s a bit over exposed I will usually leave the Exposure slider alone and play with the Recovery Slider and Blacks slider. I find I prefer these two sliders together for overexposed images vs the Exposure slider by itself. Just seems to be a cleaner way to get the colors and richness back in. But if it’s very overexposed, then I’ll play with the Exposure slider as well. Then once I’ve worked on my WB, Exposure/Recovery/Blacks sliders, I will up the clarity a bit. Don’t go too far or your images will have too much contrast and become harsh looking. The clarity slider gives you well…Clarity! Ha! It helps defog the image a bit and gives it some depth. I never go above 30 on portraits and usually much lower. But on landscape/random/flower shots, I’ll up it a bit above 30 depending on the pic and the look I’m going for. Then if I’m feeling colorful I’ll up the Vibrancy slider a bit. This works differently than the Saturation slider that I NEVER use. It takes colors that are dull in your image and ups them a bit. It does not touch colors that are already properly saturated. I use this very slightly if at all on portraits unless there is a lot of scenery/sky. But I do use it on landscapes/random/flower shots. And that is all I do in ACR. You can do MUCH more in ACR, but I prefer to work in layers. If I am batch processing, I will open a set of shots taken in the same lighting, edit the first, then select all and synchronize them. I then look at each one and make any small adjustments if needed. If I’m editing a big batch, I will hit done so that the ACR edits are saved, but so I do not have to open them all in CS4 and risk it running too slow. If I only have a few, then I hit Open Images and do the rest in CS4.
Here is what my ACR screen looks like once I've made my ACR adjustments...
I recorded an All in Once action with my steps, with each layer set up for what I’ve found works for my Canon photos. If I’m editing my friends Nikon images, I have to scale this way back. I’ve found that my Canon shots are much more dull and flat which I’ve found I like a LOT because I feel I have more control & I LOVE to edit. I’m a crazy control freak with my photos…and a big OCD! Shhh…don’t tell anyone! And the Nikon shots I’ve taken in RAW on her camera are much more rich & colorful. Which works for some because there is less to do in PP’ing (post processing=editing), but I prefer a blanker slate.
**Disclaimer…this is in NO way bashing Nikon or saying anything bad about the brand because they are AWESOME…really! Just the experiences I have had personally with shooting images from my entry level XSi and my friends entry level D60. So please do not shoot me Nikon girls…lol…it’s just my personal preference! I love you too! Heck, I love everyone who shoots with ANY camera. As long as you are taking pictures and enjoying the process! End of disclaimer! **
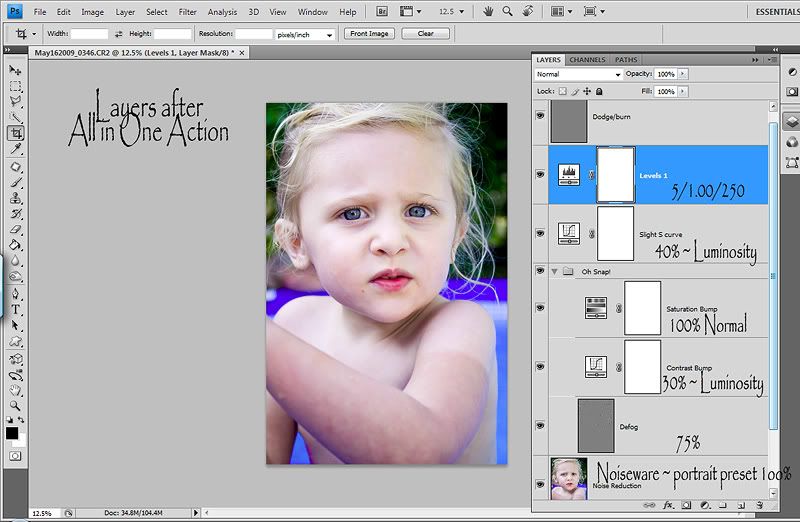
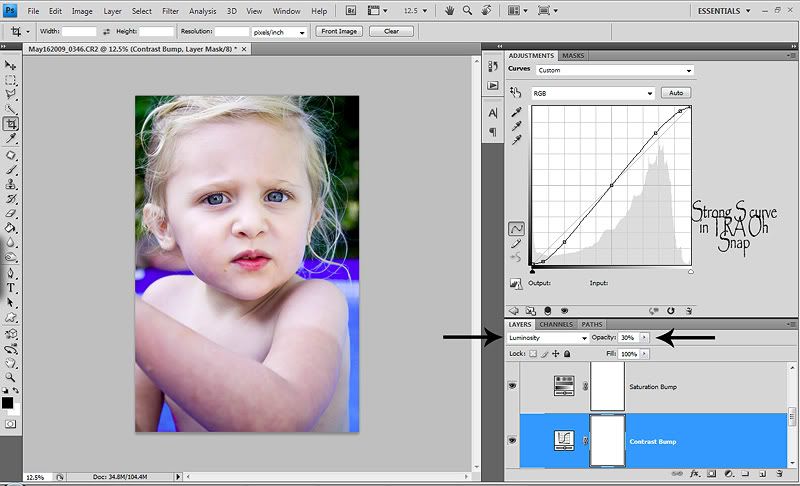
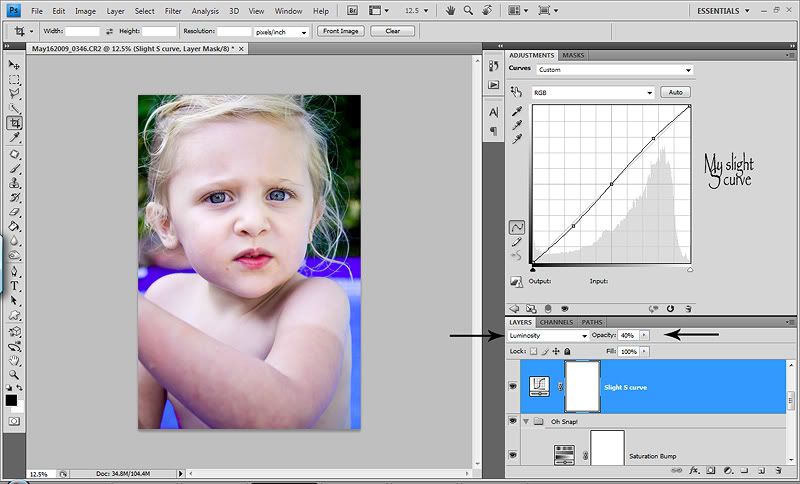
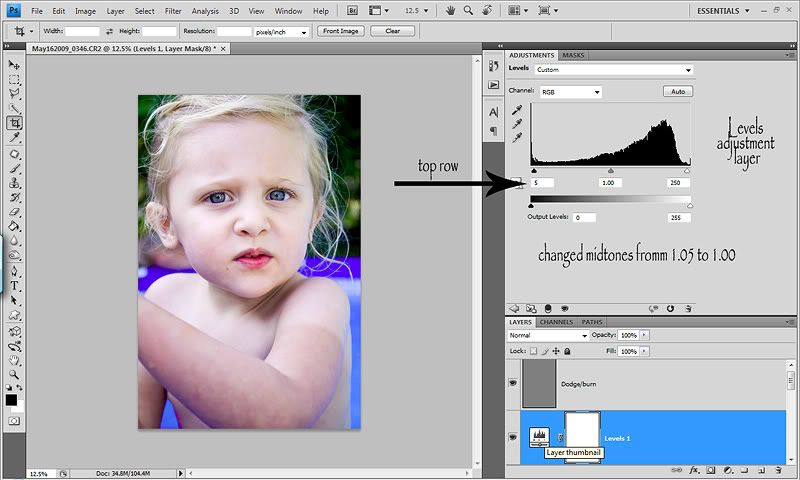
Once I open the image(s) in CS4 I hit shift/f9…which is my All in One Action. The first thing it does is run my TRA Oh Snap action which is the EXACT same as PW’s free Boost action in Set 1 (and you can get Set 2 here as well...they are GREAT) It contains 3 layers…a high pass sharpen layer which works as a Defog. I have the opacity of this layer set to 75%. Then the next layer is a strong S Curve. This layer as is, is CRAZY & makes skin tones wonky and yellow. So I have my action set up to change the blend mode to Luminosity. Now I do not have wonky skin tones. I have it set to 50% opacity. Then the final layer in this action is a very slight Saturation boost. I’m not a big Saturation fan because I choose to do that with burning or every once in a while the sponge tool on a dup layer. But this is so subtle, that I leave it as is. Then I run a slight S curve and change the blend mode to Luminosity as well and have the layer set to 50% opacity. Yes, I could probably omit the slight S curve and just use a higher opacity on the strong S Curve, but this is just my crazy wacky way! Ha! Then I run a basic levels adjustment layer and here is where I have control the specific parts of my photos. You have control over specific parts of your images with curves too, I just prefer to control the shadow/midtones/highlights in levels. But you CAN do it in curves too & we did with the 2 S curve layers which gave us contrast. See my previous post on Curves to get the basics of using them for controlling the shadows/midtones/highlights. Many would probably disagree with me, and that’s okay! :O) I know that curves are the more preferred method. And again, we did use curves for contrast which is done by shadows/midtones/highlights. I just like to have a little more control with a final layer. For my levels adjustment layer I have the action set up to have the shadows slider at 5, the midtone slider at 1.05 and the highlights slider at 250…blend mode left on Normal and opacity left at 100%. This layer does not effect skin tones.
Then my action runs a dodge/burn layer. It’s the ONLY way I dodge/burn now. I learned this from Scott Kelby’s CS4 book. It creates a new layer via ctrl/shift/n…not through the new layer icon in the layers panel. When the dialog box comes up, I have it set to blend mode Overlay (you can also use Soft Light) and the box under that says fill with neutral 50% gray checked. Then my action is also recorded to go down to the photo layer and duplicate it and name it Noise Reduction and add a white layer mask.
So once I hit shift/f9 and my action runs, it’s now on the dup noise reduction layer. If I shot at ISO 400 or above, I run my Noiseware Filter from Imagenomic because my XSi is HORRIBLE with noise…ARG! I LOVE this filter. I hate noise unless I’m going creative, so it does get a lot of use. This is a personal choice. I usually use the Portrait preset in the drop down menu, but for HIGH noise I will play with Strong Luma Noise and Full Strong Luma Noise. The Luma Noise options are not for the faint of heart. They will really smooth out your photo and skin. They way I think about Noise is I want to smooth out the noise in the photo so it’s ready for sharpening later in editing. I HATE to sharpen noise, it looks rough to me. I make sure it’s on a duplicate layer so that I can play with the opacity of the layer if needed and the white layer mask so that I can mask with a low opacity brush, anywhere I want to lessen the effect.
Then I go through my layers to adjust anything that needs adjusting. For the most part, on a good SOOC (straight out of camera) shot, I have it set up so that I do not have to adjust anything. If I do need to adjust layers, it’s usually the opacity of the strong S Curve in the TRA Oh Snap action…and I never up it…only lower it. I usually stay within 15-50%, usually around 30% depending on the image. Then sometimes I need to lower the opacity of my slight S Curve, but this one is pretty subtle, so I usually keep it around 30-50%. Since the blend modes of both of these were recorded to be changed to Luminosity, I never have to do the extra steps. Then I may go into the levels adjustment layer and play with the settings a bit. But for the most part, the settings I recorded it with work pretty well and I always leave the opacity at 100% and the blend mode to Normal for this layer.
Then if I want to do any dodging (lightning) or burning (darkening), I go up to the dodge/burn layer and do it all here. I love burning. I’ve found it a wonderful way to saturate colors and get nice rich deep colors. So to burn, I select my brush tool, opacity around 10% & flow 15% and change my foreground color to BLACK. Then I start burning where I want it a bit darker or richer. You can also use this method for free hand edge burns. Then to dodge, I set my brush opacity to about 5% (go much lighter on dodging or it can look ghost like and faded), with my flow at 10%, foreground color set to WHITE and paint anywhere that needs to be lightened. I do not dodge much. Sometimes if a face has some shadows on it, I’ll touch it up a bit. But then again, I’m learning to like shadows. You can dodge the eyes to brighten them up, but I never do. I feel it takes out all of the detail and leaves them flat. I have a method for working on eyes that I’ll post about another time which only includes a curves & levels adjustment layer and no sharpening.
Here is what my layers panel looks like after the action...
Here is a close up look at the strong S Curve from the TRA action...Oh Snap...
Here is an up close look at my slight S Curve layer...
And here is an up close look at my levels adjustment layer...
Now once my image(s) are done and I am happy…it’s time to sharpen. I now flatten all of the layers of my All in One action.
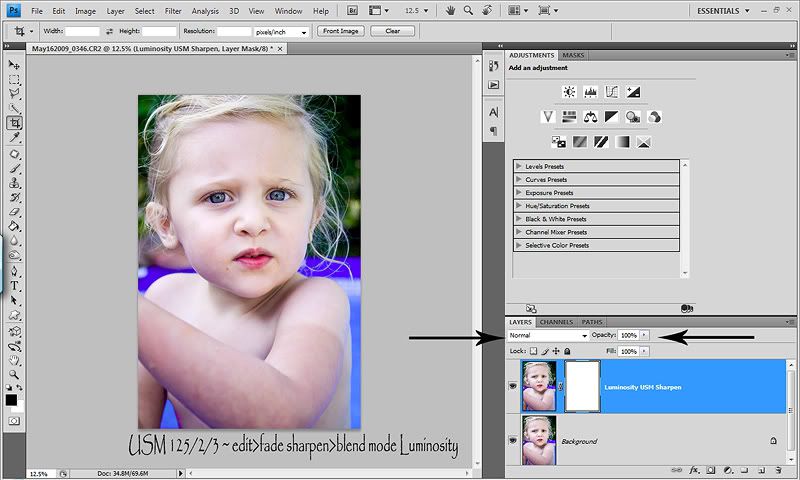
I have found a new way to sharpen thanks to Scott Kelby and I LOVE it! It’s the only way I sharpen now. I have this action set to short key shift/f10. This action is set to duplicate the photo layer for opacity control. It runs a USM of Amount 125, Radious 2, Threshold 3. I prefer to edit a bit hot and dial it down for more control. Then right after the USM is run, it goes to Edit>Fade USM. Then the blend mode is changed to Luminosity. It’s VERY important to do the Edit>Fade USM right after hitting okay in the USM dialog box. It will not work the same way if you just change the blend mode of the layer to Luminosity. Then I also have the action recorded to add a white layer mask. So that way I can mask out any over sharpening…which now that I use this method is rare. If I have to do it, it’s only in the hair and I’ll do it with a brush opacity of about 30%. And I can lower the opacity of the layer if I choose. The great thing about editing the blend mode to Luminosity right after running the USM, is that the USM is only sharpening the Luminosity of your images and not sharpening the color of your images! It doesn’t give you any wonky colors or over sharpening halos. It works wonders on the eyes & lashes. But again, can be a bit much on the hair. Nothing a little low opacity masking can’t fix!
Here is a look at the Luminosity USM Sharpen layer...screenshot probably NOT needed...lol
And that is my workflow. On this shot I might do a little color correcting with CS4s wonderful new TAT tool that is teaching me to see colors and I would do a curves & levels adjustment layer on her eyes. But for this tut, I will leave it as is. It may seem like a lot, but since I have it all recorded to actions and assigned short keys, if the image is good SOOC, I can edit each pic in about 2 minutes. A little more if the shot needs a little more work or masking. But now, I hit shift/f9 and make a couple quick adjustments, flatten and hit shift/f10 and I’m good to go!
So try to find a workflow that works for you and save yourself some time and record it in an action. I would love to share my action with you, but since I use the TRA action IN my action, I cannot share it.
Again, this is just my way and I believe in different strokes for different folks. Just find what floats your boat and have fun!
If you have any questions, please don’t hesitate to ask. I will do my best to help! :O)
I finally have a good consistent work flow and I thought I’d share how I edit my photos. This is just a basic clean it up standard edit. It will not go into fixing blemishes, how to even out skin tones (which this pic could use lol), enhancing eyes or color correcting. I will go over how * I * do that in another post. It’s nothing to write home about but is meant to give you a starting point and then you can adjust it from there. This is for good SOOC shots, or cleaned up in ACR and good images when brought into my CS4.
Here is what the SOOC camera, ACR edits and final edits look like side by side...
And here is the SOOC & final basic edit side by side...
I shoot in RAW, so the first thing I do is open my RAW images (.CR2 for Canon and I believe it’s .NET for Nikon) through Bridge. It opens my images in ACR (Adobe Camera Raw). I won’t go into the boring details that I do in Bridge. But I do love me some Bridge! Ha!
I first take the WB (white balance) picker and try to find a neutral gray area to check. If I can find one, this works the best because it reads your photo and gives the most true WB. If I cannot find a neutral gray color, I will click other areas that are close and sometimes get lucky and sometimes will find a decent spot but still need to play with the sliders a bit to get it more accurate. If I cannot find any neutral area in my photo, then I start with the presets. Most of the time As Shot works just fine for outdoor photos with some slider adjustments. Indoors is a whole nother world. Lol! I shoot in AWB (Auto White Balance) because I shoot in RAW. If I try a preset, I will usually try Auto and it works pretty well, but always always play with the sliders after I select the preset because they are still usually off a bit. I find the Daylight preset to be too warm for outside shots, even though I do prefer my images on the warmer side vs the cooler side.
Once I have my WB where I want it, I will play with the Exposure slider IF needed. If my image is a bit underexposed I will up it. If it’s a bit over exposed I will usually leave the Exposure slider alone and play with the Recovery Slider and Blacks slider. I find I prefer these two sliders together for overexposed images vs the Exposure slider by itself. Just seems to be a cleaner way to get the colors and richness back in. But if it’s very overexposed, then I’ll play with the Exposure slider as well. Then once I’ve worked on my WB, Exposure/Recovery/Blacks sliders, I will up the clarity a bit. Don’t go too far or your images will have too much contrast and become harsh looking. The clarity slider gives you well…Clarity! Ha! It helps defog the image a bit and gives it some depth. I never go above 30 on portraits and usually much lower. But on landscape/random/flower shots, I’ll up it a bit above 30 depending on the pic and the look I’m going for. Then if I’m feeling colorful I’ll up the Vibrancy slider a bit. This works differently than the Saturation slider that I NEVER use. It takes colors that are dull in your image and ups them a bit. It does not touch colors that are already properly saturated. I use this very slightly if at all on portraits unless there is a lot of scenery/sky. But I do use it on landscapes/random/flower shots. And that is all I do in ACR. You can do MUCH more in ACR, but I prefer to work in layers. If I am batch processing, I will open a set of shots taken in the same lighting, edit the first, then select all and synchronize them. I then look at each one and make any small adjustments if needed. If I’m editing a big batch, I will hit done so that the ACR edits are saved, but so I do not have to open them all in CS4 and risk it running too slow. If I only have a few, then I hit Open Images and do the rest in CS4.
Here is what my ACR screen looks like once I've made my ACR adjustments...
I recorded an All in Once action with my steps, with each layer set up for what I’ve found works for my Canon photos. If I’m editing my friends Nikon images, I have to scale this way back. I’ve found that my Canon shots are much more dull and flat which I’ve found I like a LOT because I feel I have more control & I LOVE to edit. I’m a crazy control freak with my photos…and a big OCD! Shhh…don’t tell anyone! And the Nikon shots I’ve taken in RAW on her camera are much more rich & colorful. Which works for some because there is less to do in PP’ing (post processing=editing), but I prefer a blanker slate.
**Disclaimer…this is in NO way bashing Nikon or saying anything bad about the brand because they are AWESOME…really! Just the experiences I have had personally with shooting images from my entry level XSi and my friends entry level D60. So please do not shoot me Nikon girls…lol…it’s just my personal preference! I love you too! Heck, I love everyone who shoots with ANY camera. As long as you are taking pictures and enjoying the process! End of disclaimer! **
Once I open the image(s) in CS4 I hit shift/f9…which is my All in One Action. The first thing it does is run my TRA Oh Snap action which is the EXACT same as PW’s free Boost action in Set 1 (and you can get Set 2 here as well...they are GREAT) It contains 3 layers…a high pass sharpen layer which works as a Defog. I have the opacity of this layer set to 75%. Then the next layer is a strong S Curve. This layer as is, is CRAZY & makes skin tones wonky and yellow. So I have my action set up to change the blend mode to Luminosity. Now I do not have wonky skin tones. I have it set to 50% opacity. Then the final layer in this action is a very slight Saturation boost. I’m not a big Saturation fan because I choose to do that with burning or every once in a while the sponge tool on a dup layer. But this is so subtle, that I leave it as is. Then I run a slight S curve and change the blend mode to Luminosity as well and have the layer set to 50% opacity. Yes, I could probably omit the slight S curve and just use a higher opacity on the strong S Curve, but this is just my crazy wacky way! Ha! Then I run a basic levels adjustment layer and here is where I have control the specific parts of my photos. You have control over specific parts of your images with curves too, I just prefer to control the shadow/midtones/highlights in levels. But you CAN do it in curves too & we did with the 2 S curve layers which gave us contrast. See my previous post on Curves to get the basics of using them for controlling the shadows/midtones/highlights. Many would probably disagree with me, and that’s okay! :O) I know that curves are the more preferred method. And again, we did use curves for contrast which is done by shadows/midtones/highlights. I just like to have a little more control with a final layer. For my levels adjustment layer I have the action set up to have the shadows slider at 5, the midtone slider at 1.05 and the highlights slider at 250…blend mode left on Normal and opacity left at 100%. This layer does not effect skin tones.
Then my action runs a dodge/burn layer. It’s the ONLY way I dodge/burn now. I learned this from Scott Kelby’s CS4 book. It creates a new layer via ctrl/shift/n…not through the new layer icon in the layers panel. When the dialog box comes up, I have it set to blend mode Overlay (you can also use Soft Light) and the box under that says fill with neutral 50% gray checked. Then my action is also recorded to go down to the photo layer and duplicate it and name it Noise Reduction and add a white layer mask.
So once I hit shift/f9 and my action runs, it’s now on the dup noise reduction layer. If I shot at ISO 400 or above, I run my Noiseware Filter from Imagenomic because my XSi is HORRIBLE with noise…ARG! I LOVE this filter. I hate noise unless I’m going creative, so it does get a lot of use. This is a personal choice. I usually use the Portrait preset in the drop down menu, but for HIGH noise I will play with Strong Luma Noise and Full Strong Luma Noise. The Luma Noise options are not for the faint of heart. They will really smooth out your photo and skin. They way I think about Noise is I want to smooth out the noise in the photo so it’s ready for sharpening later in editing. I HATE to sharpen noise, it looks rough to me. I make sure it’s on a duplicate layer so that I can play with the opacity of the layer if needed and the white layer mask so that I can mask with a low opacity brush, anywhere I want to lessen the effect.
Then I go through my layers to adjust anything that needs adjusting. For the most part, on a good SOOC (straight out of camera) shot, I have it set up so that I do not have to adjust anything. If I do need to adjust layers, it’s usually the opacity of the strong S Curve in the TRA Oh Snap action…and I never up it…only lower it. I usually stay within 15-50%, usually around 30% depending on the image. Then sometimes I need to lower the opacity of my slight S Curve, but this one is pretty subtle, so I usually keep it around 30-50%. Since the blend modes of both of these were recorded to be changed to Luminosity, I never have to do the extra steps. Then I may go into the levels adjustment layer and play with the settings a bit. But for the most part, the settings I recorded it with work pretty well and I always leave the opacity at 100% and the blend mode to Normal for this layer.
Then if I want to do any dodging (lightning) or burning (darkening), I go up to the dodge/burn layer and do it all here. I love burning. I’ve found it a wonderful way to saturate colors and get nice rich deep colors. So to burn, I select my brush tool, opacity around 10% & flow 15% and change my foreground color to BLACK. Then I start burning where I want it a bit darker or richer. You can also use this method for free hand edge burns. Then to dodge, I set my brush opacity to about 5% (go much lighter on dodging or it can look ghost like and faded), with my flow at 10%, foreground color set to WHITE and paint anywhere that needs to be lightened. I do not dodge much. Sometimes if a face has some shadows on it, I’ll touch it up a bit. But then again, I’m learning to like shadows. You can dodge the eyes to brighten them up, but I never do. I feel it takes out all of the detail and leaves them flat. I have a method for working on eyes that I’ll post about another time which only includes a curves & levels adjustment layer and no sharpening.
Here is what my layers panel looks like after the action...
Here is a close up look at the strong S Curve from the TRA action...Oh Snap...
Here is an up close look at my slight S Curve layer...
And here is an up close look at my levels adjustment layer...
Now once my image(s) are done and I am happy…it’s time to sharpen. I now flatten all of the layers of my All in One action.
I have found a new way to sharpen thanks to Scott Kelby and I LOVE it! It’s the only way I sharpen now. I have this action set to short key shift/f10. This action is set to duplicate the photo layer for opacity control. It runs a USM of Amount 125, Radious 2, Threshold 3. I prefer to edit a bit hot and dial it down for more control. Then right after the USM is run, it goes to Edit>Fade USM. Then the blend mode is changed to Luminosity. It’s VERY important to do the Edit>Fade USM right after hitting okay in the USM dialog box. It will not work the same way if you just change the blend mode of the layer to Luminosity. Then I also have the action recorded to add a white layer mask. So that way I can mask out any over sharpening…which now that I use this method is rare. If I have to do it, it’s only in the hair and I’ll do it with a brush opacity of about 30%. And I can lower the opacity of the layer if I choose. The great thing about editing the blend mode to Luminosity right after running the USM, is that the USM is only sharpening the Luminosity of your images and not sharpening the color of your images! It doesn’t give you any wonky colors or over sharpening halos. It works wonders on the eyes & lashes. But again, can be a bit much on the hair. Nothing a little low opacity masking can’t fix!
Here is a look at the Luminosity USM Sharpen layer...screenshot probably NOT needed...lol
And that is my workflow. On this shot I might do a little color correcting with CS4s wonderful new TAT tool that is teaching me to see colors and I would do a curves & levels adjustment layer on her eyes. But for this tut, I will leave it as is. It may seem like a lot, but since I have it all recorded to actions and assigned short keys, if the image is good SOOC, I can edit each pic in about 2 minutes. A little more if the shot needs a little more work or masking. But now, I hit shift/f9 and make a couple quick adjustments, flatten and hit shift/f10 and I’m good to go!
So try to find a workflow that works for you and save yourself some time and record it in an action. I would love to share my action with you, but since I use the TRA action IN my action, I cannot share it.
Again, this is just my way and I believe in different strokes for different folks. Just find what floats your boat and have fun!
If you have any questions, please don’t hesitate to ask. I will do my best to help! :O)

8 comments:
Thanks so much for doing this tutorial - added to my faves!
Thanks so much for sharing this! I have booked marked your page to come back to it when i need it!!!
Thanks for putting this together! Trying to justify buying CS4!lol I only have PSE 6 and PSPX2 which seems to be working for me right now!
Thanks so much for the posting! I have CS3, and I am new at this photography thing, but I love it! I just bought a Canon 50D. I have a question... I don't think I have the ACR in my photoshop. What do you suggest to do in CS3? I appreciate your help!
lauren
Hi Lauren! I started with CS3. It's a great program. I just recently upgraded to CS4. Do you shoot in RAW? You can open jpegs in ACR as well, you just don't have as much control as if you shoot in RAW. But you can still open jpegs in ACR by clicking ctrl/shift/alt/o and choose the camera raw option in the drop down tool bar. It will bring up ACR. Try that to see if it works. If it does, you have the current ACR plugin. If it doesn't that means that you need to go to the Adobe site and download the current ACR plugin. I'm not 100% that your 50D RAW files are compatiable with CS3 but you can find that info there as well. If CS3 isn't compatiable with your 50D RAW files, Adobe as a DNG converter. It basically converts your RAW files to a DNG so you can open them in ACR and still have complete control. I hope that helps and if you have any other questions just let me know!
Thanks so much! I am really enjoying this blog has been so helpful to me. You are so generous to share all that you have learned with us. Care to share your all in one action?
Thanks again
okay sorry just read one of the last lines that says why you can't share. Sorry.
Yeah, I really wish I could. If it was all my own stuff, I would share it in a heartbeat! But I gave the steps for it, so if you download The Pioneer Woman's Set 1 and use the action boost, you could record your own action that's the exact same as mine with the steps from the post. If you need help with that, just let me know and I'd be happy to help. It's not as hard as it sounds! :O)
Post a Comment