How I did it #1...
Hi all and happy Monday! I will start by saying I am yet AGAIN having issues with my calibrator and I'm about over it! I have a ticket into Spyder and hopefully they will sending out a new calibrator because this is getting OLD! My computer says the device has malfunctioned. I've already un installed and re installed, downloaded the updates yada yada yada! Still not working. Everything else I plug into my USB ports are working perfectly. So instead of not posting on the blog, I figured I'd post anyway but warn you I am working on an UN calibrated laptop...which is a BIG NO NO! My colors are off BADLY and my laptop monitor runs VERY COOL, so these may be WAY too yellow. So take the post/pics with a grain of salt! Ha! Although with that said, my goal was to create a very warm sun kissed edit. On my cool screen it looks good, but it may be overload on yours, especially if you are calibrated. So when I say I edited it to be a warm sun kissed photo, I did not edit it to be an orange kissed photo! Ha! :O) Anything I do in PS right now is just because I need my fix. None will be saved and printed! :O)
So I love how MCP does her blueprint posts and I've always wanted to do something similar. Obviously mine won't be nearly as good and will have various different techniques and actions from different places, whereas she uses all her own actions that she sells. But it may turn you onto an action, texture or technique you didn't know of before!
So I pulled up a pretty boring snap I took of Avyree. And yes, please excuse the fact that she has no shirt on....MOST of the shots I have of her are this way. I know some people think it's wrong to post topless pics of babies, or in their panties (which I've done). But she's 2 and if it were a boy shot it wouldn't be so bad. So this is my choice and I am okay with it! :O)
I am always trying new things in PS. I love getting creative and breaking the rules. I like clean edits, but my heart has ALWAYS been drawn to creative edits...and I think it's there to stay. I especially like to take a very boring/dull snapshot and trying to make it fun! I like to try to make them fun creative works of art...something different. Some turn out good, others NOT! Ha! So you can be the judge if you think this is good or not! To each is own in this awesome world of photography and PS!
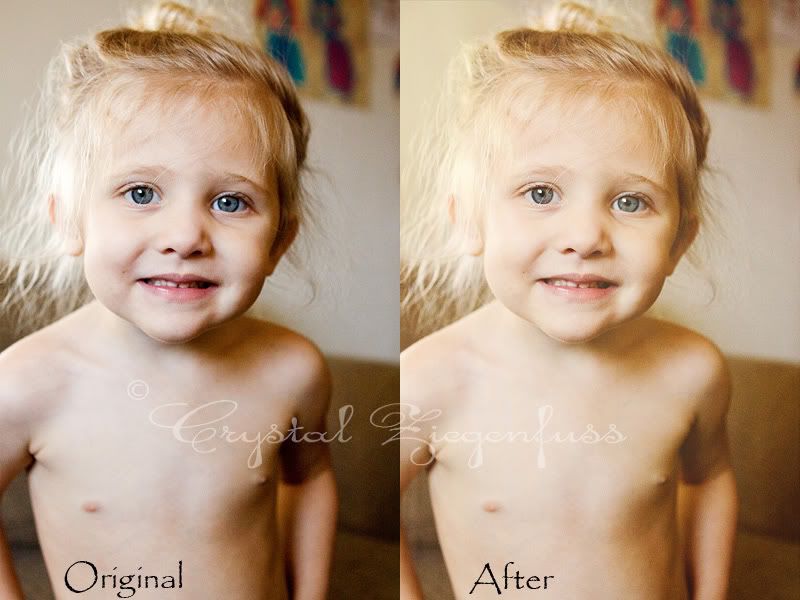
Here is the before after and I'll go over what I did...
Now normally when I go for a creative edit, I always do my own standard PP'ing first. This was shot at ISO 1600 (on my XSi is AWFUL) but because I want to try different things, I didn't use my Noiseware plugin nor did I run my All in One action. I did some minor tweaks in ACR (since my colors are off I didn't work too hard on the WB) and then just started playing! I really like to try different actions/textures/overlays etc from different makers on the same photos to get so many different looks. The possibilities are ENDLESS!
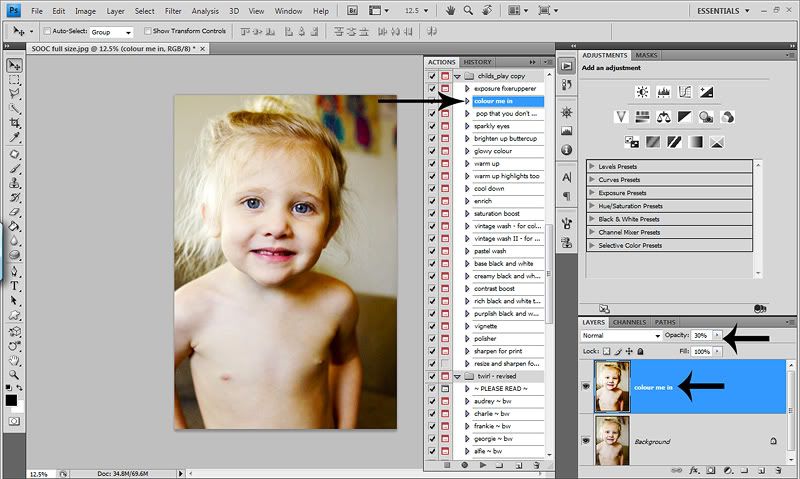
The first thing I did was run "Colour me in" from Child's Play and reduced the opacity to 30%. Sometimes I'll add a layer mask to do any masking I want, but again with no calibration, I'm not working real hard right now! Ha!
Then I ran "Felix" from the new Twirl set (can be found at the Child's Play link above) and lowered the opacity of the whole folder to 30%. I just got this set and haven't had much time to play, so I can't wait to play more once I'm calibrated again!

Now comes the REALLY fun part! Then I used 2 AMAZING Overlays that I just bought this am! I LOVE MCP, but she's making me go BROKE! Ha! I bought the 2 textures packs from Kaleidoscope. Head over to MCP and check out her MUCH BETTER examples and get the discount code and run out and get them! She has a texture pack and a VERY unique Overlay pack. I want to do a full review of Kaleidoscope, so I won't say much more. But head over to MCP quick because the discount code ends Aug 2nd then head over to Kaleidoscope and check out her AMAZING examples and hit that BUY button...you won't regret it.
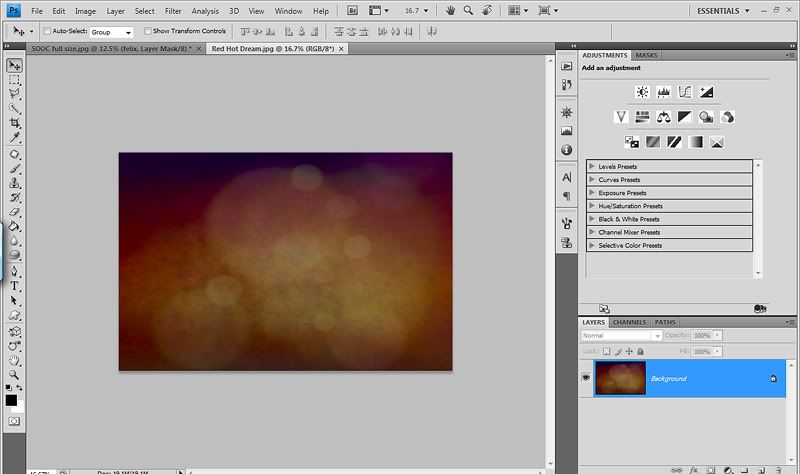
So the first texture I used is called "Red Hot Dream" from her "Dream" texture collection. This is what it looks like before applying it to my image...
So just as with any texture, ctrl/a to select all. Ctrl/c to copy. Then go back to photo, ctrl/v to paste. Then ctrl/t (free transform tool) and stretch it over your image then hit enter. And as you'll see, your picture is completely covered. So I lowered the opacity of the texture layer down to 15%. Then with a low opacity brush, I went over Avyree a bit to lessen the effect of the texture on her.

Now it gets even more fun! Here Overlays are AWESOME! She has bokeh and sunray Overlays and so much more. These will get a LOT of use!
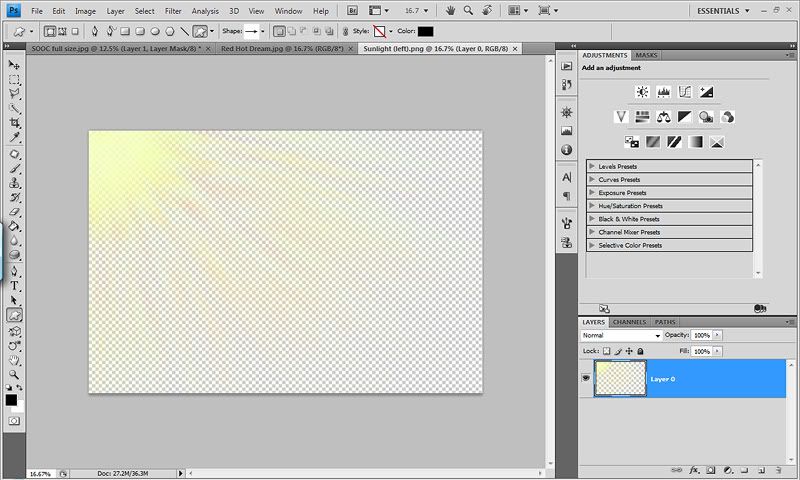
So I used "Sunlight Left" from her "Layer's of Light" collection. Here is what it looks like before I copy/paste it over my image! All the Overlays are .png
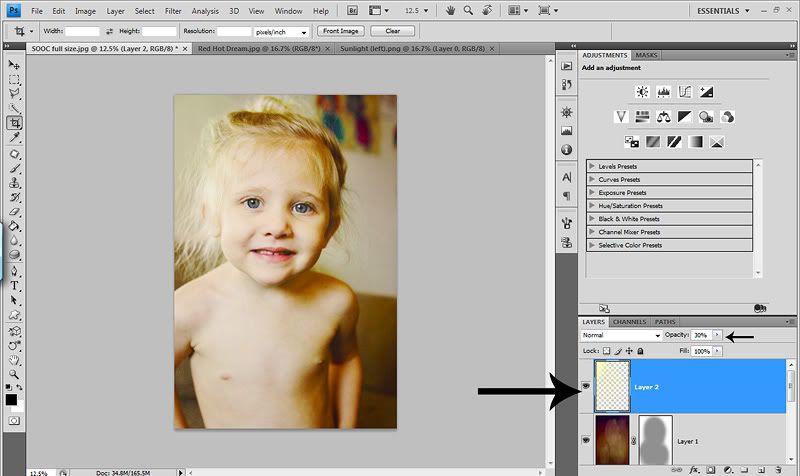
Once I get it on my photo and stretched properly, I lowered the opacity of the layer to 30%. Again, you can add a mask and do any masking that you want.
So I decide I'm going to stop here. I could add more but I won't! Ha! These textures and overlays are PERFECT for outside shots! So now I flatten my image and run a Luminosity USM (instructions can be found on a past post here on the blog).
And that's it! It was a really quick play and I had SO much fun with my new toys. I've invested so much in stuff for PS that I need to start playing with it more. When I get my calibrator situation all fixed up, I will do a full review of these WONDERFUL Kaleidoscope textures & overlays with lots of fun examples.
So I hope you enjoyed my very first How I did it! Happy Monday!
So I love how MCP does her blueprint posts and I've always wanted to do something similar. Obviously mine won't be nearly as good and will have various different techniques and actions from different places, whereas she uses all her own actions that she sells. But it may turn you onto an action, texture or technique you didn't know of before!
So I pulled up a pretty boring snap I took of Avyree. And yes, please excuse the fact that she has no shirt on....MOST of the shots I have of her are this way. I know some people think it's wrong to post topless pics of babies, or in their panties (which I've done). But she's 2 and if it were a boy shot it wouldn't be so bad. So this is my choice and I am okay with it! :O)
I am always trying new things in PS. I love getting creative and breaking the rules. I like clean edits, but my heart has ALWAYS been drawn to creative edits...and I think it's there to stay. I especially like to take a very boring/dull snapshot and trying to make it fun! I like to try to make them fun creative works of art...something different. Some turn out good, others NOT! Ha! So you can be the judge if you think this is good or not! To each is own in this awesome world of photography and PS!
Here is the before after and I'll go over what I did...
Now normally when I go for a creative edit, I always do my own standard PP'ing first. This was shot at ISO 1600 (on my XSi is AWFUL) but because I want to try different things, I didn't use my Noiseware plugin nor did I run my All in One action. I did some minor tweaks in ACR (since my colors are off I didn't work too hard on the WB) and then just started playing! I really like to try different actions/textures/overlays etc from different makers on the same photos to get so many different looks. The possibilities are ENDLESS!
The first thing I did was run "Colour me in" from Child's Play and reduced the opacity to 30%. Sometimes I'll add a layer mask to do any masking I want, but again with no calibration, I'm not working real hard right now! Ha!
Then I ran "Felix" from the new Twirl set (can be found at the Child's Play link above) and lowered the opacity of the whole folder to 30%. I just got this set and haven't had much time to play, so I can't wait to play more once I'm calibrated again!
Now comes the REALLY fun part! Then I used 2 AMAZING Overlays that I just bought this am! I LOVE MCP, but she's making me go BROKE! Ha! I bought the 2 textures packs from Kaleidoscope. Head over to MCP and check out her MUCH BETTER examples and get the discount code and run out and get them! She has a texture pack and a VERY unique Overlay pack. I want to do a full review of Kaleidoscope, so I won't say much more. But head over to MCP quick because the discount code ends Aug 2nd then head over to Kaleidoscope and check out her AMAZING examples and hit that BUY button...you won't regret it.
So the first texture I used is called "Red Hot Dream" from her "Dream" texture collection. This is what it looks like before applying it to my image...
So just as with any texture, ctrl/a to select all. Ctrl/c to copy. Then go back to photo, ctrl/v to paste. Then ctrl/t (free transform tool) and stretch it over your image then hit enter. And as you'll see, your picture is completely covered. So I lowered the opacity of the texture layer down to 15%. Then with a low opacity brush, I went over Avyree a bit to lessen the effect of the texture on her.
Now it gets even more fun! Here Overlays are AWESOME! She has bokeh and sunray Overlays and so much more. These will get a LOT of use!
So I used "Sunlight Left" from her "Layer's of Light" collection. Here is what it looks like before I copy/paste it over my image! All the Overlays are .png
Once I get it on my photo and stretched properly, I lowered the opacity of the layer to 30%. Again, you can add a mask and do any masking that you want.
So I decide I'm going to stop here. I could add more but I won't! Ha! These textures and overlays are PERFECT for outside shots! So now I flatten my image and run a Luminosity USM (instructions can be found on a past post here on the blog).
And that's it! It was a really quick play and I had SO much fun with my new toys. I've invested so much in stuff for PS that I need to start playing with it more. When I get my calibrator situation all fixed up, I will do a full review of these WONDERFUL Kaleidoscope textures & overlays with lots of fun examples.
So I hope you enjoyed my very first How I did it! Happy Monday!

1 comments:
Great tutorial! Thanks for sharing!!
Post a Comment