Let's POP the eyes...
Sorry I didn't get this posted last night. Went to dinner with the family! :O)
So first I want to share how I pop eyes by hand, then I'll talk about the action. When popping eyes, you need to be very careful. There is a fine line between eyes that sparkle and pop, and eyes that look over worked and scary. Always use a light hand when popping eyes. And something that is very important to me when working on the eyes is to keep detail. Sure, you can lighten them so they stand out, but if not done right, they lose detail. And when eyes lose detail, they look vacant, which can ruin a really great shot. The eyes are the soul of the shot, so it's important to keep detail to keep emotion.
So here is my SOOC shot (tweaks in ACR & sharpened for the web) that I'll be using for the Tut & the action set.

This is my cousin. She is beautiful and has gorgeous eyes. My SOOC shot (taken a year ago) does NOT do them justice. So my goal is to get them looking like they look IRL (in real life).
So the first thing I do (which I didn't show in the tut..sorry) is create a new folder and name it Eyes. This way all of the layers I use are in one folder. I can turn the folder on/off to see my results.
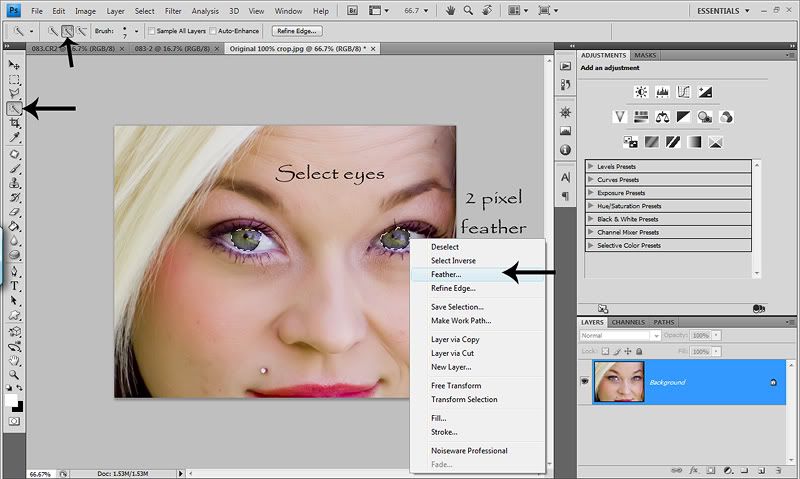
Now since we are just working on the eyes, we need to select them. For the selection here, we are only selecting the iris of the eye. So take whatever method you use to make a selection and select both eyes. I like to use the Quick Wand. Make sure that whatever selection tool you use, have it set to ADD to selection so you can select both eyes at the same time. **Quick note...if your eyes don't have the same light in each (one in shadows) you might want to work on them seperately). One you have your eyes selected, right click and choose Feather. I use 2px feather. Here's a screenshot...
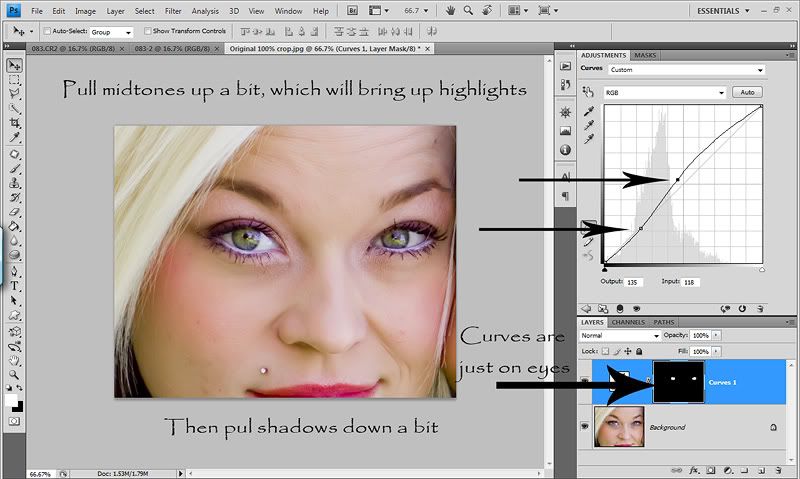
Now with your selection in place, open a curves adjustment layer. We are going to use the Curves to do a basic lighten. So take the midtones section of the curves line (middle) and pull it up & out watching the eyes as you pull it. As you'll notice, the highlights section will also go up a bit! You'll see it lighten, but you'll also see you lose some detail. So now, take the shadows section of the curves line (bottom) and pull it down a tad. When you look in your layers panel, you will see a black layer mask with white where the eyes are. Basically this means the curves you just did are on the eyes (white...showing) and where you see black, the curves are hidden. I like to change the blend mode to Luminosity for my curves layers so there is no yellowing. But if you want some yellow in your eyes, leave it as is. Sorry I forgot to change the blend mode for the screenshot. Too many kids here this morning! Ha!
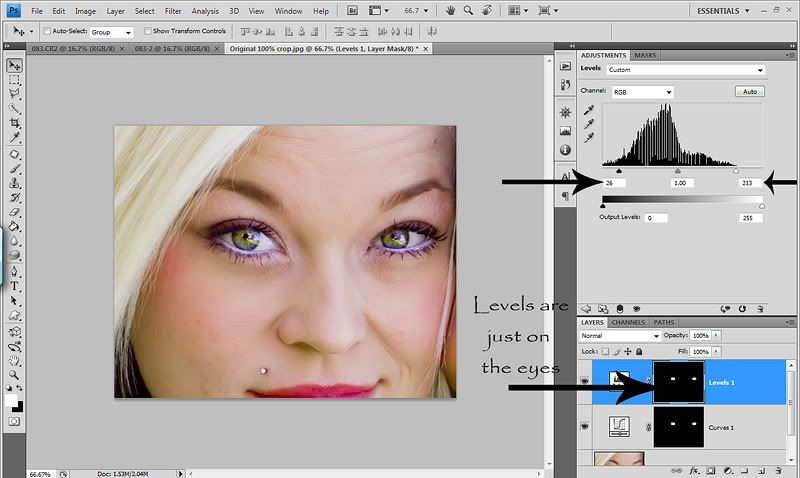
Now you'll see your selction is gone. But we need it back. Don't worry, you don't have to reselect the eyes. Just hold down the ctrl button and click on the black layer mask and VIOLA...your selection is back. And you don't have to re feather, because the first layer already has the feather in the selection. Now open a levels adjustment layer. This is my FAV layer for the eye pop. This is where I get a LOT of detail and depth back in the eyes. I usually only worry about the shadows & highlights for this layer. We already worked on the midtones with the curves adjustment layer. So I take the shadows slider in more than I normally would till the darks of the eyes are deep. Then I take the highlights slider in until the lights of the eyes really POP. You can leave the blend mode to Normal here. Here's my screenshot...
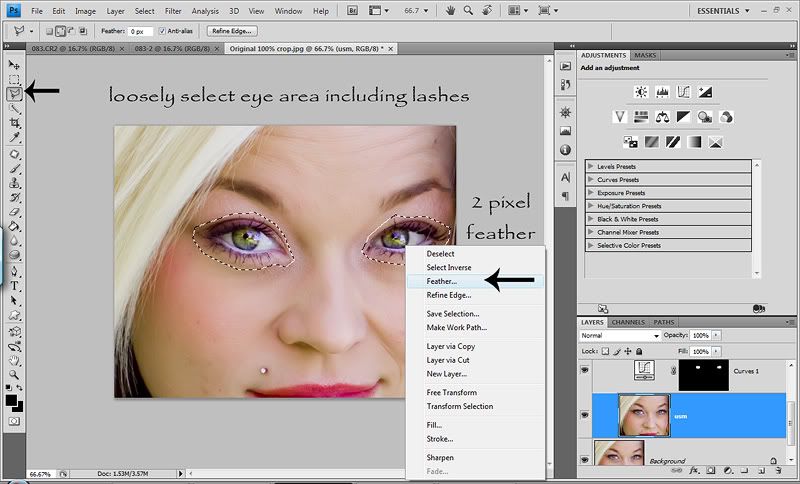
Now IF you want to do some sharpening to the eyes, here's how I do it WHEN I do it. Go down to the photo and and duplicate the layer and name it what you like. I named mine USM. I also slide it up into the Eyes folder. I like to sharpen the whole eye area vs just the iris. This way it looks a bit more natural rather than really sparkly sharp iris' and dull lashes. Plus it makes the whole eye area POP more this way. So take your lasso tool and loosely select the whole eye area like this. You don't have to be perfect because you can play with layer opacity and add a white layer mask to lighten/remove the sharpening where you don't want it. And right click, feather, I again use a 2px feather. Here's my selection...
Now run a USM. I like to edit hot and play with layer opacity. So I go pretty strong here. Amount 150, Radious 1.5, Threshold 3. After you hit click DON'T do anything else yet!!!!
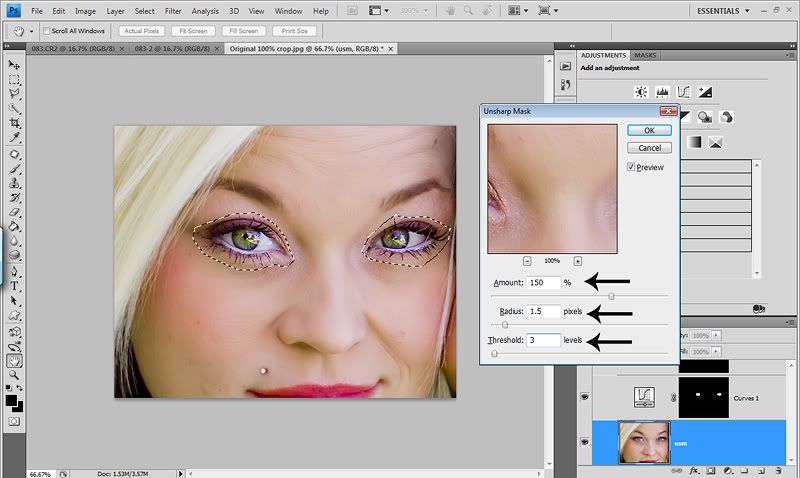
I prefer to do Luminosity sharpen whenever I run a USM (Unsharp Mask). So RIGHT AFTER you hit okay on the USM dialog box, go to Edit>Fade Unsharp Mask and change the MODE to Luminosity. You can change the opacity here, but I prefer to do that in the layers panel.
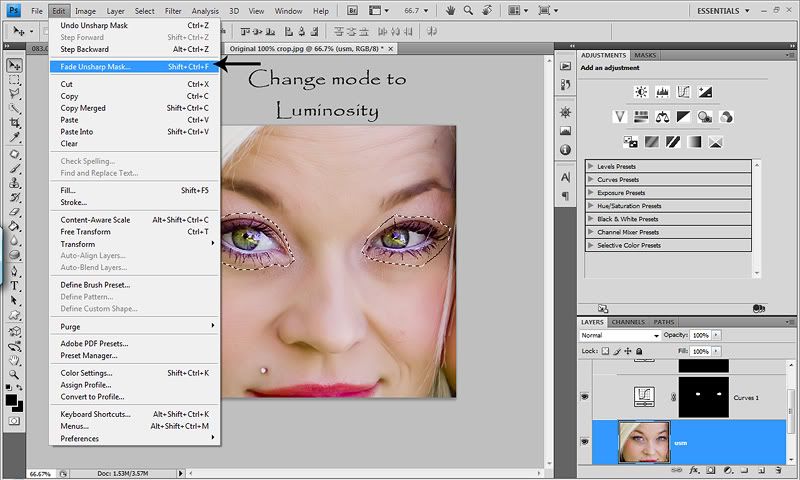
If the sharpening went over where you didn't want it, add a white layer mask, brush tool, round soft brush, opacity at about 10%, flow 15%, foreground color set to black and paint where you want to lesson or remove the sharpening. Now play with the opacity of the layers if you'd like. I like to toggle the folder on/off to see how much it changed the eyes.
I personally rarely ever POP eye color. But if I do decide to do it, I use the Lab Color POP, add a black layer mask and paint over just the eyes at 100% brush opacity and lower the layer down to about 10-30%. The LAB color pop is in the action set! :O)
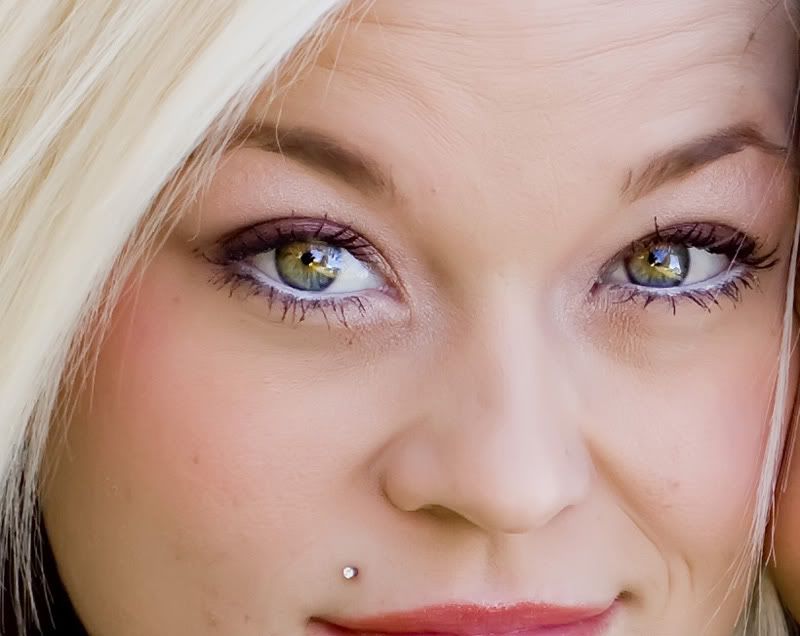
And here is my after. I went pretty light on the eyes here, but you can use stronger settings and lower opacity or mask out with a low opacity brush...
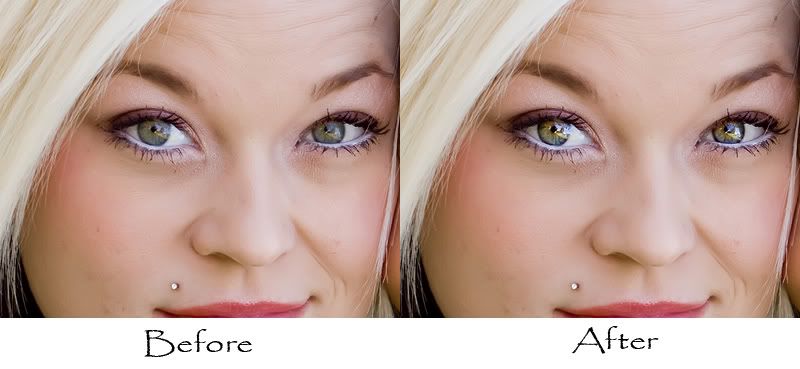
And here is the before/after side by side. A nice subtle POP.
Now let's talk about the Eye POP action set I recorded. Sadly I rarely use it, but I do think it's a pretty good action and will give you a LOT of control over all aspects of your eyes in your images. Every layer has a black layer mask attached...which means the effect of every layer is hidden. You have to paint the effect of each layer back IN. To paint in on each layer mask, first make sure you are ON the black layer mask. Just click it once and when you paint on your image, it will paint on the black layer mask. Then choose your brush tool...soft round brush, layer opacity pretty low as well with flow rate. Make sure your foreground color is set to white, and start painting. The action is recorded in a folder, so you can minimize it to do further edits, turn it on/off to see the results etc.
There are 6 actions in this set. The first is the Eye POP. Then there are color pops for different eye colors (I will admit these are just OKAY) and then one general eye pop that is the Lab Color POP. You can play with all of them to see which you prefer, or none. Ha! And again, please excuse the breaks. I recorded this a while ago and have since learned my lesson! :O)
In the Eye POP action there are 8 layers. The top photo layer is the dodge/burn layer. Probably not needed because the other layers give you full control, but I just threw it in there. The next layer from the top going down is "No Bloodshot". Basically this layer is just to remove red. Use it only on the whites of the eyes or if you have red reflections in the eyes. The next layer is "Lushes Lashes". Use this on the lashes to deepen/darken them and can also be used on makeup or eye liner. The next layer is "White whites" which you know what to do. Use a low opacity brush here!!! You don't want freaky white whites!!!!! The next layer is "Catch Lights" which will give them a bit of shine and enchance the lights of the eyes. The next layer is "Give em depth" and my FAV layer. This will pop the highlights and deepen the darks of the eyes, giving them depth and detail. The next layer is "Give em light". As you can tell, it will lighten the eyes. Don't go too far or you'll loose detail. And the last layer of this action is "Sharp eyes". For this layer (like the tut) I like to sharpen the iris and the surrounding eye area including the eye lashes. For this layer, I like to use a brush opacity of 100% then lower the opacity of the layer. But that's a personal preference.
I think the key to popping eyes with this action is to use a lower brush opacity when painting so as to not make a major change with just one layer. A light hand on all layers will combine a nice eye pop.
So looking back at the original image...here is my after using the eye pop action. I went a bit strong to show you what it's capable of. You can go even stronger (although I don't recommend it lol) or even lighter than I did...

And here is the side by side. Normally I would do more cleanup to the eyes, removing makeup spots etc. But I just did the basics for this post.

So if you'd like to download and try my Eye POP Action set, please let me know how you like it. I can't wait to hear what you think. I hope this post finds you well and I hope you and your family has a WONDERFUL & SAFE 4th of July! :O)
So first I want to share how I pop eyes by hand, then I'll talk about the action. When popping eyes, you need to be very careful. There is a fine line between eyes that sparkle and pop, and eyes that look over worked and scary. Always use a light hand when popping eyes. And something that is very important to me when working on the eyes is to keep detail. Sure, you can lighten them so they stand out, but if not done right, they lose detail. And when eyes lose detail, they look vacant, which can ruin a really great shot. The eyes are the soul of the shot, so it's important to keep detail to keep emotion.
So here is my SOOC shot (tweaks in ACR & sharpened for the web) that I'll be using for the Tut & the action set.
This is my cousin. She is beautiful and has gorgeous eyes. My SOOC shot (taken a year ago) does NOT do them justice. So my goal is to get them looking like they look IRL (in real life).
So the first thing I do (which I didn't show in the tut..sorry) is create a new folder and name it Eyes. This way all of the layers I use are in one folder. I can turn the folder on/off to see my results.
Now since we are just working on the eyes, we need to select them. For the selection here, we are only selecting the iris of the eye. So take whatever method you use to make a selection and select both eyes. I like to use the Quick Wand. Make sure that whatever selection tool you use, have it set to ADD to selection so you can select both eyes at the same time. **Quick note...if your eyes don't have the same light in each (one in shadows) you might want to work on them seperately). One you have your eyes selected, right click and choose Feather. I use 2px feather. Here's a screenshot...
Now with your selection in place, open a curves adjustment layer. We are going to use the Curves to do a basic lighten. So take the midtones section of the curves line (middle) and pull it up & out watching the eyes as you pull it. As you'll notice, the highlights section will also go up a bit! You'll see it lighten, but you'll also see you lose some detail. So now, take the shadows section of the curves line (bottom) and pull it down a tad. When you look in your layers panel, you will see a black layer mask with white where the eyes are. Basically this means the curves you just did are on the eyes (white...showing) and where you see black, the curves are hidden. I like to change the blend mode to Luminosity for my curves layers so there is no yellowing. But if you want some yellow in your eyes, leave it as is. Sorry I forgot to change the blend mode for the screenshot. Too many kids here this morning! Ha!
Now you'll see your selction is gone. But we need it back. Don't worry, you don't have to reselect the eyes. Just hold down the ctrl button and click on the black layer mask and VIOLA...your selection is back. And you don't have to re feather, because the first layer already has the feather in the selection. Now open a levels adjustment layer. This is my FAV layer for the eye pop. This is where I get a LOT of detail and depth back in the eyes. I usually only worry about the shadows & highlights for this layer. We already worked on the midtones with the curves adjustment layer. So I take the shadows slider in more than I normally would till the darks of the eyes are deep. Then I take the highlights slider in until the lights of the eyes really POP. You can leave the blend mode to Normal here. Here's my screenshot...
Now IF you want to do some sharpening to the eyes, here's how I do it WHEN I do it. Go down to the photo and and duplicate the layer and name it what you like. I named mine USM. I also slide it up into the Eyes folder. I like to sharpen the whole eye area vs just the iris. This way it looks a bit more natural rather than really sparkly sharp iris' and dull lashes. Plus it makes the whole eye area POP more this way. So take your lasso tool and loosely select the whole eye area like this. You don't have to be perfect because you can play with layer opacity and add a white layer mask to lighten/remove the sharpening where you don't want it. And right click, feather, I again use a 2px feather. Here's my selection...
Now run a USM. I like to edit hot and play with layer opacity. So I go pretty strong here. Amount 150, Radious 1.5, Threshold 3. After you hit click DON'T do anything else yet!!!!
I prefer to do Luminosity sharpen whenever I run a USM (Unsharp Mask). So RIGHT AFTER you hit okay on the USM dialog box, go to Edit>Fade Unsharp Mask and change the MODE to Luminosity. You can change the opacity here, but I prefer to do that in the layers panel.
If the sharpening went over where you didn't want it, add a white layer mask, brush tool, round soft brush, opacity at about 10%, flow 15%, foreground color set to black and paint where you want to lesson or remove the sharpening. Now play with the opacity of the layers if you'd like. I like to toggle the folder on/off to see how much it changed the eyes.
I personally rarely ever POP eye color. But if I do decide to do it, I use the Lab Color POP, add a black layer mask and paint over just the eyes at 100% brush opacity and lower the layer down to about 10-30%. The LAB color pop is in the action set! :O)
And here is my after. I went pretty light on the eyes here, but you can use stronger settings and lower opacity or mask out with a low opacity brush...
And here is the before/after side by side. A nice subtle POP.
Now let's talk about the Eye POP action set I recorded. Sadly I rarely use it, but I do think it's a pretty good action and will give you a LOT of control over all aspects of your eyes in your images. Every layer has a black layer mask attached...which means the effect of every layer is hidden. You have to paint the effect of each layer back IN. To paint in on each layer mask, first make sure you are ON the black layer mask. Just click it once and when you paint on your image, it will paint on the black layer mask. Then choose your brush tool...soft round brush, layer opacity pretty low as well with flow rate. Make sure your foreground color is set to white, and start painting. The action is recorded in a folder, so you can minimize it to do further edits, turn it on/off to see the results etc.
There are 6 actions in this set. The first is the Eye POP. Then there are color pops for different eye colors (I will admit these are just OKAY) and then one general eye pop that is the Lab Color POP. You can play with all of them to see which you prefer, or none. Ha! And again, please excuse the breaks. I recorded this a while ago and have since learned my lesson! :O)
In the Eye POP action there are 8 layers. The top photo layer is the dodge/burn layer. Probably not needed because the other layers give you full control, but I just threw it in there. The next layer from the top going down is "No Bloodshot". Basically this layer is just to remove red. Use it only on the whites of the eyes or if you have red reflections in the eyes. The next layer is "Lushes Lashes". Use this on the lashes to deepen/darken them and can also be used on makeup or eye liner. The next layer is "White whites" which you know what to do. Use a low opacity brush here!!! You don't want freaky white whites!!!!! The next layer is "Catch Lights" which will give them a bit of shine and enchance the lights of the eyes. The next layer is "Give em depth" and my FAV layer. This will pop the highlights and deepen the darks of the eyes, giving them depth and detail. The next layer is "Give em light". As you can tell, it will lighten the eyes. Don't go too far or you'll loose detail. And the last layer of this action is "Sharp eyes". For this layer (like the tut) I like to sharpen the iris and the surrounding eye area including the eye lashes. For this layer, I like to use a brush opacity of 100% then lower the opacity of the layer. But that's a personal preference.
I think the key to popping eyes with this action is to use a lower brush opacity when painting so as to not make a major change with just one layer. A light hand on all layers will combine a nice eye pop.
So looking back at the original image...here is my after using the eye pop action. I went a bit strong to show you what it's capable of. You can go even stronger (although I don't recommend it lol) or even lighter than I did...
And here is the side by side. Normally I would do more cleanup to the eyes, removing makeup spots etc. But I just did the basics for this post.
So if you'd like to download and try my Eye POP Action set, please let me know how you like it. I can't wait to hear what you think. I hope this post finds you well and I hope you and your family has a WONDERFUL & SAFE 4th of July! :O)

15 comments:
Wow! Thank you so much for this! I just down-loaded the action and printed your instructions. I won't get to play with this until hopefully this weekend. But I just wanted to thank you now and tell you how impressed I am with the level of detail you included in your instructions! So little time. . . so much to learn, and play with :)
this is a great tutuorial....and your cousin's eyes are beautiful. I can't wait to get a shot that's good enough for me to try this out on. thanks.
Thanks for the tut and action. This is a completely different way to eye pop than I usually use, so I can't wait to try it out. Holie
leaving you some 'blog luv' - Thanks for the action (yet again), and also the tut on how to do myself. - I don't have time to read it all right now, but I just wanted to say that I love how you explain how you are doing everything, really helps us beginners out--it's good to know what I am doing, not just pressing 'play' (I don't learn how to be better that way).
Jenn G.
thank you! thank you! thank you! i'm SO excited to try it out. I appreciate your willingness to share what you've learned.
Wow! Amazing tips...thanks for the time and effort you put forth helping us clueless folks!
Fabulous...I'm gonna have to sit down and go thru this step by step... but regardless, I will learn something! Thanks for sharing your talent and knowledge!
Mama-Floss
Thank you, thank you!! I love this blog, it's on my favorites.
Thanks so much Crystal! The action is amazing. I've read/followed your eye pop tutorial before, but the action is really handy and gives you a LOT of freedom and options depending on the photo, eyes, look you're going for etc. Love it!
thanks so much!! can't wait to give this a try!!
You have developed true skills mama. I love coming to read your blog and borrowing all of your hard work. :) Until the day that I have the time, I will count on you for all of the best tuts and actions. :) I am still so serious about being partners. :) What ever happened to moving to AZ? :) Love you.
I LoVe your blog!!! I cant wait to use this action!!! THankS!!!
Thank so much for this action and tutorial!!
so... i am up and running on the comp downstairs. it is just not the same but i will take what i can get :). he even gave me cs4. whoot whoot. i used your Eye POP action and holy crap i am in love! i used it on one of the train shots of ez and just worked on the catch light and lashes and the girl is glowing. what do i owe you? :) love you.
Hi all! I'm so happy that the action is helpful! I hope you all enjoy.
Amanda...ALL I need is your FRIENDSHIP! OXXO Email me an edit you did with the action!
Post a Comment