Selective color casts on SKIN...
Today I'd like to talk about selective color casts on skin! Not to be confused with WB (global color cast) issues. By selective color casts I mean, reflections from a wall or shirt etc. that casts on your subjects skin. I already went over how I remove selective color casts in shadows etc by using the hue/sat slider to remove color. Which I still use & love. I still have blue/cyans in my shadows and on my whites & blacks. So this is still my go to method. But I don't think it's the best method on skin!
There are MANY ways to remove selective color casts on skin. Some are more complex than others. This one is pretty darn easy and quick. So that's the one I will go over today!
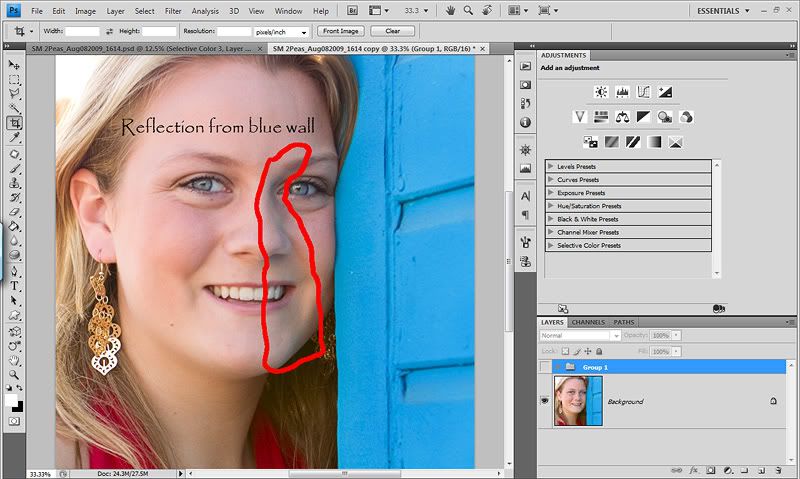
So while on a fun photographer gathering with my So Cal 2Peas I took a shot of a beautiful senior. She was leaning on a bright cyan wall, which reflected a color cast onto sections of her face. Don't mind that I said blue in the screen shot. I meant cyan...lol! At first glance, it's not horribly noticeable. But when brought into CS4, I could really see it.
I've outlined where the color cast is here...
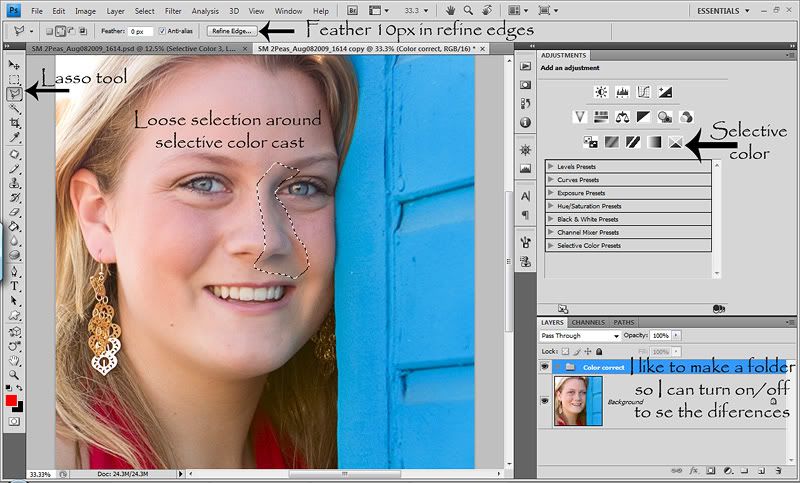
The first thing I did was grab my lasso tool and made a very loose selection around the top portion. I prefer to do it in sections for more control. The cast me be stronger in some areas, so I want to be able to go strong on some sections and lighter in others. Then I did a feather of 10px. You can either right click and choose feather or in CS4, use the Refine Edges and choose 10px in your feather section.
Here is what it looks like now. Don't pay attention to the layers panel in this screen shot. And note where the Selective Color Adjustment Layer is in CS4. That's the layer we'll use to correct this...
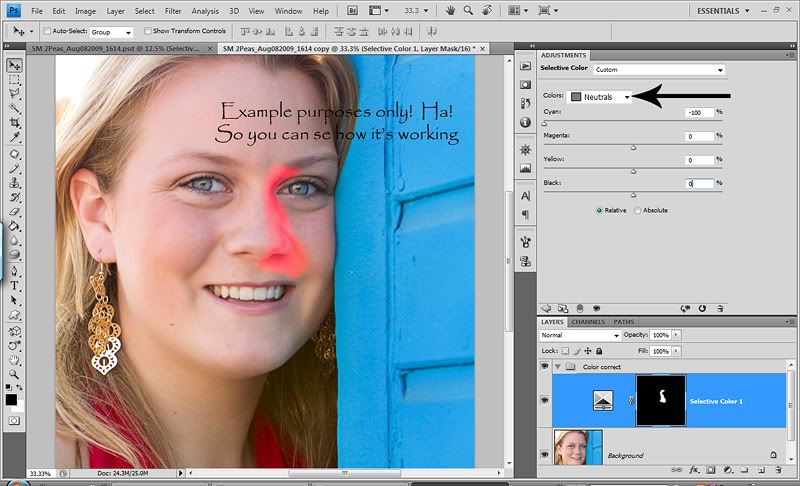
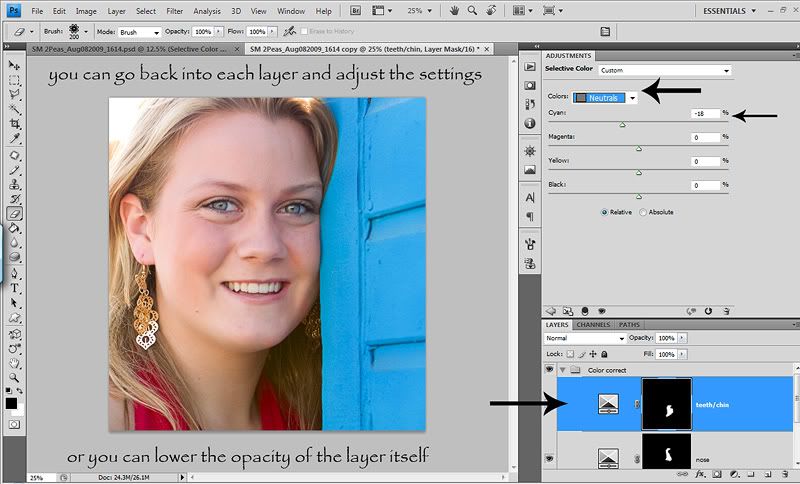
Now click the Selective Color Adjustment Layer either in the adjustments panel or in the little half black/white circle below the layers panel. The key here is to work in the Neutrals! So select Neutrals in the drop down menu.
Now I know my color cast is cyan off the bat. So I go to the cyan slider and slide it to the left which adds red. Remember... Cyan/Red ~ Green/Magenta ~ Blue/Yellow. And to show you how it works, for example purposes, I slid the cyan slider all the way over, which is adding red. Because of your selection, it is only going to effect that area. You can also see it feather out, which will help you get a more natural look.
How the Selective Color Adjustment Layer works is you slide it to the right to add THAT color or slide it to the left to add it's OPPOSITE color!
I slid the cyan slider to the left a little watching my photo. I have the screen shot for 10, but I went back in and changed it to 18, as I felt 10 wasn't enough.
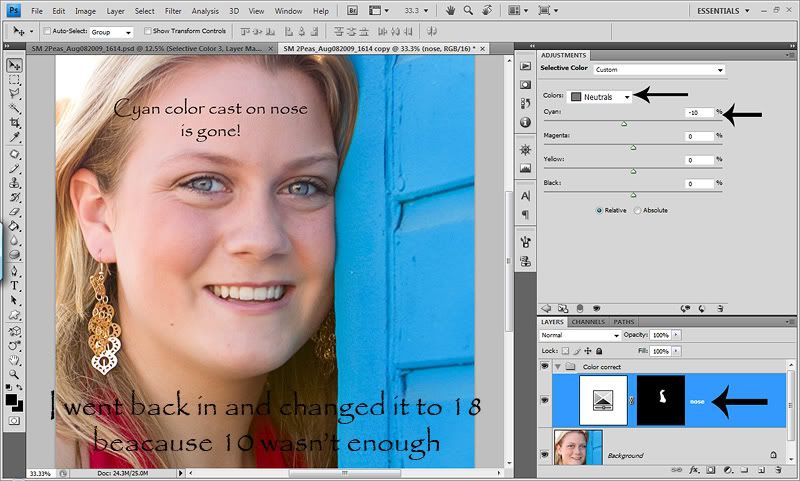
In hind sight, I also should have slid the yellow slider to the right a bit adding a little yellow to blend a little more with her skin tone.
Now I'm pretty happy with that section, it's time to move onto the rest of the cast. So I did another selection and feathered it and clicked a new Selective Color layer. Now in my layers panel you see two Selective Color layers. In the actual photo I edited, I did it in more sections than just two. But you get the idea!
And here is the side by side...
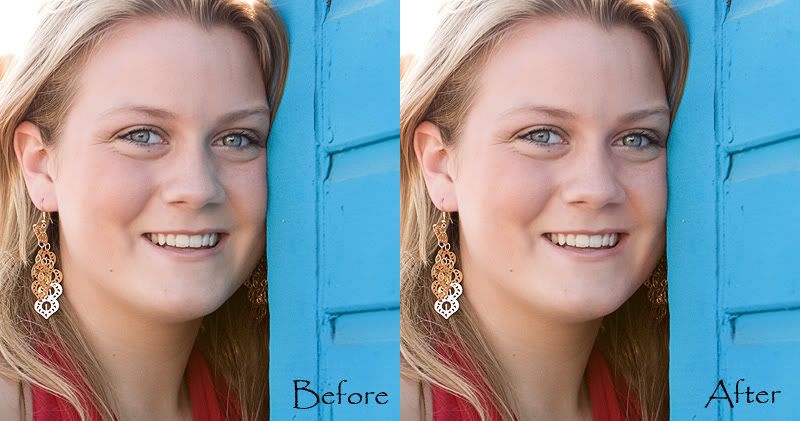
So the key with this method is first trying to assign a color to the cast! Then making your loose selection, giving a decent feather so it looks natural, and working in the Neutral tones in the drop down menu. Just open a Selective Color layer, go to Neutral and start sliding around watching how it effects your photos. This is probably the best way to get comfy with it. And remember the color wheel and which color is opposite the other... Blue/Yellow ~ Green/Magenta ~ Cyan/Red. Write it down and keep it next to your computer so you can reference it until you remember. And make sure not to go too far with any of the sliders so you don't introduce a new cast. And there will be times that you need to correct/slide more than one color. Don't be afraid to slide them around because you can also delete the layer or set them all back to zero!
And to really clean it up a step further you can use the method I posted in the link above by adding a new layer and painting over the area with the subjects skin tone to even it out nicely! I've also used this method by itself to fix some selective color casts from reflections. Combine them both and you are on your way! :O)
Let me know if you have any questions!
There are MANY ways to remove selective color casts on skin. Some are more complex than others. This one is pretty darn easy and quick. So that's the one I will go over today!
So while on a fun photographer gathering with my So Cal 2Peas I took a shot of a beautiful senior. She was leaning on a bright cyan wall, which reflected a color cast onto sections of her face. Don't mind that I said blue in the screen shot. I meant cyan...lol! At first glance, it's not horribly noticeable. But when brought into CS4, I could really see it.
I've outlined where the color cast is here...

The first thing I did was grab my lasso tool and made a very loose selection around the top portion. I prefer to do it in sections for more control. The cast me be stronger in some areas, so I want to be able to go strong on some sections and lighter in others. Then I did a feather of 10px. You can either right click and choose feather or in CS4, use the Refine Edges and choose 10px in your feather section.
Here is what it looks like now. Don't pay attention to the layers panel in this screen shot. And note where the Selective Color Adjustment Layer is in CS4. That's the layer we'll use to correct this...

Now click the Selective Color Adjustment Layer either in the adjustments panel or in the little half black/white circle below the layers panel. The key here is to work in the Neutrals! So select Neutrals in the drop down menu.
Now I know my color cast is cyan off the bat. So I go to the cyan slider and slide it to the left which adds red. Remember... Cyan/Red ~ Green/Magenta ~ Blue/Yellow. And to show you how it works, for example purposes, I slid the cyan slider all the way over, which is adding red. Because of your selection, it is only going to effect that area. You can also see it feather out, which will help you get a more natural look.

How the Selective Color Adjustment Layer works is you slide it to the right to add THAT color or slide it to the left to add it's OPPOSITE color!
I slid the cyan slider to the left a little watching my photo. I have the screen shot for 10, but I went back in and changed it to 18, as I felt 10 wasn't enough.

In hind sight, I also should have slid the yellow slider to the right a bit adding a little yellow to blend a little more with her skin tone.
Now I'm pretty happy with that section, it's time to move onto the rest of the cast. So I did another selection and feathered it and clicked a new Selective Color layer. Now in my layers panel you see two Selective Color layers. In the actual photo I edited, I did it in more sections than just two. But you get the idea!

And here is the side by side...

So the key with this method is first trying to assign a color to the cast! Then making your loose selection, giving a decent feather so it looks natural, and working in the Neutral tones in the drop down menu. Just open a Selective Color layer, go to Neutral and start sliding around watching how it effects your photos. This is probably the best way to get comfy with it. And remember the color wheel and which color is opposite the other... Blue/Yellow ~ Green/Magenta ~ Cyan/Red. Write it down and keep it next to your computer so you can reference it until you remember. And make sure not to go too far with any of the sliders so you don't introduce a new cast. And there will be times that you need to correct/slide more than one color. Don't be afraid to slide them around because you can also delete the layer or set them all back to zero!
And to really clean it up a step further you can use the method I posted in the link above by adding a new layer and painting over the area with the subjects skin tone to even it out nicely! I've also used this method by itself to fix some selective color casts from reflections. Combine them both and you are on your way! :O)
Let me know if you have any questions!

7 comments:
great information. Thanks so much for sharing....
WICKED! THANKS!
Awesome tutorial. Thanks!
Fabulous! Thanks!
this is a great tut, thanks for sharing it!
I have been trying to figure out how to do this for weeks and I could never get a straight answer. I was playing around with it myself tonight and then finally figured it out on my own. I wanted to confirm that I had it right, so I googled it and came up with your website. I wish I had found your website months ago. Your feathering tip was the added bonus. Thank you so much! And I think I recognize you from CM too. :)
I'm so glad the tut helped! :O) And Jody, I'm so glad you found my blog and am surprised I came up on a google search! Lol!
Post a Comment