PSE actions FINALLY ready!
Boy was that a journey! Thanks for sticking this out with me. I now understand how it works, so next time will be a breeze. And I wanted to give a shout out to Kim for holding my hand through the learning process. She is the reason I'm able to share this set and I can't thank her enough. If you click on her name it will take you to her website and she also sells great actions for PSE as well as overlays and textures. So be sure to check out her stuff...she's AWESOME. Another quick shout out for the PSE girls is Rita at The Coffee Shop! Rita is a wonderful caring and VERY talented woman who gives and gives. ALL of the actions & tuts on her site are FREE! Her site helped me get this done as well. So jump over there if you haven't been there yet and leave her some love on her blog if you download anything. So thank you Kim & Rita. You helped me more than you'll ever know!!
Okay, onto the actions! I'm really excited about this set. It's very similar to the Jewel Tone Washes that I shared for full PS users. I basically took the same look, but made it PSE friendly. And I have loaded and tested them all in PSE7 and they work perfectly! YAY! :O)
For the Jewel Tone Washes there are 4 levels adjustment layers all doing something different to your photos, 1 optional b&w gradient map that is turned off (just turn the eye on to use it) and 1 solid color fill. None of these actions flatten, so once you run them you can adjust each and every layer to your taste. You can up the opacity of the layers for an extreme look, lower the opacity of the layers to make it more subtle, you can turn layers off or turn the b&w on! The possibilities are endless!
This set will work on images with good exposure and color. So if your shot is under/over exposed or has any color issues, clean it up first. Because it's a Wash set, if your shot is over exposed, this will bleach it out. Will work fairly well with darker images...within reason. But I do not suggest running this on a SOOC shot as you'll want to add some contrast before the actions. If you don't add some contrast and pop your image a bit, the end result will probably be too washed out!
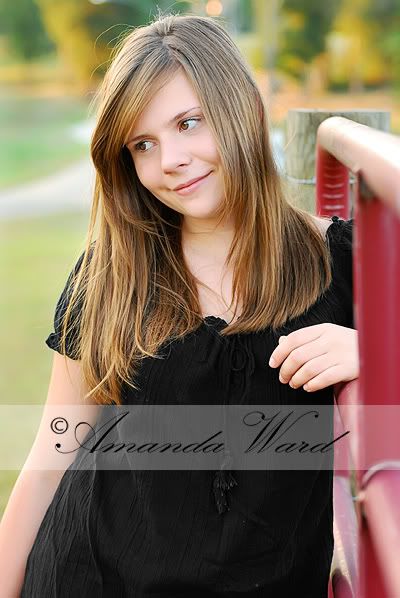
So here is the original edited image I used for the examples. This photo was taken by my DEAR friend & fellow photographer Amanda. Thank you for giving me such lovely images to play with!
Here are the examples of the Jewel Tone Washes...

All examples above were adjusted after the action ran. Most actions do not look good run as is because every photo needs something different and not all actions look good on all photos.
And here are examples when turning on the b&w gradient map for some b&w tones...
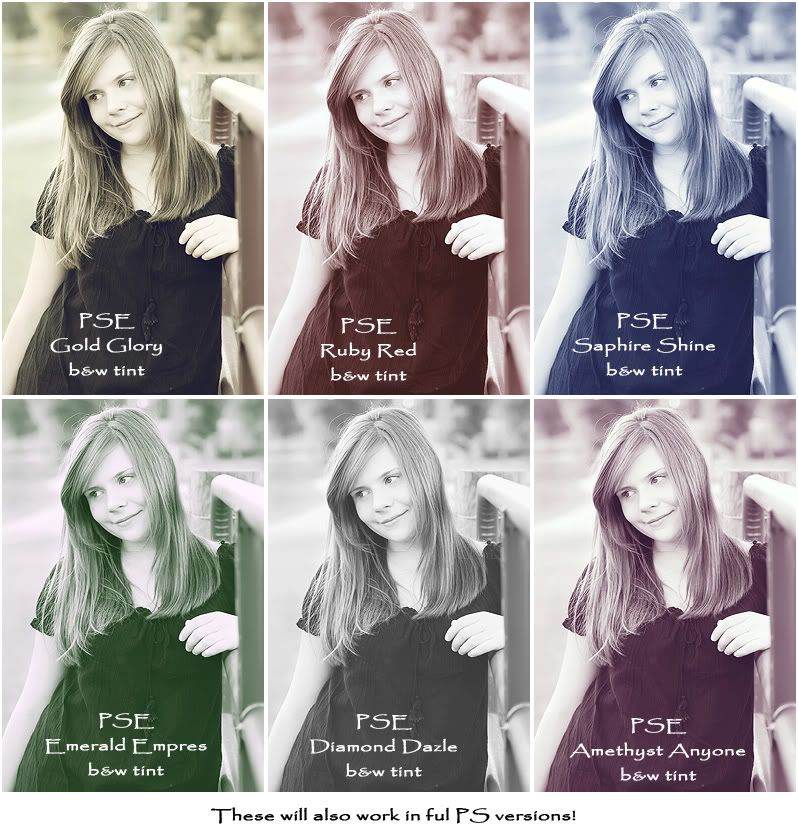
Again, layers adjusted for the examples and you can bring down the tones much more than I did. And you can take it a step further and lower the opacity of the b&w layer for a faded vintage feel or even spice it up and change the blend mode of the b&w layer to soft light (hard light or overlay) and then play with layer opacity. And another thing you can do to change the look of an action that I don't think people think about, is changing the layer order. Switch them around and see what it does to your photos. Actions are ALL about learning! :O)
I also included some extras in the set too! The only one I couldn't get to work was the warmer/cooler because I either use curves adjustment layers or color balance, neither of which PSE uses. I tried to do it in levels but I couldn't get it to look right. Now if you haven't see the Smart Curve yet, GO GET IT! It's a plugin for PSE (it'll be in your Filter menu) and allows you full control with curves and working in the R G B channels. I've tried it and it works GREAT! The only thing is that you can't double click on it to adjust it later like you do with adjustment layers. So make sure to duplicate your photo layer, name it curves and run your Smart Curve on that so you can lower opacity, erase or mask any areas you aren't happy with.
Now comes the not so fun part. How I recorded and saved these. For those of you who know how they come and how to install them, you don't need to read this part. But if you are new to PSE, you might want to know! Full PS is very different. You can have 1 atn file and have as many actions in it as possible. Then you just double click on the atn file and it's loaded in your actions panel in a nice pretty folder with all of your actions in the folder. Well you PSE girls know that it's very different for you.
So what I did is saved a separate folder for EVERY action I ran. Each folder will be named with what action set is inside. In each folder there will be 3 files...the atn file (the action) a png (for PSE 6 & 7) and a psd (for PSE 3,4,5).
Here is what all the folders will look like after you unzip the file...
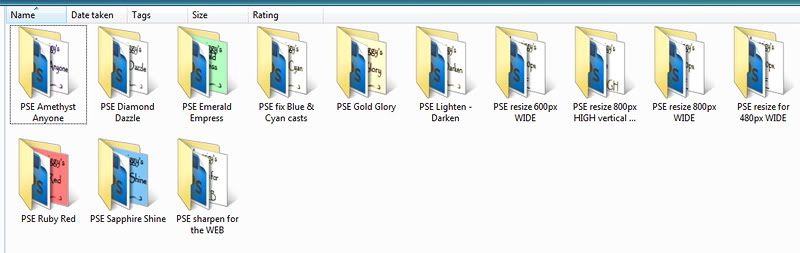
And here is the inside of one of the actions folder...
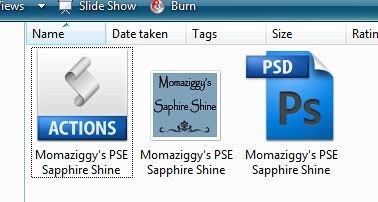
Sorry the icon is so ugly. Hopefully they'll get better over time, but I'm not good with that kinda stuff...so maybe not! Ha! You CAN make your own if you'd like to toss mine out! All you have to do is make it 64x64 and get creative. When you are done creating, merge visible (DO NOT flatten) and save as a png with the EXACT same name as my atn file. And if you use PSE 5 or lower, you need to save it as a psd instead of png. But if you can stand looking at my ugly icon, more power to ya! :O)
Now onto installing the actions. Of course you'll have to unzip the file first. Most just double click or right click and choose your unzip program and the rest will be done for you!
I was going to explain it all, but figured I'd leave that to the pros! So if you need help on how to install them go HERE on Rita's site and all the info is there!
Once you've got them all installed (you'll have to go into each folder and copy/paste for each action), just open PSE and click on Photo Effects, then select the one you want to run and either double click it or hit apply.
Momaziggy's PSE Jewel Tone Wash action set!
And after all that boring stuff is done...HAVE FUN!
Let me know if you have any questions and I will do my best to help. Now that I know what I'm doing, I will from time to time share PSE actions that I think you'll like or will be helpful!
I'd love to see plays with the actions, so you can link me in the comments section and I'll go check them out!
Happy editing! :O)
Okay, onto the actions! I'm really excited about this set. It's very similar to the Jewel Tone Washes that I shared for full PS users. I basically took the same look, but made it PSE friendly. And I have loaded and tested them all in PSE7 and they work perfectly! YAY! :O)
For the Jewel Tone Washes there are 4 levels adjustment layers all doing something different to your photos, 1 optional b&w gradient map that is turned off (just turn the eye on to use it) and 1 solid color fill. None of these actions flatten, so once you run them you can adjust each and every layer to your taste. You can up the opacity of the layers for an extreme look, lower the opacity of the layers to make it more subtle, you can turn layers off or turn the b&w on! The possibilities are endless!
This set will work on images with good exposure and color. So if your shot is under/over exposed or has any color issues, clean it up first. Because it's a Wash set, if your shot is over exposed, this will bleach it out. Will work fairly well with darker images...within reason. But I do not suggest running this on a SOOC shot as you'll want to add some contrast before the actions. If you don't add some contrast and pop your image a bit, the end result will probably be too washed out!
So here is the original edited image I used for the examples. This photo was taken by my DEAR friend & fellow photographer Amanda. Thank you for giving me such lovely images to play with!
Here are the examples of the Jewel Tone Washes...
All examples above were adjusted after the action ran. Most actions do not look good run as is because every photo needs something different and not all actions look good on all photos.
And here are examples when turning on the b&w gradient map for some b&w tones...
Again, layers adjusted for the examples and you can bring down the tones much more than I did. And you can take it a step further and lower the opacity of the b&w layer for a faded vintage feel or even spice it up and change the blend mode of the b&w layer to soft light (hard light or overlay) and then play with layer opacity. And another thing you can do to change the look of an action that I don't think people think about, is changing the layer order. Switch them around and see what it does to your photos. Actions are ALL about learning! :O)
I also included some extras in the set too! The only one I couldn't get to work was the warmer/cooler because I either use curves adjustment layers or color balance, neither of which PSE uses. I tried to do it in levels but I couldn't get it to look right. Now if you haven't see the Smart Curve yet, GO GET IT! It's a plugin for PSE (it'll be in your Filter menu) and allows you full control with curves and working in the R G B channels. I've tried it and it works GREAT! The only thing is that you can't double click on it to adjust it later like you do with adjustment layers. So make sure to duplicate your photo layer, name it curves and run your Smart Curve on that so you can lower opacity, erase or mask any areas you aren't happy with.
Now comes the not so fun part. How I recorded and saved these. For those of you who know how they come and how to install them, you don't need to read this part. But if you are new to PSE, you might want to know! Full PS is very different. You can have 1 atn file and have as many actions in it as possible. Then you just double click on the atn file and it's loaded in your actions panel in a nice pretty folder with all of your actions in the folder. Well you PSE girls know that it's very different for you.
So what I did is saved a separate folder for EVERY action I ran. Each folder will be named with what action set is inside. In each folder there will be 3 files...the atn file (the action) a png (for PSE 6 & 7) and a psd (for PSE 3,4,5).
Here is what all the folders will look like after you unzip the file...
And here is the inside of one of the actions folder...
Sorry the icon is so ugly. Hopefully they'll get better over time, but I'm not good with that kinda stuff...so maybe not! Ha! You CAN make your own if you'd like to toss mine out! All you have to do is make it 64x64 and get creative. When you are done creating, merge visible (DO NOT flatten) and save as a png with the EXACT same name as my atn file. And if you use PSE 5 or lower, you need to save it as a psd instead of png. But if you can stand looking at my ugly icon, more power to ya! :O)
Now onto installing the actions. Of course you'll have to unzip the file first. Most just double click or right click and choose your unzip program and the rest will be done for you!
I was going to explain it all, but figured I'd leave that to the pros! So if you need help on how to install them go HERE on Rita's site and all the info is there!
Once you've got them all installed (you'll have to go into each folder and copy/paste for each action), just open PSE and click on Photo Effects, then select the one you want to run and either double click it or hit apply.
Momaziggy's PSE Jewel Tone Wash action set!
And after all that boring stuff is done...HAVE FUN!
Let me know if you have any questions and I will do my best to help. Now that I know what I'm doing, I will from time to time share PSE actions that I think you'll like or will be helpful!
I'd love to see plays with the actions, so you can link me in the comments section and I'll go check them out!
Happy editing! :O)

18 comments:
Thank you so much for doing this .... I love good actions and free is even better!
You're the best! Thanks for these! Can't wait to play.
Thank you so much for doing these! I can't wait to play with them!! :)
Thanks for persevering--it was soooo worth the wait!!! You are very kind for sharing these...
Sue
It's so nice of you to go to all of this trouble- now I need to learn how to use actions!!!
You girls are SO welcome. I always feel bad that everything here is full PS related. A lot can be used in PSE, but I know not everything. So I will from time to time post PSE actions and maybe some PSE tuts.
And to use actions in PSE isn't much different from full PS in after they've been run. For me, when I run a new set I start by turning off each layer, starting at the bottom to see how each layer is effecting my images. That's the easiest way to get started with actions. Then once you get comfy with them, you can really start adjusting them. Start there and then when you get more comfy, you can start playing with blend modes, erasing/masking and changing up the settings. It's all about taking it one step at a time...or what I like to call...one LAYER at a time! Ha.
If you have any questions please let me know! :O)
Thanks so much!
Awesome actions! They work perfectly and are gorgeous :). I posted some samples on my blog if you want to see: http://endlesslightcreations.blogspot.com/2009/08/thank-you-momaziggy.html
Thank you again!
Amanda
OH MY- thank you SO much for taking the time to make not only one, but 7 FREE actions for elements users. I have already tested them out and they are amazing. Your generosity is very much appreciated. Thank you again!!! I will link after I complete am image.
You are very welcome! I hope you enjoy and get a lot of use out of them! :O)
Thanks for putting in the time to get these awesome actions to us PSE users! I love PSE, but do get action-envy of PS everyone once and a while! :o) No need now, thanks to the Ziggy!
You ROCK Crystal!! :) Love your actions and thanks so much for making them PSE compatible!! :) Celine
You are so awesome! =) I am so excited to download the actions and start playing!!
I am a newbie so I am a little worried I will get it all wrong. I am working with CS3, that should work fine with the actions? And your advice is absolutely right, "One layer at a time!"
Well let me toot your horn some more :)... I heart you. Am proud of you. And thankful for all your freebies. Once again, you are going to be rich someday; I swear it. :) xoxo.
Thank you!!!!!!!!!!!!! You are a true gem.
wow, i'm so excited about finding your blog (through 2 peas)! I'm excited about trying your actions. thanks!!!!
Wwahoo! Gotta luv 2Peas! :O) I hope you find the blog helpful and get a lot of use out of the actions! :O)
Thanks! Just downloaded and I am going to check them out! I am going to check in often.
Post a Comment