How to give the skin a soft "Glow"...
First and foremost I want to thank Rachel on Clickinmoms for introducing me to the FAB little trick to give the skin just a slight pretty glow! She posted a tut on CM and I asked her if it would be okay for me to share this tut on my blog and she gave me the go ahead. I wrote the tut and used my own examples! If you aren't a memeber of CM yet, I HIGHLY suggest trying it out! It's really inexpensive and you can join with a monthly account or pay in advance. I bought a year membership and it's already paid for itself 100 times over with the help I've gotten and the tuts on the board! All of the girls are very knowledgeable and so very helpful! So please try it for at least one month...you won't regret it!
So, do you want to give your skintones just a little pop...a little healthy glow? Well this is the trick for you! It's VERY subtle which on skin, we want. But with that said, you can use higher settings to make it more intense. Beauty is in the eye of the beholder, so make it your own!
This method is meant to be done at the very end of editing. So do all your stuff, including any patching to the skin that needs to be done and sharpening etc. Then you want to flatten your image so all you have is one layer open!
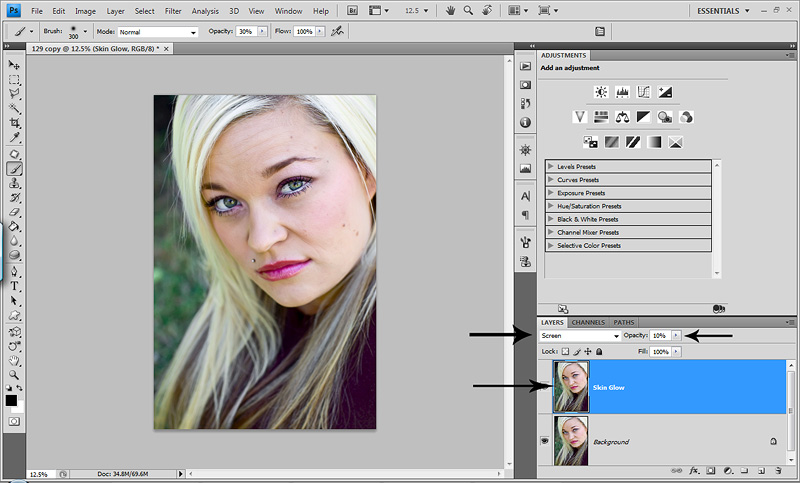
Then duplicate your photo layer (ctrl/j) and you can name it if you want! I call this Skin Glow. Now change the blend mode to Screen and lower the opacity to about 10%. We don't want to blow any highlights or have white skin. So low opacity is important!
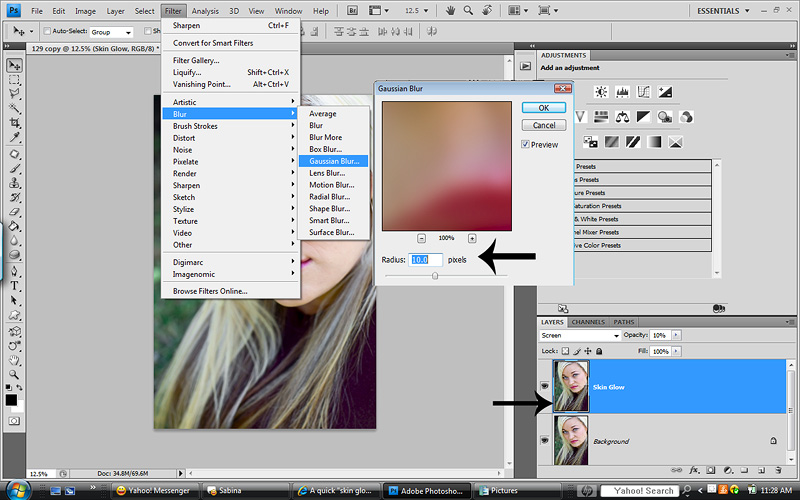
Now we want to add some blur for a touch of smooth skin. So go to Filter>Blur>Gaussian Blur. The numbers will vary depending on the look you want and the size of your photo. The smaller the photo, the smaller number. You can use a higher number if it's a high res pic. The lower the number the more subtle the overall effect will be and the higher number the more intense it will be. Rachel suggested in her tut between 4-6 but I used 10 for a little more. Test out different numbers so you can make it your own...
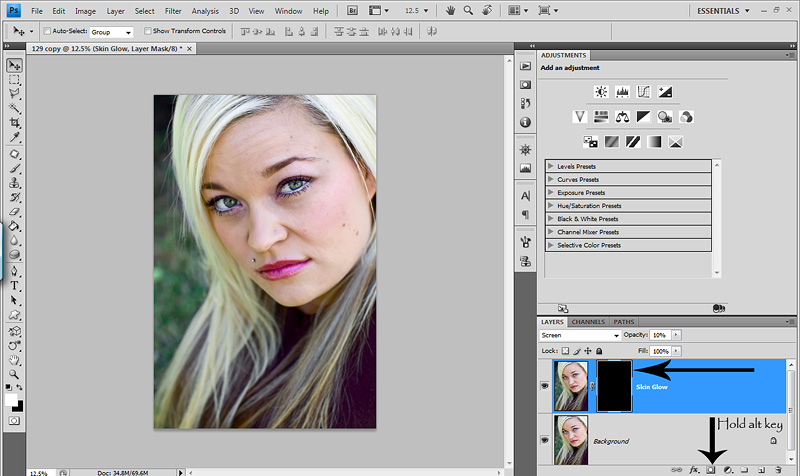
Oops..forgot to crop that screen shot above! Ha! Okay...so now obviously we don't want blur everywhere. We only want to have the blur where we choose. Easy fix. Hold down the alt key and press the mask icon (little camera looking icon at the bottom of the layers panel) and now you will have a black layer mask which is HIDING the screen blend mode and blur!
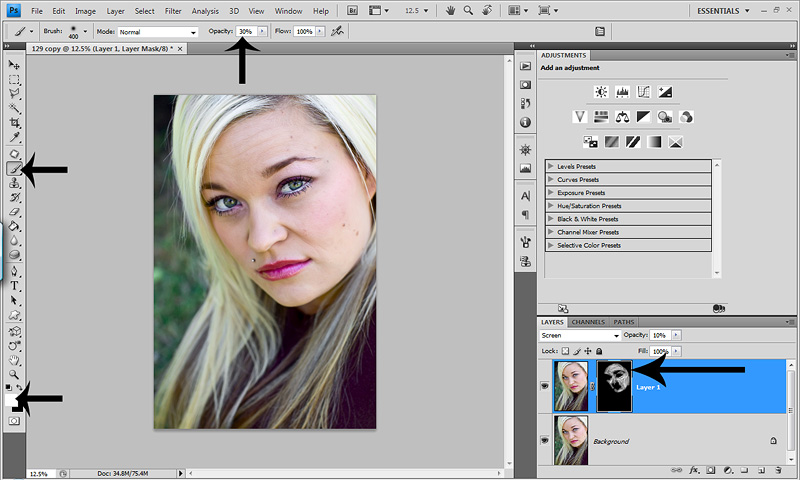
Now comes the creative part where you get to control how much and where! Take your brush tool, foreground color set to white (opposite the mask) and set your opacity to about 30%. For a more subtle look, use a lower brush opacity and for a more intense look, use a higher brush opacity. I prefer to do most of my masking at about 30% and go over some areas more than others! Make sure the black layer mask is active by clicking on it once. You'll see a little frame around it and that is how you know you have it active. Now just start painting where you want the soft glow! Here is what my layer mask looked like when I was done...
And here is the before and after. As you can see it's VERY subtle. To really see how it effected your pic, zoom in to get a good view of the skin where you painted and toggle the layer on and off. You'll see a nice soft, clean and subtle pop and glow to the skin!

Hope you enjoyed this and thanks again Rachel! Lemme know if you have any questions!
So, do you want to give your skintones just a little pop...a little healthy glow? Well this is the trick for you! It's VERY subtle which on skin, we want. But with that said, you can use higher settings to make it more intense. Beauty is in the eye of the beholder, so make it your own!
This method is meant to be done at the very end of editing. So do all your stuff, including any patching to the skin that needs to be done and sharpening etc. Then you want to flatten your image so all you have is one layer open!
Then duplicate your photo layer (ctrl/j) and you can name it if you want! I call this Skin Glow. Now change the blend mode to Screen and lower the opacity to about 10%. We don't want to blow any highlights or have white skin. So low opacity is important!

Now we want to add some blur for a touch of smooth skin. So go to Filter>Blur>Gaussian Blur. The numbers will vary depending on the look you want and the size of your photo. The smaller the photo, the smaller number. You can use a higher number if it's a high res pic. The lower the number the more subtle the overall effect will be and the higher number the more intense it will be. Rachel suggested in her tut between 4-6 but I used 10 for a little more. Test out different numbers so you can make it your own...

Oops..forgot to crop that screen shot above! Ha! Okay...so now obviously we don't want blur everywhere. We only want to have the blur where we choose. Easy fix. Hold down the alt key and press the mask icon (little camera looking icon at the bottom of the layers panel) and now you will have a black layer mask which is HIDING the screen blend mode and blur!

Now comes the creative part where you get to control how much and where! Take your brush tool, foreground color set to white (opposite the mask) and set your opacity to about 30%. For a more subtle look, use a lower brush opacity and for a more intense look, use a higher brush opacity. I prefer to do most of my masking at about 30% and go over some areas more than others! Make sure the black layer mask is active by clicking on it once. You'll see a little frame around it and that is how you know you have it active. Now just start painting where you want the soft glow! Here is what my layer mask looked like when I was done...

And here is the before and after. As you can see it's VERY subtle. To really see how it effected your pic, zoom in to get a good view of the skin where you painted and toggle the layer on and off. You'll see a nice soft, clean and subtle pop and glow to the skin!

Hope you enjoyed this and thanks again Rachel! Lemme know if you have any questions!

4 comments:
Thanks for the tutorials! I'm new to Photoshop and honestly I just don't "get" it - all the layers and steps to make the tiniest adjustments..argh! I won't give up though, I'll continue reading all I can about it and one day hopefully the lightbulb will go on for me.:)
Hey Mindy! I was where you are so don't worry...you WILL have your light bulb moment or as I always say...your "click" moment! Cheesy I know! Ha! Just keep reading and practicing and it'll get easier and more fun! If you ever have any questions, just ask here or email me at momaziggy @ yahoo . com.
I'm not a pro or anything but I know my way around PS and would happy to try to answer any questions you have! :O)
Thanks for posting this! I missed it at CMs, and your tut and examples are awesome. Thanks!!
sweet. thanks again for the awesome tuts! and sorry to hear about your photobucket episode. That's brutal!
Post a Comment